Lesson 31: Continuous Integration for AI Engineering
In our last lessons, we introduced agent observability with Opik, started building our offline evaluation dataset, and covered the evaluation-driven development framework. We learned that improving a system requires seeing what it does and capturing data to test against. Now, we shift focus to Continuous Integration (CI): the automated infrastructure that keeps your codebase maintainable and prevents regressions from reaching production.
What is Continuous Integration?
Continuous Integration is a software development practice where developers frequently merge code changes into a shared repository. Each merge triggers automated checks to detect integration issues early. The core principle is to catch bugs quickly and cheaply by automatically testing every change.
For AI agent projects, CI follows the same principles but with unique challenges. Prompts change frequently as new model versions are released with different capabilities and behaviors, and as edge cases are discovered in production that require prompt adjustments to handle properly. Additionally, schemas evolve, and LLM outputs are non-deterministic.
Here are three of the failure modes that typically emerge without CI:
- Inconsistent code formatting across the team. When team members use different formatters or manual formatting, pull requests become cluttered with whitespace and unrelated style changes. Code reviews waste time debating indentation and formatting instead of focusing on meaningful changes.
- Skipped pre-commit checks, leading to CI failures. A developer tests a change locally, runs formatting, and pushes the code. Later, the build fails in CI because they forgot to run the test suite before pushing. Without automated enforcement, manual verification steps are skipped under time pressure or due to simple oversight.
- Non-deterministic tests that call real LLM APIs. The temptation with AI agents is to call real LLMs in tests to verify behavior. But real API calls make tests slow, expensive, and non-deterministic, as the same input can produce different outputs. Your test suite becomes flaky and unreliable, undermining confidence in your CI pipeline.
To address these challenges, we adapt standard CI practices into a three-tier model for AI agents based on cost and speed:
- Tier 1: Formatting and Linting (Always Run). These checks are fast (taking seconds) and cheap (no API calls). They catch syntactic issues and enforce style consistency. This tier is identical to traditional CI.
- Tier 2: Unit and Integration Tests (Always Run). These verify deterministic logic, such as parsing, schema validation, and routing, without calling external APIs. By mocking LLM responses, tests run quickly (under a minute) and reliably.
- Tier 3: AI Evaluations (Manual/Release). This tier is unique to AI systems. It involves expensive, LLM-based quality checks that use real API calls to evaluate agent quality on a curated dataset. We run these selectively before major releases or after significant prompt changes.
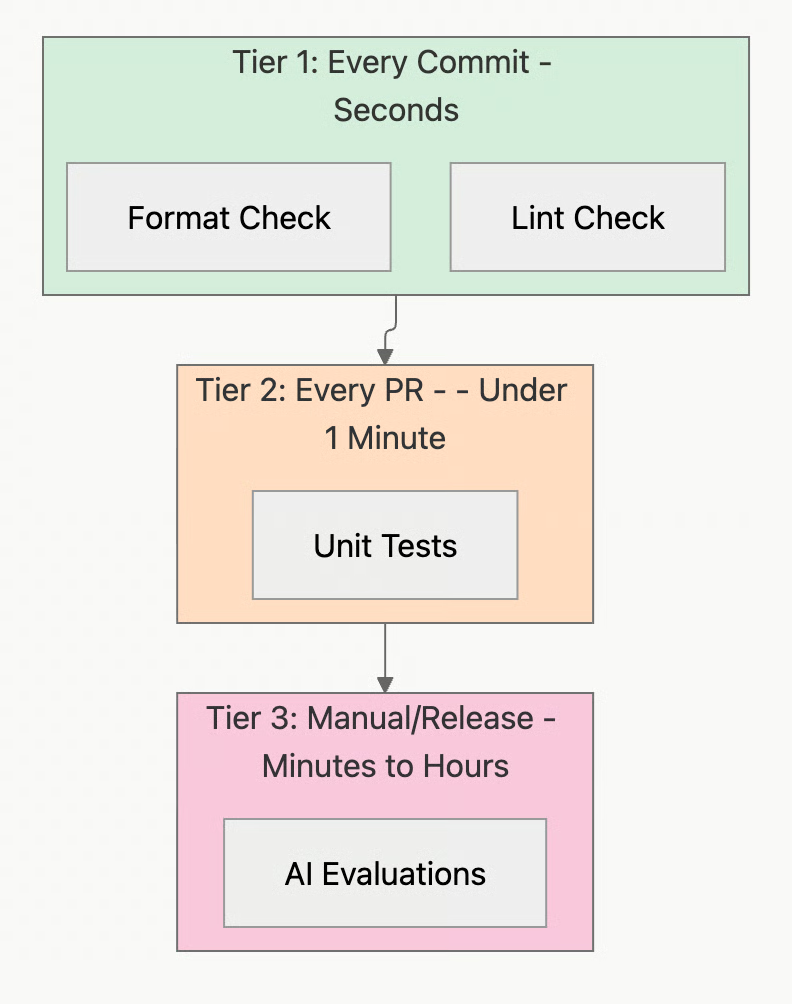
Image 1: A three-tier CI model for AI agents, showing the flow from commit checks to PR tests and finally to manual/release AI evaluations, with each tier distinctly colored.
This lesson covers CI essentials for building production-ready AI agents. We focus on practical techniques you will use daily: automated quality checks, testing with mocked LLMs, and structuring CI pipelines around cost constraints. We will not cover comprehensive DevOps topics like Kubernetes or Terraform. Instead, we teach you how to effectively move from prototype to production-ready agents.
We will cover:
- Setting up pre-commit hooks to enforce code quality automatically.
- Configuring Ruff for linting and formatting.
- Writing unit tests for deterministic agent code with mocked LLM responses.
- Building a CI pipeline that runs automatically on every change.
- Using AI evaluations as selective regression tests in CI.
This lesson includes a hands-on notebook where you will practice running formatting checks, linting, and tests on Brown, our writing agent.
Pre-commit Hooks: Automated Local Guardrails
Pre-commit hooks are Git hooks [13] that run automatically before you create a commit. They catch issues immediately in your local environment, providing a fast feedback loop. You fix problems in seconds, not minutes later when CI fails.
The pre-commit framework manages Git hooks using a declarative YAML configuration. You define hooks in .pre-commit-config.yaml, and the framework handles installation and execution. Hooks are references to external repositories, so the community maintains them for popular tools.
Brown’s Pre-commit Configuration
Let’s understand each hook:
**validate-pyproject**: This tool validates that yourpyproject.tomlfile is structurally correct according to PEP standards. A malformed file can break the entire project.**prettier**: A popular code formatter we use for configuration files like.github/workflows/ci.yml. Consistent formatting makes these files readable and reduces merge conflicts.**ruff-check**and**ruff-format**: These hooks run Ruff, a modern Python linter and formatter. The-fixflag automatically fixes issues, and-exit-non-zero-on-fixensures the hook fails even after auto-fixing, forcing you to review and re-stage the changes. Theruff-checkhook runs beforeruff-formatas recommended by Ruff’s authors.
Setting Up Pre-commit
In the lessons/writing_workflow repo (or any repo where you have configured your .pre-commit-config.yaml file), you can set up pre-commit hooks with:
The pre-commit install command creates a Git hook at .git/hooks/pre-commit . Now, every time you run git commit, pre-commit runs automatically. You can also run hooks manually:
The workflow is simple: make changes, stage them with git add, and run git commit. If hooks fail, review the errors, fix them, re-stage, and commit again. This tight feedback loop catches issues in seconds [15].
Ruff: Fast Python Linting and Formatting
Ruff is an extremely fast Python linter and formatter written in Rust [3]. It replaces a collection of older tools like Black, isort, and Flake8, consolidating them into a single binary that runs in milliseconds.
It’s important to understand the distinction between formatting and linting:
- Formatting rewrites code to follow consistent style rules (indentation, line breaks). It is automatic and opinionated.
- Linting analyzes code for bugs, suspicious patterns, and violations of best practices (unused variables, missing imports) [1].
Brown’s Ruff Configuration
Ruff’s configuration for Brown is in lessons/writing_workflow/pyproject.toml:
Here’s its meaning:
target-version = "py312"tells Ruff which Python version to use for syntax checks.line-length = 140sets the maximum line length.select = [“F”, “E”, “I”]enables rule sets for catching common bugs (Pyflakes), enforcing PEP 8 style (pycodestyle), and organizing imports (isort).known-first-party = [“src”, “tests”]tells isort how to group project-specific imports.
Each target uses uv run to execute commands within the project’s virtual environment [16], which is managed automatically and doesn’t require manual activation. You can run these from the writing_workflow/ directory to check or fix your code before committing.
Hands-On Example: Fixing Formatting Issues
To see Ruff’s formatter in practice, let’s take a poorly formatted Python file.
- Create a file with inconsistent spacing and line breaks.
- Check the formatting without making changes.
It outputs:
- Auto-fix the formatting.
It outputs:
The file is now perfectly formatted, with consistent spacing and structure. This automation keeps the codebase clean and stylistically consistent with zero manual effort.
Hands-On Example: Fixing Linting Issues
Linting catches bugs and quality issues.
- Create a file with an unused import and a duplicate import.
- Check for linting issues.
It outputs:
- Auto-fix the issues.
Ruff automatically removes the unused and duplicate imports. This demonstrates how linting catches and fixes potential bugs before they enter the codebase.
Unit Tests for Agent Repos
Unit tests verify that code behaves correctly under controlled conditions. For AI agents, the core logic involves calling LLMs, which return non-deterministic outputs. Real API calls make tests slow, flaky, and expensive.
The solution is to mock external dependencies. Just as traditional apps mock databases, AI agents must mock LLM calls. We focus on the deterministic parts of your agent:
- Parsing and rendering: Does your markdown loader extract articles correctly?
- Schema validation: Does your Pydantic model reject invalid data?
- Routing decisions: Given a specific state, does your workflow route to the correct node?
- Utilities: Do helper functions for URL extraction or text cleaning work correctly?
Unit Tests vs. Integration Tests
In traditional software, unit tests verify individual functions or classes in isolation, while integration tests verify that multiple components work together correctly. For AI agents, this distinction becomes blurred because most nodes integrate multiple components (prompt templates, LLM calls, parsers). We follow a pragmatic approach: if a test runs quickly with mocked dependencies and tests deterministic logic, we call it a unit test regardless of how many internal components it touches.
There are several patterns for mocking LLM calls in tests [11]. In Brown, we use response injection, where we create a fake model class that returns pre-scripted responses. For most AI agent projects, this approach provides the best balance of simplicity and control.
Our Implementation: The FakeModel Pattern
In our Brown agent, we implement response injection with a FakeModel class that is compatible with LangChain’s interface. The pattern has three parts:
- Configuration specifies the fake model: The
debug.yamlconfiguration atlessons/writing_workflow/configs/debug.yamlsets all nodes to usemodel_id: “fake”. - Model factory returns FakeModel: The model builder in
src/brown/models/get_model.pyreturns aFakeModelinstance, when the configuration specifies it. - Tests inject specific responses: The
FakeModelinsrc/brown/models/fake_model.pyextends LangChain’sFakeListChatModeland allows tests to inject a list of responses.
Here’s a part of the implementation of the FakeModel class:
An instance of the FakeModel class takes a list of pre-scripted responses in the constructor (responses: list[str]). When ainvoke() is called, it returns the first response from the list, and consumes it.
This design ensures that unit tests can run with a fake model by default, and individual tests can inject specific responses when needed.
Example: Testing Nodes with Mocked Responses
For nodes that call LLMs, you mock the responses. Here is an example test from lessons/writing_workflow/tests/brown/nodes/test_article_writer.py:
The test creates a mock JSON response, builds a fake model, injects the response into it, and then instantiates the ArticleWriter node with that fake model. This pattern keeps tests fast, deterministic, and free [7].
Running Brown’s Tests
To run Brown’s test suite, use the command from the Makefile:
This command runs CONFIG_FILE=configs/debug.yaml uv run pytest. The debug.yaml configuration ensures tests use the fake models and never call real LLMs.
CI Workflows: Automated Enforcement
CI enforces checks by running them automatically on every push and pull request. If checks fail, the PR cannot be merged. We use GitHub Actions [10] for both the Brown and Nova agents, which integrates seamlessly with GitHub repositories and requires minimal setup [4].
Our Complete CI Configuration
The workflow file lives at .github/workflows/ci.yml in your repository. Here’s the complete configuration we use for both agents:
This configuration defines when the workflow runs and what checks it performs. The on section specifies that the workflow triggers on pull requests to the main and dev branches, as well as on direct pushes to main. This ensures that every code change gets validated before it can be merged.
The env section defines an environment variable QA_FOLDERS that lists all the directories we want to check. Notice it includes both src/brown and src/nova, allowing us to use the same CI configuration for both agents in a monorepo structure.
Understanding the Job Structure
The workflow defines two independent jobs that run in parallel: qa and tests. Splitting them provides clear, fast feedback. If formatting fails, you immediately see “QA job failed” without waiting for tests to complete. This parallel execution saves time and makes it easier to identify which category of checks failed.
Each job runs on ubuntu-latest, which is a virtual machine provided by GitHub. The jobs are completely isolated from each other, which means they can run simultaneously without interference.
The qa job focuses on code quality checks that don’t require running the application. It starts by checking your code with actions/checkout@v4, then installs uv using astral-sh/setup-uv@v4. The Python setup step uses actions/setup-python@v5 and reads the Python version from your .python-version file, ensuring consistency between local development and CI. After syncing dependencies with uv sync --dev (which includes development dependencies needed for formatting and linting), it runs two checks. The format check uses uv run ruff format --check to verify that all code follows consistent formatting rules without modifying any files. The lint check uses uv run ruff check to detect code quality issues, unused imports, and potential bugs.
The tests job follows a similar setup process. It runs uv sync without the --dev flag since tests don’t require development tools like formatters. The test step uses CONFIG_FILE=configs/debug.yaml to ensure tests run with the fake model configuration, preventing any real LLM API calls during CI. This keeps tests fast, deterministic, and free.
Setting Up GitHub Actions for Your Repository
To enable this CI workflow in your repository, you need to create the workflow file in the correct location. GitHub Actions looks for workflow files in the .github/workflows/ directory at the root of your repository.
First, create the directory structure if it doesn’t already exist. From your repository root, run mkdir -p .github/workflows. Then create the file .github/workflows/ci.yml and paste the complete configuration shown above. Make sure your repository has a .python-version file at the root that specifies which Python version to use, such as 3.12. You should also ensure that configs/debug.yaml exists and configures your agents to use fake models for testing.
Once you commit and push this file to GitHub, the workflow becomes active immediately. You don’t need to configure anything in the GitHub UI for basic workflows, though you will need to add secrets for more advanced scenarios, such as API keys for evaluation workflows.
Running the Pipeline and Observing Results
The pipeline runs automatically whenever its trigger conditions are met. When you push a commit directly to the main branch, GitHub Actions executes the workflow within seconds. When you open a pull request targeting main or dev, the workflow runs automatically and reports its status on the pull request page.
You can also trigger the workflow manually to test changes or re-run failed checks. Navigate to your repository on GitHub and click the “Actions” tab at the top. You’ll see a list of all your workflows. Click on “CI” to view all runs of this workflow. In the top right corner, you’ll see a “Run workflow” button. Click it, select the branch you want to run the workflow on, and click the green “Run workflow” button. This is particularly useful when you want to verify that a fix works without creating a new commit or pull request.
To monitor a workflow run, click any run in the list to view its details. The interface shows both jobs (qa and tests) with their current status. You can click each job to view the output of its individual steps. If a step fails, its output is expanded automatically and highlighted in red, making it easy to identify the problem. The format and lint checks show exactly which files have issues and what needs to be fixed.
Interpreting CI Results and Fixing Issues
When the CI pipeline runs, it produces one of three outcomes for each job: success (green checkmark), failure (red X), or in progress (yellow dot). GitHub also displays the overall status on your pull request, preventing merges when checks fail.
If the qa job fails due to formatting; the output shows which files would be reformatted and exactly what changes Ruff would make to them. You can fix this locally by running make format-fix from the writing_workflow/ directory, then committing and pushing the formatted code. If the qa job fails on linting, the output lists each violation with its file location, line number, and error code. Many of these can be auto-fixed by running make lint-fix locally.
If the tests job fails, the pytest output shows which test failed and why. The traceback helps you identify the issue, whether it’s a logic error, an incorrect mock response, or a missing dependency. You should fix the underlying issue, verify the fix by running make tests locally, then push your changes.
A critical principle is that CI should run the exact same commands you run locally. The qa job executes uv run ruff format --check and uv run ruff check, which are identical to the targets your Makefile runs. The tests job runs CONFIG_FILE=configs/debug.yaml uv run pytest, which is exactly what make tests does. This eliminates “works on my machine” problems. If tests pass locally with make tests, they will pass in CI, and if they fail in CI, you can reproduce the failure locally by running the same command.
Trying It Out
The best way to understand how CI works is to intentionally trigger a failure and observe the results. Try introducing a formatting violation by creating a file with inconsistent spacing, committing it, and pushing to a branch. Open a pull request and watch the qa job fail with clear output showing what needs to be fixed. Then run make format-fix locally, commit the corrected code, and push again. The CI pipeline will re-run automatically, and this time the checks will pass.
You can also experiment with the manual trigger feature. Go to the Actions tab, run the workflow on your current branch, and observe how the jobs execute. This hands-on experience will make the abstract concept of CI concrete and help you develop confidence in the system.
AI Evaluations as Regression Tests
AI evaluations serve a critical purpose: regression testing [9]. A change might pass all unit tests but degrade the semantic quality of the agent’s output. AI evaluations catch these regressions.
Why AI Evals Are Unique to AI Systems
Traditional CI lacks an equivalent to Tier 3 evaluations because unit and integration tests are fast enough to run on every commit. For AI agents, semantic quality testing requires real LLM calls, which are slow and expensive.
A modest evaluation dataset of 10 samples could require 50-100 LLM calls. At an average cost of 2.50-$5.00 (Note: Frequent current price check from LLM provider is important as costs changes over time). Running this on every commit for a team of five could cost thousands of dollars per month and slow development to a crawl. This is why we run them selectively.
Manual-Trigger CI Workflow for AI Evals
Here’s an example of what a CI workflow for evaluations might look like. You could save it to .github/workflows/eval.yml. Note that this is illustrative: a working implementation would use the actual evaluation scripts we developed in previous lessons (like those using Opik for scoring and metrics).
This workflow differs from the main CI pipeline in several key ways. The workflow_dispatch trigger means it never runs automatically. You must manually trigger it from the Actions tab in GitHub. This prevents expensive API calls from running on every commit.
The workflow uses a production configuration (configs/production.yaml) instead of the debug configuration used in tests. This ensures evaluations use real LLM models rather than fake models. The LLM_API_KEY environment variable pulls from GitHub Secrets, which you configure in your repository settings under Settings → Secrets and variables → Actions. This keeps API keys secure and out of your codebase.
The evaluation command (python -m scripts.run_eval) should point to your evaluation script that loads your dataset, runs your agent on each sample, and computes metrics. The exact implementation depends on your evaluation framework, whether that’s Opik, LangSmith, or a custom solution.
To trigger this workflow, navigate to the Actions tab, select “AI Evaluations ” from the workflow list, click “Run workflow, ” choose your branch, and click the green “Run workflow ” button. The workflow will run and display results in the Actions interface, including logs that show evaluation metrics and any failures.
The decision on when to run AI evals depends on your project’s maturity:
- Early development: Run manually to measure progress weekly or after major changes.
- Active development: Run before merging significant changes to catch regressions.
- Mature product: Run as part of your release process to ensure production quality never degrades.
Daily Development Workflow
With these tools in place, a typical daily workflow looks like this:
- Write code and corresponding tests.
- Run quick checks periodically:
make lint-checkandmake format-check. - Run tests after changing logic:
make tests. - Commit your changes. Pre-commit hooks will run automatically.
- Push and open a pull request. CI runs automatically, enforcing all checks.
- Before releasing, run AI evaluations manually to check for quality regressions.
This workflow takes seconds for most commits and catches issues early.
Conclusion
Continuous Integration for AI agents adapts traditional software engineering practices to the unique challenges of LLM-powered systems. The three-tier model: fast checks, deterministic tests with mocked LLMs, and selective AI evaluations provides a robust framework for building maintainable and reliable agents. The investment in CI pays for itself the first time it catches a regression before your customers see it.
References
- Astral. (n.d.-a). Ruff Linter. Ruff Docs. docs.astral.sh/ruff/linter
- Astral. (n.d.-b). ruff-pre-commit. GitHub. github.com/astral-sh/ruff-pre-commit
- Astral. (n.d.-c). Ruff. Ruff Docs. docs.astral.sh/ruff
- Astral. (n.d.-d). Integration with GitHub Actions. uv Docs. docs.astral.sh/uv/guides/integration/github
- Astral. (n.d.-e). Integration with pre-commit. uv Docs. docs.astral.sh/uv/guides/integration/pre-commit
- BetterStack. (n.d.). pyproject.toml explained. BetterStack Community. betterstack.com/community/guides/scaling-python/pyproject-ex...
- Bright Security. (n.d.). Unit testing best practices: 13 ways to improve your tests. Bright Security Blog. brightsec.com/blog/unit-testing-best-practices
- CiCUBE. (n.d.). How to run jobs in parallel with GitHub Actions. DEV Community. dev.to/cicube/how-to-run-jobs-in-parallel-with-gith...
- Deepchecks. (n.d.). LLM evaluation for CI/CD pipelines: A practical guide. deepchecks.com/llm-evaluation/ci-cd-pipelines
- GitHub. (n.d.). GitHub Actions documentation. GitHub Docs. docs.github.com/en/actions
- LangChain. (n.d.). Testing. LangChain Docs. docs.langchain.com/oss/python/langchain/test
- Paul, K. (n.d.). A practical guide to integrating AI evals into your CI/CD pipeline. DEV Community. dev.to/kuldeep_paul/a-practical-guide-to-integratin...
- pre-commit. (n.d.). pre-commit. pre-commit.com
- pytest. (n.d.). pytest documentation. docs.pytest.org
- Talk Python To Me. (n.d.). Pre-commit hooks for Python devs. talkpython.fm/episodes/show/482/pre-commit-hooks-for-pytho...
- Upsun. (n.d.). Why Python developers should switch to uv. Upsun DevCenter. devcenter.upsun.com/posts/why-python-developers-should-switch-to-uv