Lesson 32: Preparing For Deployment: Authentication and Docker
In Part 2 of this course, we built a research agent, Nova, that used the Model Context Protocol (MCP) to read and write files on a local machine. This approach was perfect for development; it let us prototype quickly and test capabilities with minimal overhead.
However, the jump from a local prototype to a production system is where many AI projects stumble. Production introduces new constraints that a simple local setup cannot handle: security, data isolation across multiple users, and the ephemeral nature of cloud infrastructure. Making that jump requires solid software engineering principles, applied specifically to AI systems.
In Lesson 31, we established a Continuous Integration (CI) pipeline to ensure our code quality is production-grade. Now, we will address: deployment infrastructure. Our target platform is Google Cloud Run, a fully managed serverless platform that lets us run containers without managing servers [1]. It handles critical production tasks like automatic scaling, health checks, and load balancing, allowing us to focus on building our application rather than managing infrastructure. While we use Cloud Run as our primary example, the architectural principles and containerization techniques we cover are universal and apply directly to similar platforms such as AWS Fargate or Azure Container Apps.
The most critical constraint imposed by these serverless platforms is that their container instances are ephemeral and stateless. An instance can be created, destroyed, or replaced by the platform at any moment to handle fluctuating traffic or hardware updates. That makes our agent’s reliance on local file storage a non-starter: anything written to the container’s disk can disappear without warning. To make the agent cloud-ready, we need four architectural shifts: replace the local file system with persistent external storage (for example, PostgreSQL), add user authentication (OAuth 2.0) so we can secure the server and isolate each user’s data, build explicit HTTP endpoints for file upload and download since MCP doesn’t define file transfer, and containerize the app so it ships as a portable Docker image.
This lesson focuses on two of those changes: implementing robust authentication and containerizing the application with Docker. We’ll lay the architectural groundwork for the database and file-handling pieces here, then implement them in detail in Lesson 33.
From Stateful to Stateless Architecture
Before we get to authentication and Docker, we need to make one core architectural shift for cloud deployment: moving from a stateful to a stateless design.
Serverless platforms like Cloud Run require stateless applications to enable horizontal scalability [2], [3]. Any incoming request can be routed to any available container instance because no critical state is stored locally between requests [4].
Our Part 2 research agent was stateful. It stored everything: research guidelines, search results, and generated artifacts in a local .nova/ directory. That’s convenient in a single-user, local setup, but it breaks in a multi-user cloud environment for a few concrete reasons:
- Data Overwrites: If two users access the agent simultaneously, they will read and write to the same files, overwriting each other’s work.
- Data Loss: When Cloud Run scales down or replaces an instance, the local filesystem is wiped, and all stored data is permanently lost.
- No Data Isolation: There is no way to associate research files with the specific user who created them.
To solve these problems, we prepared a new version of the code of our research agent in the lessons/research_agent_part_3 folder, which shifts to a stateless architecture backed by a PostgreSQL database. The application no longer stores state locally; instead, the database becomes the source of truth. Every piece of data, from research sessions to generated files, is associated with a user_id, ensuring complete data isolation.
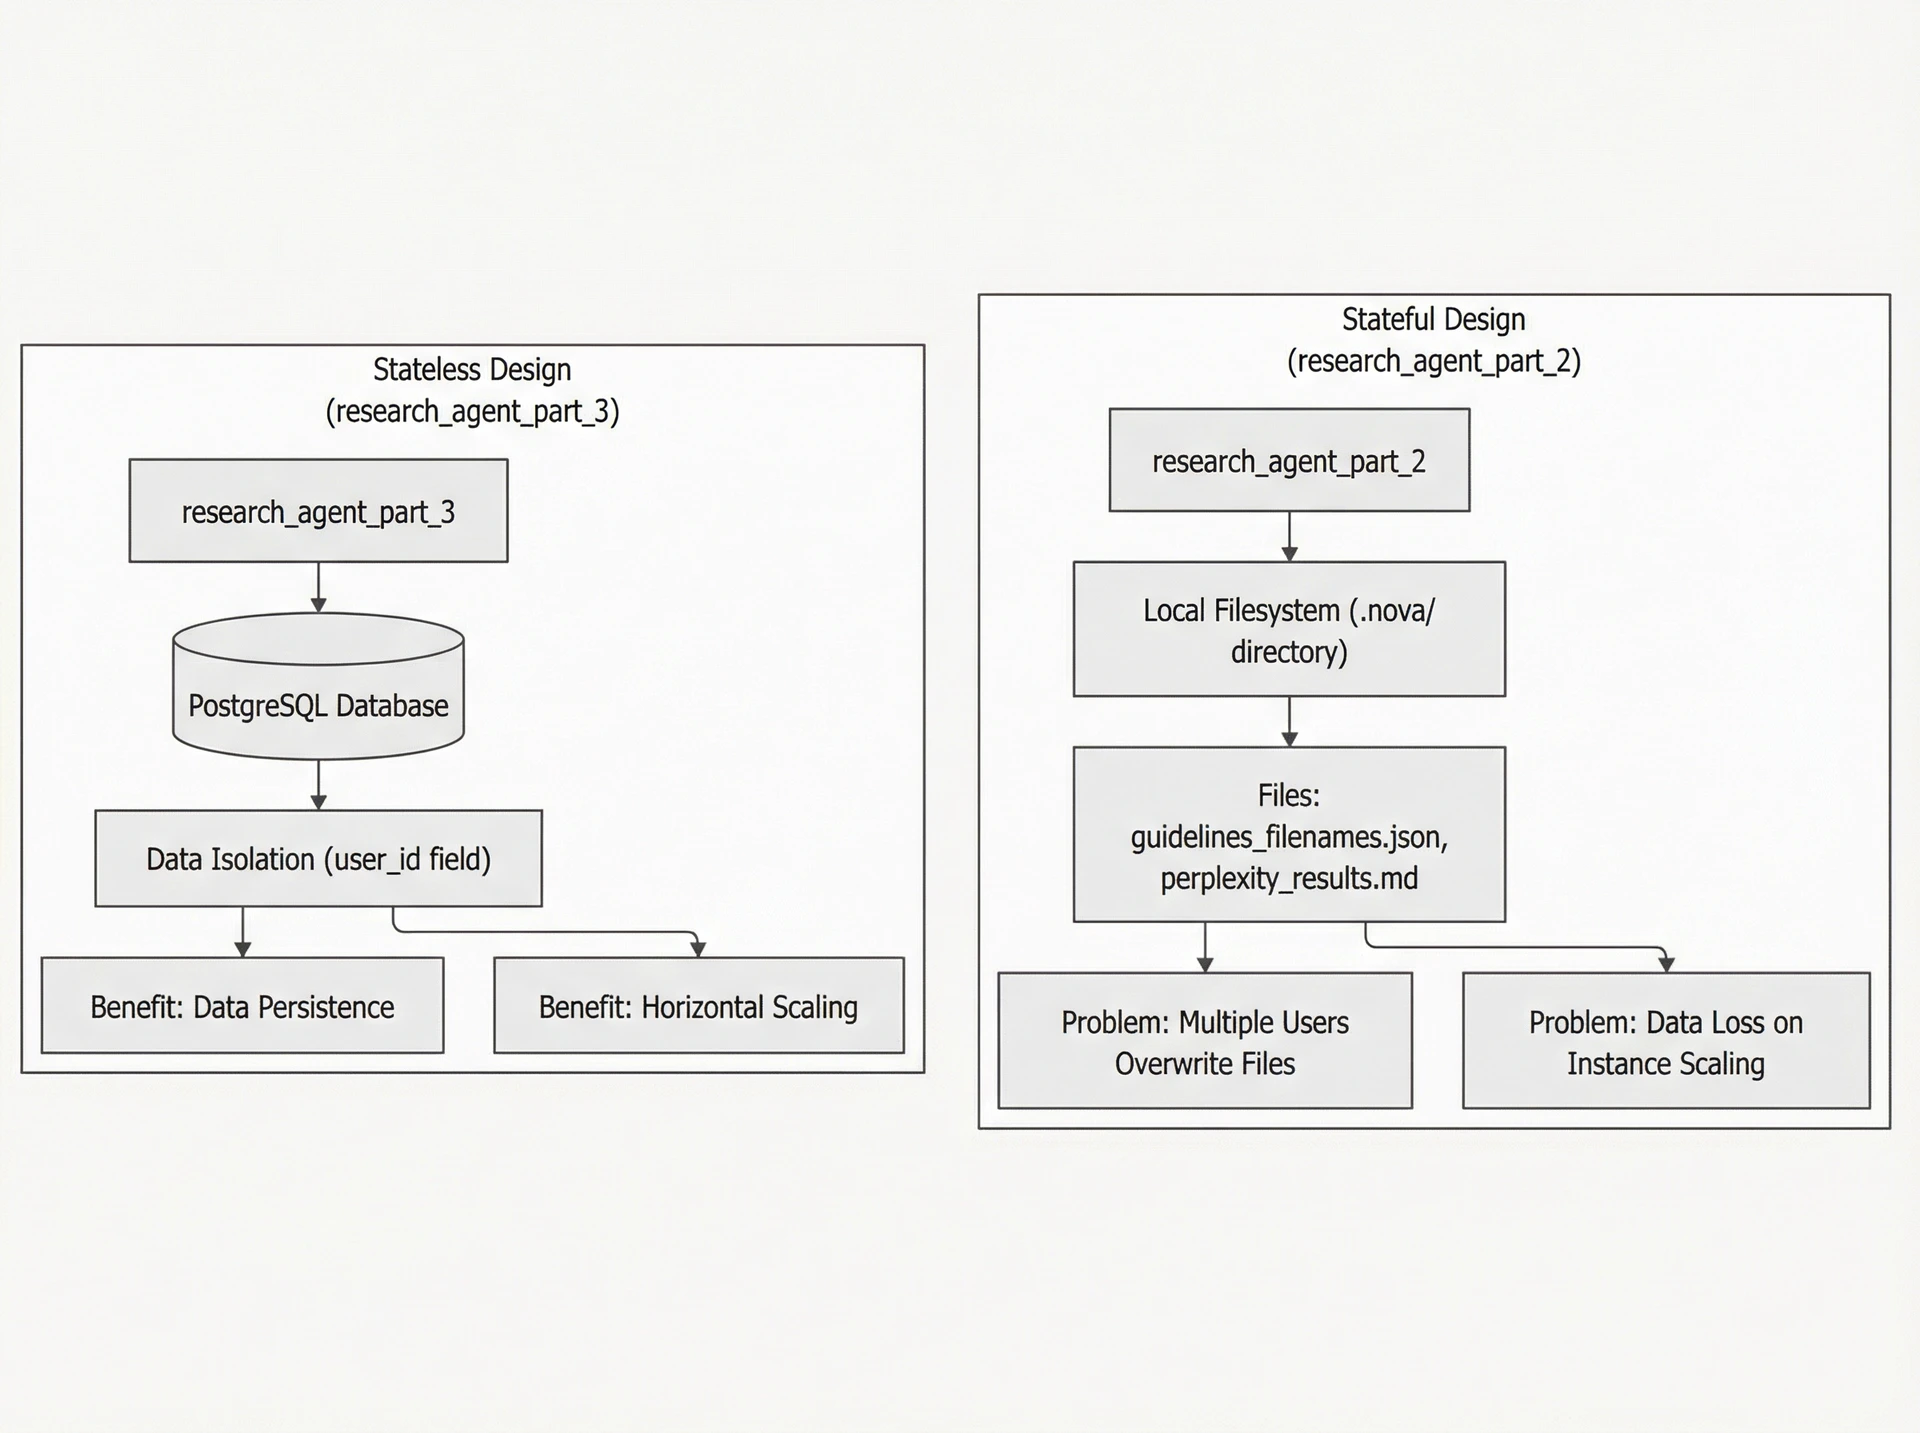 Image 1: Architectural shift from a stateful, file-based research agent to a stateless, database-backed design.
We’ll cover the database schema and configuration in Lesson 33. For now, the key takeaway is simple: the agent must be stateless. Once the data is stored in a per-user database, the system needs a reliable way to know which user it’s serving, and that’s where authentication comes in.
Authentication with Descope
For any production AI agent, authentication is not optional. It’s a fundamental requirement for security, data management, and operational control. Without it, your agent is exposed to several risks:
- Security: Anyone with your server’s URL could access its tools, potentially running expensive LLM calls or accessing sensitive data [7].
- Data Isolation: You cannot separate one user’s data from another’s without a unique user identity.
- Usage Limits: If you can’t identify who is making a request, you can’t enforce rate limits or tiered access.
- Audit Trail: Without a clear link between an action and a user, you can’t reliably track agent actions for audits or debugging.
To secure our agent, we will use Descope, an authentication and user management platform that supports OAuth 2.0. We chose Descope for its developer-friendly features, including a generous free tier, a comprehensive user management dashboard, and, most importantly, support for Dynamic Client Registration (DCR) [8]. DCR, defined in RFC 7591, allows clients like Cursor to programmatically register with our authentication server at runtime, eliminating the need for manual setup [9]. This is essential for the dynamic, many-to-many ecosystem of AI agents and MCP servers [10].
Setting Up Descope
Configuring Descope for our FastMCP server involves a few simple steps in the Descope Console:
- Create a Descope Account: Sign up for a free account if you do not have one.
- Create a Project: In the console, create a new project. Each project has a unique Project ID , which you will need for your configuration.
- Enable Dynamic Client Registration (DCR): Navigate to
Auth Hub > Inbound Appsand click the settings icon. Toggle on “Enable dynamic client registration.” This will expose a/registerendpoint that MCP clients can use to self-register [8]. - Configure Authentication Methods: Descope supports various login methods like social logins, magic links, and passkeys. You can configure these in the
Auth Hub > Authentication Methodssection.
Code Implementation
Now, integrating Descope into our FastMCP server is straightforward, thanks to the DescopeProvider. This provider, available in the fastmcp library, handles the complexities of OAuth 2.0, including endpoint discovery and JSON Web Token (JWT) validation [11].
- First, we update our
settings.pyfile (research_agent_part_3/src/config/settings.py) to load the necessary configuration from environment variables. We will set these variables in our.envfile for local development and in Cloud Run for production.
- Next, in
server.py(research_agent_part_3/src/server.py), we instantiate theDescopeProviderand pass it to ourFastMCPserver.
The provider is configured with three key parameters:
project_id: Your unique Descope Project ID, which links the provider to your specific Descope configuration.descope_base_url: The base URL for the Descope API, which defaults tohttps://api.descope.com.base_url: The public URL of our own MCP server (e.g.,http://localhost:8000). This is used to construct the correct redirect URLs required by the OAuth 2.0 flow.
The authentication flow, shown in Image 2, ensures that every request to our agent’s tools is validated. When a client like Cursor connects, it is redirected to Descope to log in. Upon successful authentication, Descope returns a token, which the client presents to our MCP server. The DescopeProvider validates this token on every request, granting access only if it is valid.
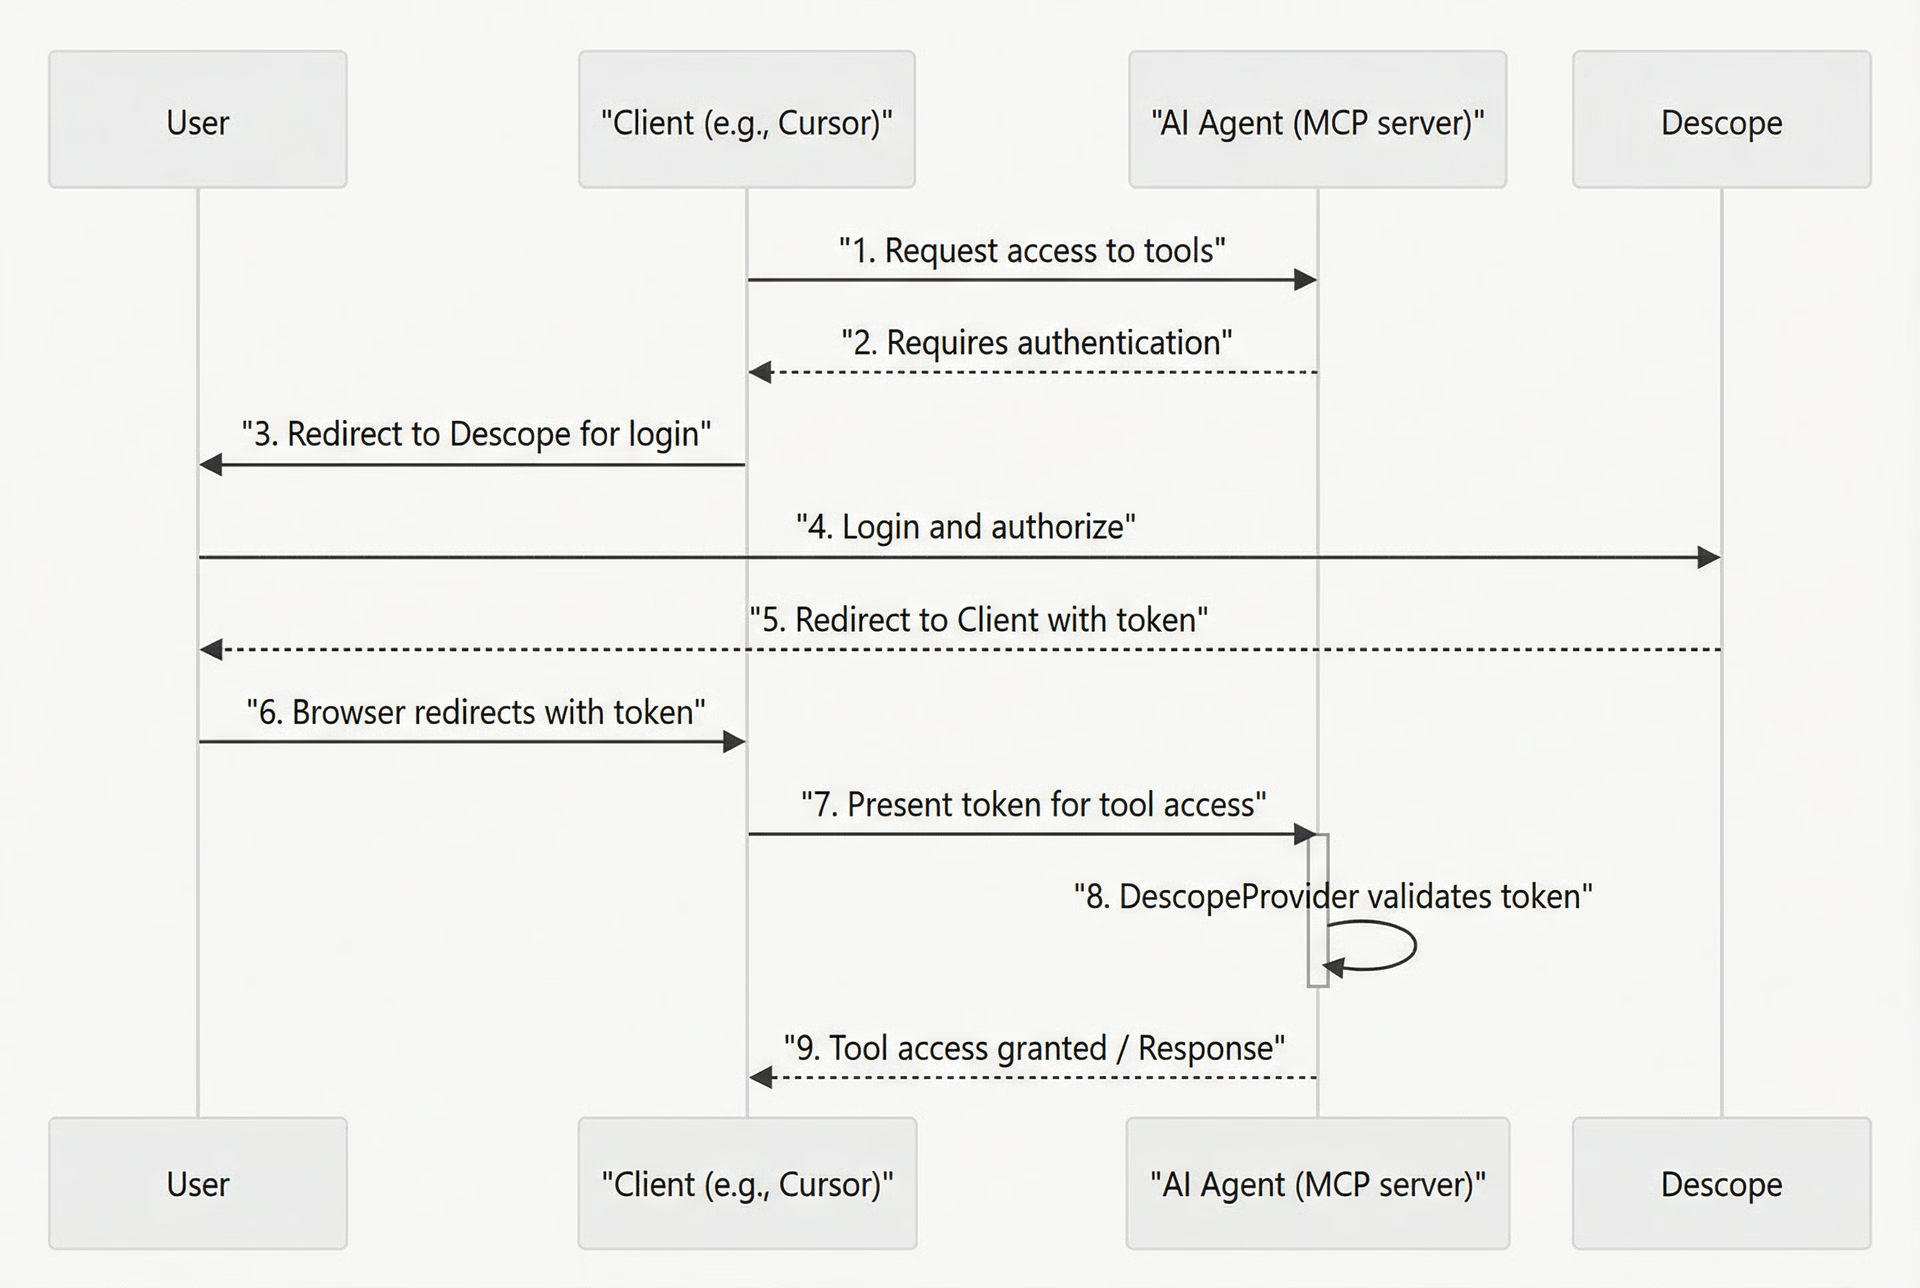 Image 2: OAuth 2.0 authentication flow for an AI agent using Descope and FastMCP's DescopeProvider.
We start with a slim Python base image. We then install uv, a fast Python package manager, by copying it from Astral’s official image [15]. A key optimization here is copying pyproject.toml and uv.lock first and running uv sync before copying the rest of our application code. This uses Docker’s layer caching. If our code changes but dependencies do not, Docker reuses the cached dependency layer, making builds much faster [16].
- Stage 2: The Runtime. This stage creates the final, lean image for production.
In this stage, we install only the necessary runtime dependencies, like libpq5 for PostgreSQL connectivity. We create a non-root user, nova, as a security best practice. We then copy the virtual environment created in the builder stage, our application code, and the entrypoint script. The HEALTHCHECK instruction tells Docker how to test if our container is working correctly, which is essential for orchestrators like Cloud Run to manage application availability [17].
Docker Compose
For local development, we use Docker Compose (research_agent_part_3/docker-compose.yml) to define and run our multi-container application. It allows us to spin up our entire stack (the MCP server and a PostgreSQL database) with a single command [18].
Our docker-compose.yml file defines two services:
**postgres**: Runs a PostgreSQL 16 server using a lightweight Alpine image. It uses a named volume,postgres_data, to persist database data even when the container is removed [19].**mcp-server**: Builds our agent from theDockerfile. Thedepends_ondirective ensures the server starts only after the database is healthy. It connects to the database using the service namepostgresas the hostname, which Docker’s internal networking resolves. We also mount the localsrcdirectory into the container, allowing for live code reloading during development.
The Entrypoint Script
The docker-entrypoint.sh (research_agent_part_3/docker-entrypoint.sh) script runs when the container starts. It ensures that database migrations are applied before the main application process begins. We’ll learn more about database migrations in the next lesson.
Using exec for the final command is important. It replaces the shell process with the uvicorn process, allowing application signals (like SIGTERM for graceful shutdown) to be handled correctly by the application rather than swallowed by the shell.
Local Development vs. Cloud Deployment
A key goal of this setup is to use the same codebase and Docker image for both local development and cloud deployment. We achieve this through environment-based configuration, as shown in Image 5.
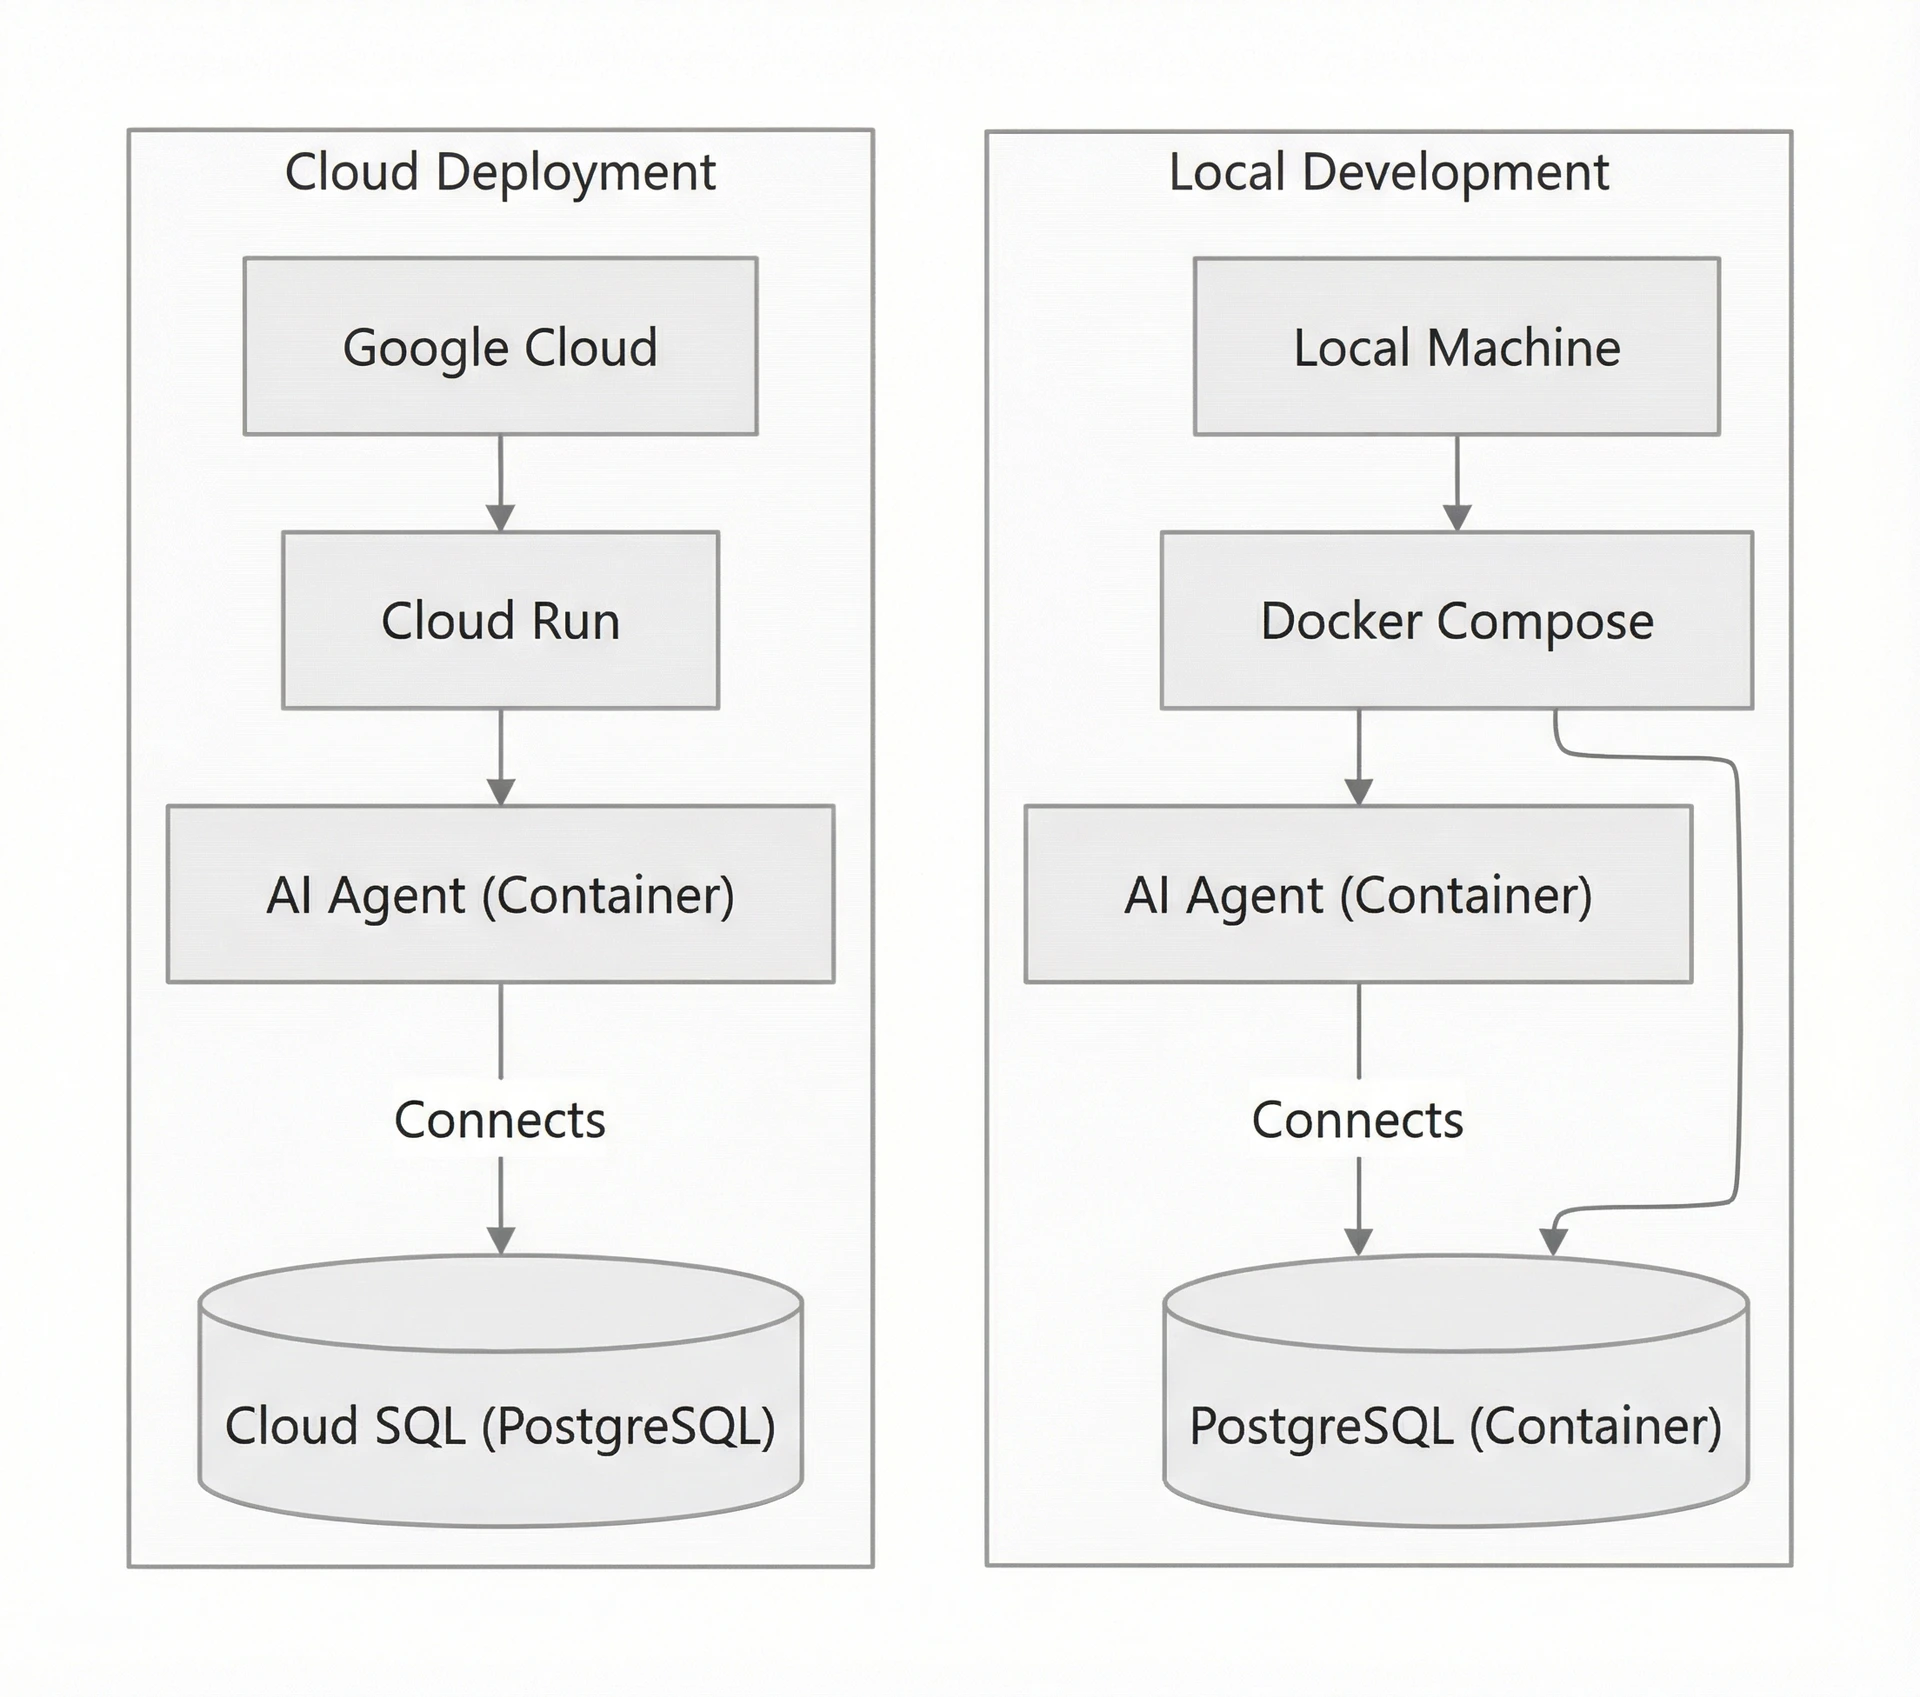 Image 3: High-level architecture diagram comparing local development with Docker Compose and cloud deployment on Google Cloud Run.
- Locally: We use Docker Compose, which provides a PostgreSQL container and sets the
DATABASE_URLto connect to it. - In the Cloud: We will deploy the same image to Cloud Run and connect it to a managed Cloud SQL database [20]. The connection details will be provided through environment variables in the Cloud Run service configuration. The repository also contains a
Dockerfile.cloudrunanddocker-entrypoint-cloudrun.shfor cloud-specific build and startup logic.
Our settings.py (research_agent_part_3/src/config/settings.py) includes logic to handle the specific connection requirements for Cloud SQL.
With Docker configured, let’s run the research agent on your local machine and see the full authentication flow.
Running the Agent Locally
This section provides a hands-on guide to running the containerized agent on your machine.
As prerequisites:
- Install Docker Desktop: Download and install Docker Desktop for your operating system.
- Create the
**.env**file: In theresearch_agent_part_3directory, create a.envfile and populate it with your API keys and Descope Project ID. You can initially copy the.env.examplefile into your new.envfile, but eventually you need to provide your keys and your Descope project ID (which you can get by following the steps described in the Descope section).
- Generate the lock file: If you have modified dependencies in
pyproject.toml, regenerate theuv.lockfile by runninguv lock.
Starting the Services
- First, build the Docker images for your services.
- Next, start the services in detached mode (
d).
- Verify that both containers are running and healthy.
It outputs:
- You can tail the MCP server’s logs to see the startup messages, including the database migration output.
Connecting from Cursor
Now for the payoff. Open Cursor and configure it to connect to your local MCP server.
- Go to Cursor → Settings → Cursor Settings → Tools & MCP → New MCP Server. Fill the
mcp.jsonfile with the following content and then save it:
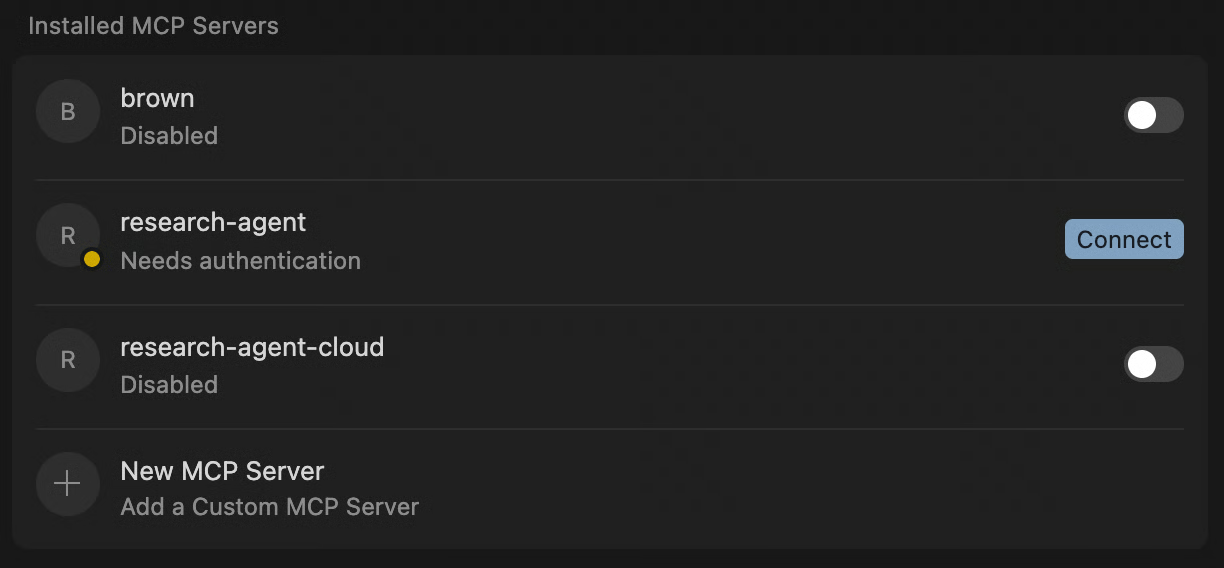 Screenshot from Cursor, listing the connected MCP servers.
- Your browser will open a new tab and redirect you to the Descope login page.
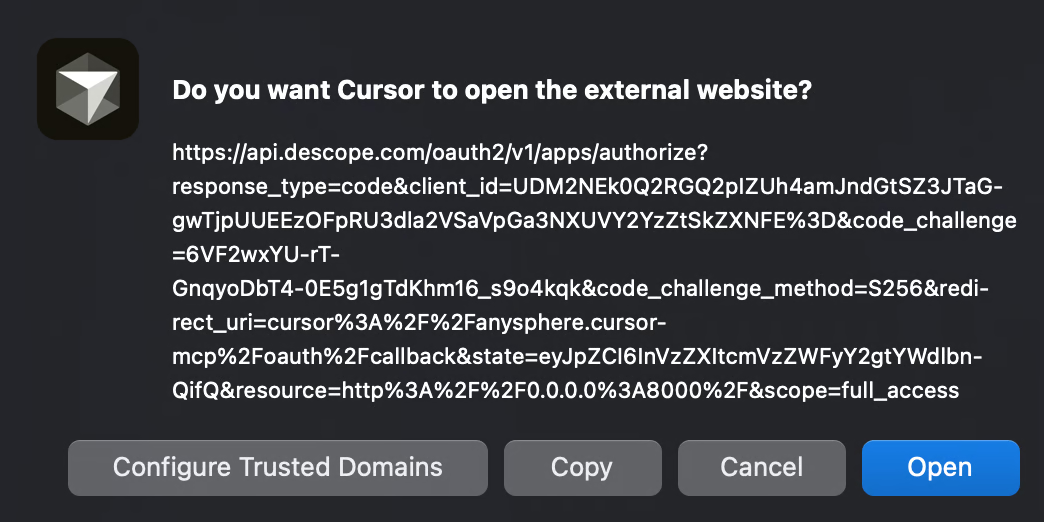
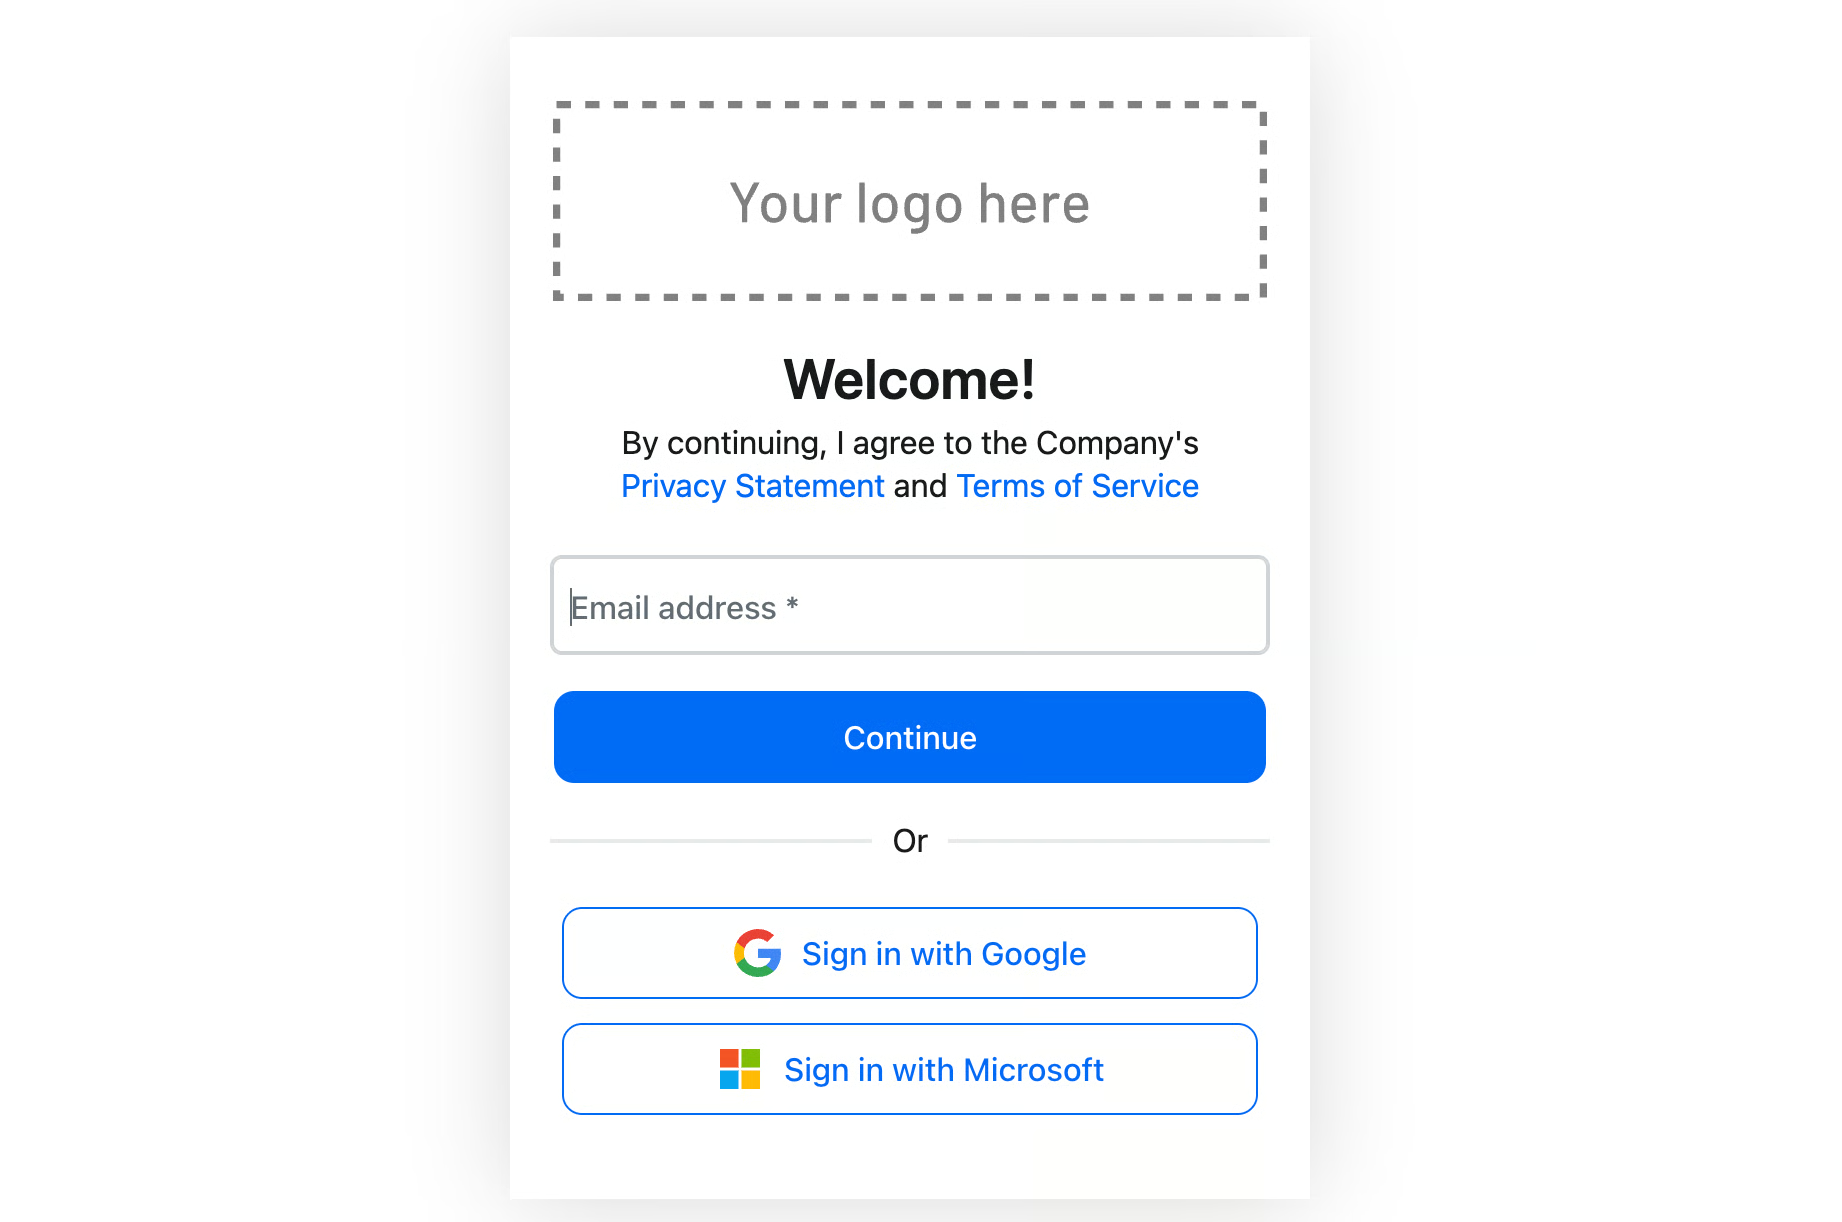
- After you log in and grant consent, you will be redirected back, and Cursor will receive an authentication token.
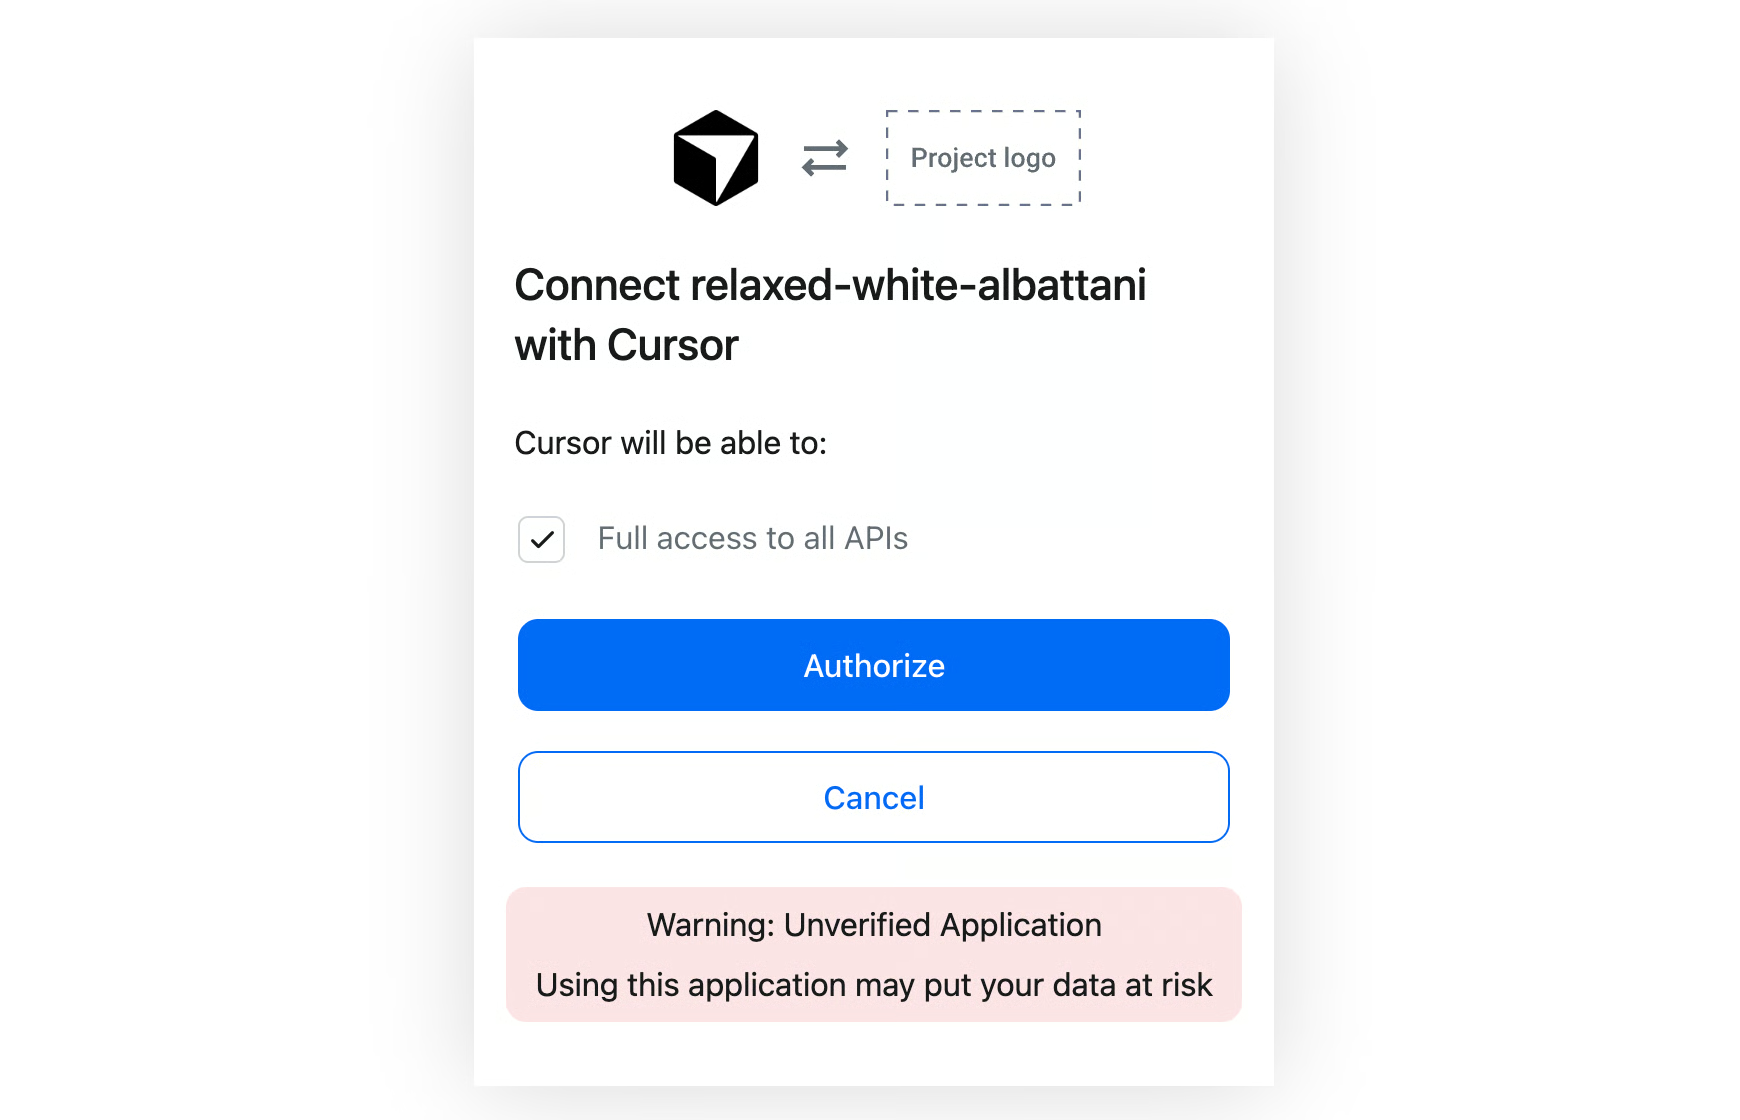
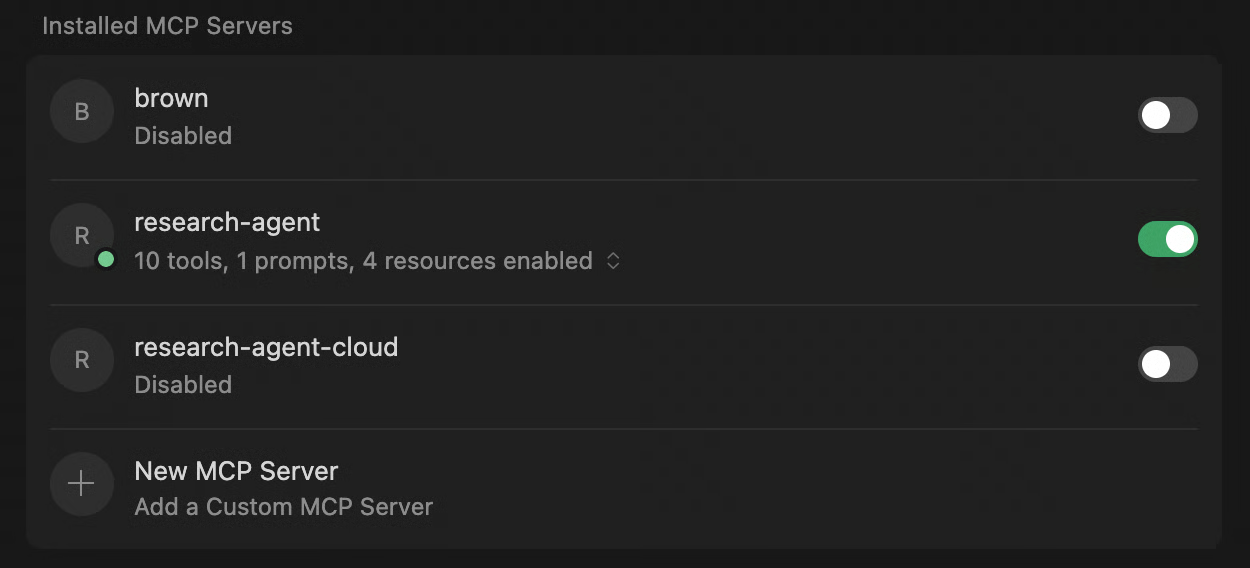
- The agent’s tools will now be available in Cursor, and you can start a research session in the same way as we did in part 2 of the course. The token is saved in your Cursor application, so you will not need to log in again until it expires.
Stopping the Services
To stop the services, you have a few options:
docker compose stop: Stops the containers but preserves them and the database volume.docker compose down: Stops and removes the containers but keeps the database volume.docker compose down -v: Stops and removes the containers and deletes the database volume, wiping all data.
Conclusion
You now have a containerized research agent running locally with production-grade authentication. This lesson covered the critical infrastructure needed to move an AI agent from a local prototype toward a cloud-native application. This is a significant step in escaping the “PoC purgatory” where so many AI projects get stuck. By building a solid foundation of security and portability, we ensure our agent is not just a clever demo but a robust application ready for real-world use.
We addressed four key topics:
- Stateless Architecture: We understood why serverless platforms demand a stateless design and shifted from local file storage to a PostgreSQL database, enabling scalability and data persistence.
- Authentication with Descope: We implemented a robust OAuth 2.0 authentication flow using FastMCP’s
DescopeProviderto secure our agent, isolate user data, and prepare for production-level access control. - Docker Containerization: We created a multi-stage
Dockerfilefor lean, secure images and adocker-compose.ymlfor a reproducible local development environment, ensuring consistency from development to deployment. - Environment-Based Configuration: We designed our application to run identically in local and cloud environments by managing configuration through environment variables, a core principle of modern software development.
The research agent is now a portable, secure, and scalable application. In the next lesson, we will cover the database schema and configuration in detail. We will also implement Alembic migrations to manage changes over time and tackle a critical missing piece: how to handle file uploads and downloads for MCP servers, since the standard protocol does not cover file transfers over HTTP. Finally, we will add user usage tracking to our database, a key feature for monitoring and monetization.
References
- Google. (n.d.). Cloud Run documentation. Google Cloud. cloud.google.com/run/docs
- GeeksforGeeks. (n.d.). System Design - Serverless Architectures. geeksforgeeks.org/system-design/serverless-architectures
- CloudOptimo. (n.d.). Serverless Computing vs Containerization: A Comprehensive Comparison for Modern Cloud Applications. cloudoptimo.com/blog/serverless-computing-vs-containerizatio...
- NetQuall. (n.d.). Serverless Architecture: A Guide for Modern Web Apps. netquall.com/blog/serverless-architecture-a-guide-for-mod...
- Tacnode. (2024, May 22). Stateful vs Stateless AI Agents: A Practical Architecture Guide for Developers. tacnode.io/post/stateful-vs-stateless-ai-agents-practic...
- Ruh AI. (n.d.). Stateful vs Stateless AI Agents: Choosing the Right Architecture for Your Needs. ruh.ai/blogs/stateful-vs-stateless-ai-agents
- Auth0. (n.d.). How to Mitigate Excessive Agency in AI Agents. auth0.com/blog/mitigate-excessive-agency-ai-agents
- Descope. (n.d.). Creating Inbound Apps. docs.descope.com/identity-federation/inbound-apps/creating-in...
- IETF. (2015, July). OAuth 2.0 Dynamic Client Registration Protocol (RFC 7591). datatracker.ietf.org/doc/html/rfc7591
- Model Context Protocol. (2025, June 18). Authorization. modelcontextprotocol.io/specification/2025-06-18/basic/authorization
- FastMCP. (n.d.). Descope Integration. gofastmcp.com/integrations/descope
- Docker. (n.d.). Docker Documentation. docs.docker.com
- Blacksmith. (n.d.). Understanding Multi-Stage Docker Builds. blacksmith.sh/blog/understanding-multi-stage-docker-builds
- TestDriven.io. (n.d.). Docker Best Practices. testdriven.io/blog/docker-best-practices
- Astral. (n.d.). Using uv in Docker. docs.astral.sh/uv/guides/integration/docker
- Snyk. (n.d.). Best practices for containerizing Python applications with Docker. snyk.io/blog/best-practices-containerizing-python-do...
- Lumigo. (n.d.). Docker Health Check: A Practical Guide. lumigo.io/container-monitoring/docker-health-check-a-p...
- Docker. (n.d.). Docker Compose Documentation. docs.docker.com/compose
- Earthly. (n.d.). Running Postgres on Docker. earthly.dev/blog/postgres-docker
- Google. (n.d.). Cloud SQL Documentation. cloud.google.com/sql/docs