Lesson 34: Continuous Deployment for AI Engineering
In Lesson 31, we established Continuous Integration (CI) as the foundation for maintaining code quality through automated tests, linting, and formatting checks. In Lesson 32, we prepared our research agent for production by containerizing it with Docker and implementing OAuth 2.0 authentication. Then, in Lesson 33, we replaced file-based storage with PostgreSQL and added rate limiting. This lesson completes the DevOps journey by deploying the agent to the cloud and setting up Continuous Deployment (CD).
Continuous Deployment extends CI by automatically releasing code changes to production after they pass all tests. While CI answers the question “does this code work?”, CD answers “can we ship it?”. Together, they form a pipeline where a developer pushes code, automated tests validate it, and the change goes live minutes later. This workflow reduces manual release work, shortens feedback loops, and lowers the chance of deployment mistakes. Without it, even well-tested code can sit for days or weeks waiting on a manual process, delaying feedback and slowing progress.
For AI agents, CD is particularly valuable because much of the development process, especially prompt engineering, is inherently iterative. You tweak a prompt, observe the results in a real environment, and refine it again. A manual deployment process introduces friction and slows down this important feedback loop. With CD, prompt changes can flow to production as smoothly as code changes, enabling rapid experimentation while ensuring that quality gates, such as automated testing, are never bypassed. This makes it easier to improve the agent in small, frequent steps instead of bundling changes into infrequent releases.
This lesson provides a comprehensive guide to building a complete deployment pipeline for our research agent. We will:
- Set up the Google Cloud Platform infrastructure using
gcloudcommands. - Create a manual deployment pipeline for controlled, on-demand releases.
- Understand core Cloud Run concepts like services, revisions, autoscaling, and zero-downtime deployments.
- Implement a continuous deployment pipeline that automatically triggers after CI passes.
By the end of this lesson, you will have a production-ready deployment pipeline that takes your code from a commit to a live production environment with minimal manual intervention.
Infrastructure as Code with Gcloud
To deploy our agent, we need to provide the necessary cloud infrastructure: a container registry for Docker images, a database for persistent storage, a system for managing secrets, and the compute service to run our agent. On Google Cloud Platform (GCP), we can do this by clicking through the web console or by running commands with the gcloud CLI.
Why Command-Line Infrastructure
A web console is intuitive for exploration and one-off tasks, but it presents major drawbacks for building and maintaining production systems:
- Not Reproducible: Configuring a service through the UI is a manual process. If you need to recreate the environment for testing or disaster recovery, you have to remember every click and setting. This is error-prone and unreliable. Imagine a new team member trying to set up a staging environment; without a script, they are likely to miss a step, leading to configuration drift and hard-to-debug “it works on my machine” issues.
- Not Version-Controlled: Changes made in the UI are not tracked in a version-control system such as Git. There is no audit trail, making it impossible to review infrastructure changes in a pull request or revert to a previous known-good state. If a change introduces a problem, you cannot easily see what was modified or by whom.
- Not Automatable: Manual UI operations cannot be automated in CI/CD pipelines. Every deployment would require a person to click buttons, defeating the purpose of automation and introducing the potential for human error at the most critical stage of the release process.
Using command-line tools to define infrastructure solves these problems. When you provision resources with gcloud commands and save them in a script; you create a reproducible recipe. This script can be version-controlled, reviewed by your team, and executed automatically. This practice is the foundation of Infrastructure as Code (IaC) , where infrastructure is managed with the same rigor as application code [1].
Infrastructure as Code and Terraform
The most advanced form of IaC uses declarative tools like Terraform or Pulumi. With these tools, you do not write imperative commands (“create this, then create that”). Instead, you declare the desired end state of your infrastructure in a configuration file (“I want these resources to exist with these settings”) [2]. The tool then determines the necessary actions to achieve that state. Terraform also tracks the state of your infrastructure, handles dependencies automatically, and can generate an execution plan (terraform plan) that shows what will change before you apply it. For complex production systems, Terraform is the industry standard. However, it introduces a learning curve: you need to learn its specific language (HCL), manage state files, and understand its lifecycle.
For our project, we will take a pragmatic middle ground. We will document all infrastructure setup as gcloud commands in a deployment guide. This gives us reproducibility and documentation without the overhead of a new tool, making it an excellent starting point for an AI engineer’s first deployment pipeline. The main tradeoff is that gcloud commands are imperative, not declarative. This means running a command twice might either fail or create a duplicate resource. You must be mindful of idempotency, and there is no automatic detection if the live infrastructure drifts from the configuration in your script. For the scope of this course, this is an acceptable tradeoff for simplicity.
Installing and Configuring gcloud
The gcloud CLI is Google Cloud’s powerful command-line interface for managing resources. It is an essential tool for any automation on GCP. Follow the official guide to install Google Cloud CLI for your operating system [3].
After installation, you need to authenticate your account and configure your default project and region.
- Run the login command, open a browser window, and sign in to your Google account.
- Next, set your default project ID and compute region. Setting these defaults means you will not have to specify the
--projectand--regionflags with every command. You can always verify your current configuration by runninggcloud config list.
Setting Up GCP Services
Now, we provision the infrastructure our research agent needs. We will go through each component, understand what it does, and see the commands to create it.
The complete deployment architecture involves several GCP services working together to build, store, run, and support our agent.
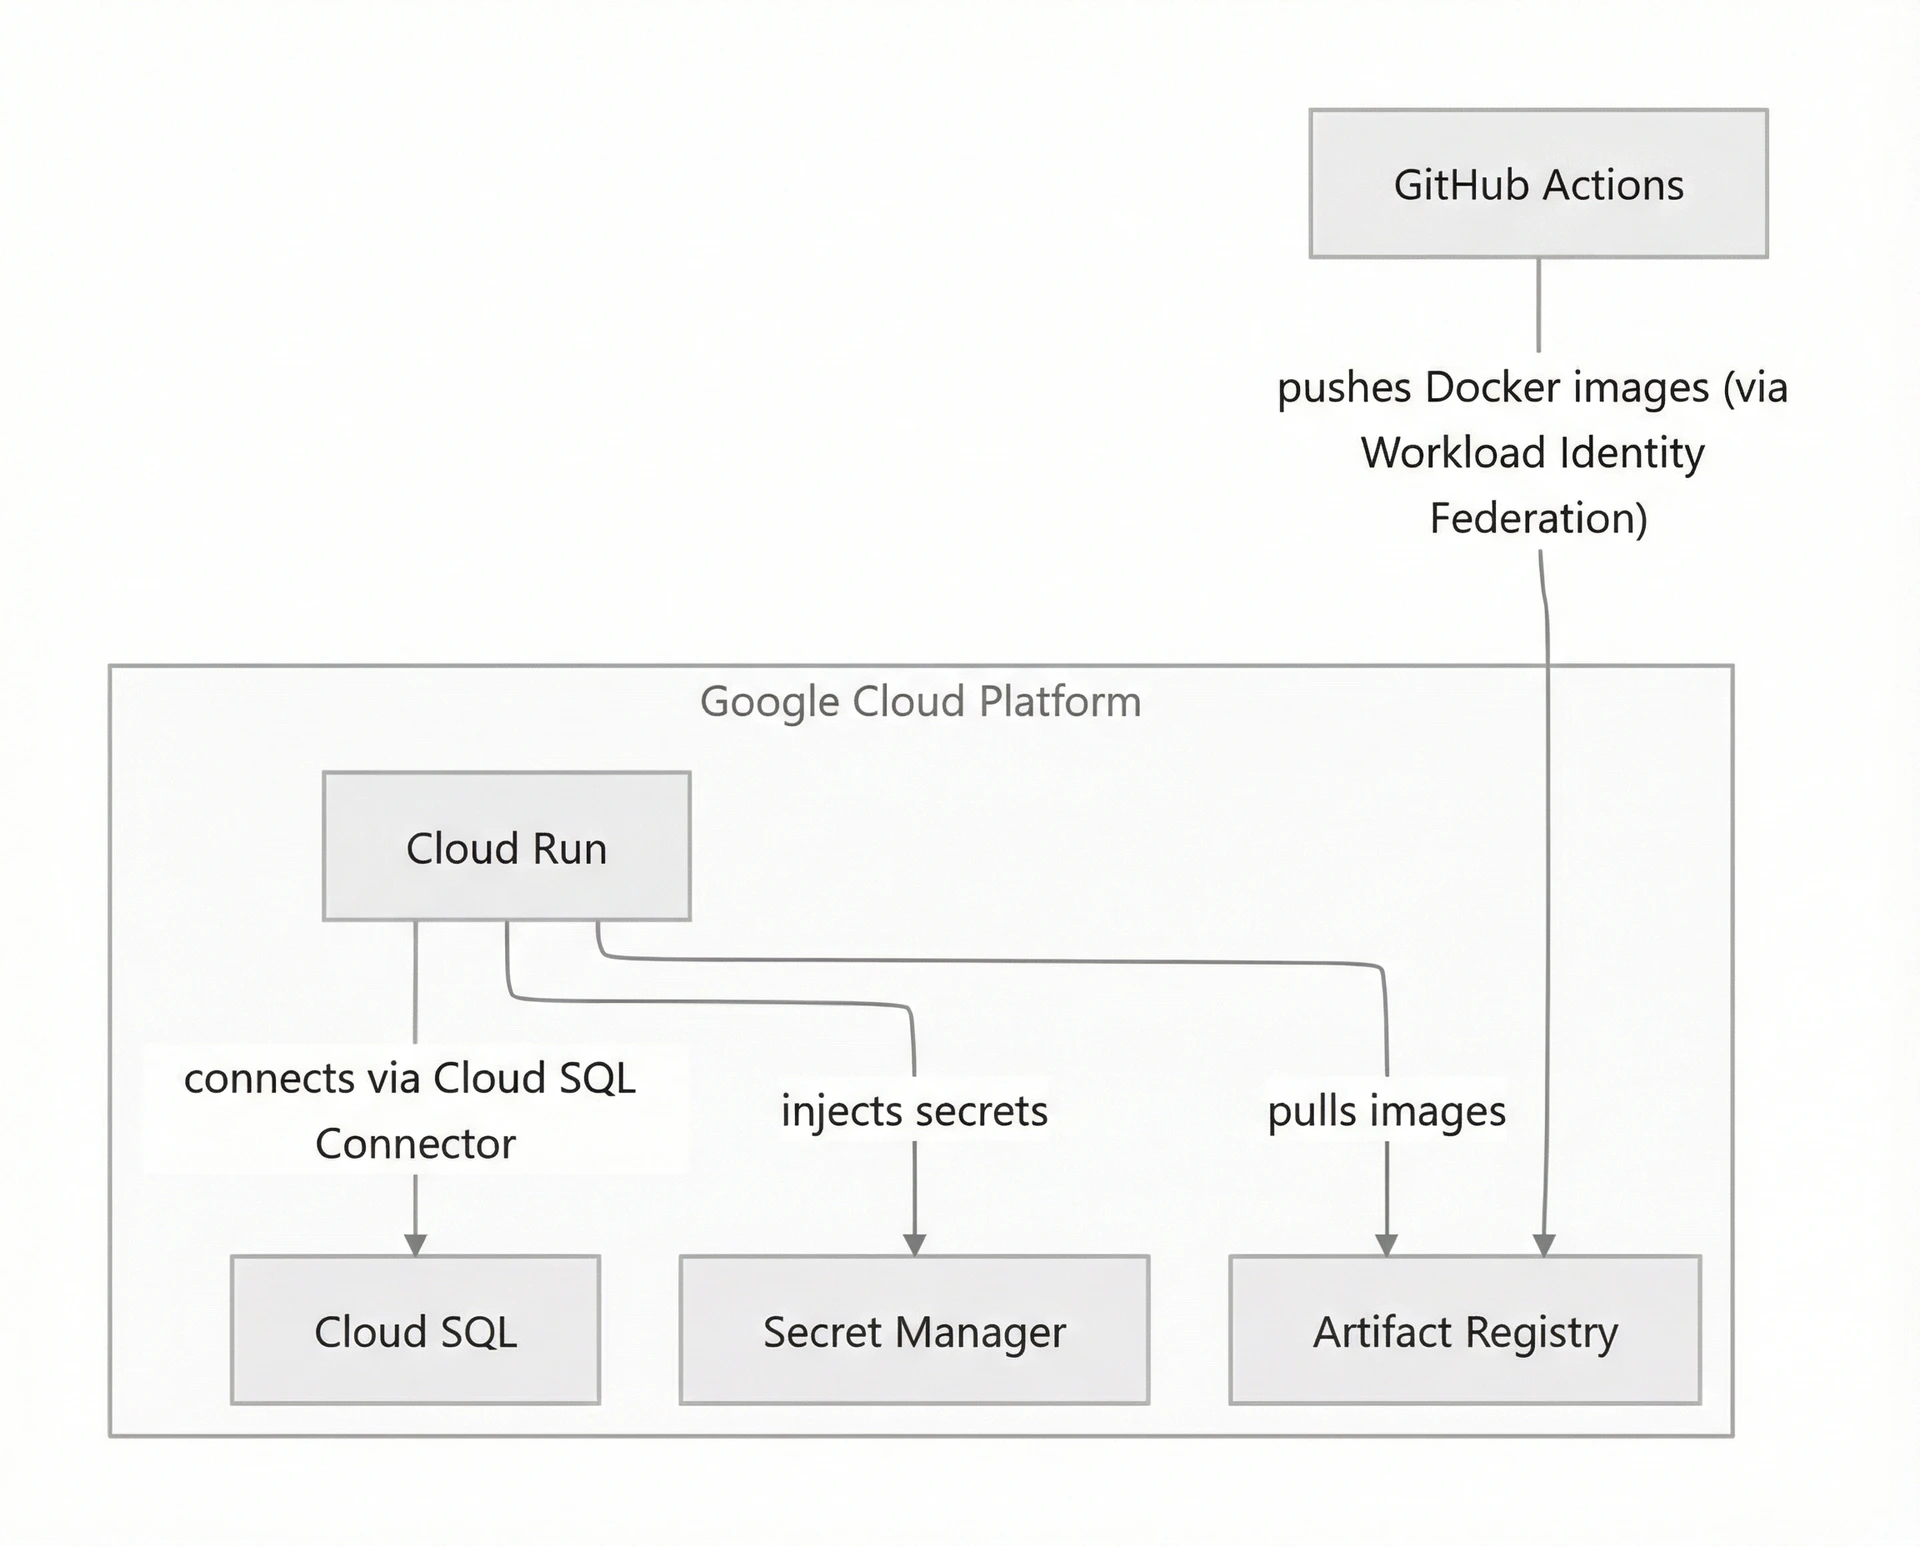 Image 1: A flowchart showing the interaction between GitHub Actions and Google Cloud Platform services like Artifact Registry, Secret Manager, Cloud Run, and Cloud SQL.
First, we will define some shell variables that will be reused in subsequent commands. This makes the scripts cleaner and easier to adapt.
Enabling Required APIs
By default, most GCP services are disabled to prevent accidental usage. We must explicitly enable the APIs for the services we intend to use.
Each of these APIs corresponds to a core service in our architecture:
run.googleapis.com: The Cloud Run API for deploying and managing containerized services.sqladmin.googleapis.com: The Cloud SQL Admin API for managing our PostgreSQL database.artifactregistry.googleapis.com: The Artifact Registry API for storing and managing our Docker images.secretmanager.googleapis.com: The Secret Manager API for securely storing our API keys and credentials.iam.googleapis.comandiamcredentials.googleapis.com: The Identity and Access Management APIs, which are essential for authentication and authorization.cloudresourcemanager.googleapis.com: The API for managing project-level resources.
Creating Artifact Registry
Artifact Registry is Google’s managed container registry for storing and managing Docker images and other artifacts [4]. In our CI/CD pipeline, it serves as the bridge between the build and deployment stages. When GitHub Actions successfully builds a new Docker image, it pushes that image to Artifact Registry. Later, when we deploy to Cloud Run, the service pulls the specified image from this registry.
This command creates a new Docker repository named nova-mcp in our specified region. Our images will be pushed to a URL with the format: $REGION-docker.pkg.dev/$PROJECT_ID/nova-mcp/nova-mcp-server:tag.
Creating Cloud SQL Instance
Cloud SQL provides a fully managed PostgreSQL database service that handles tasks such as backups, security patches, and replication. For our agent, we will create a minimal instance that is suitable for development and initial production use.
- First, create the PostgreSQL instance.
This configuration specifies PostgreSQL 16 on a db-f1-micro tier, which is the smallest and most cost-effective option (around $10/month). We are using SSD storage for better performance and have scheduled backups and maintenance for off-peak hours.
- Next, create the database and a dedicated user for our application.
- Finally, retrieve the instance connection name. Cloud Run uses this unique identifier to establish a secure connection to the database.
The output will be in the format PROJECT_ID:REGION:INSTANCE_NAME.
Creating Secrets in Secret Manager
Secret Manager is Google Cloud’s centralized service for storing sensitive data, such as API keys, passwords, and certificates [5]. Using Secret Manager allows us to inject secrets into our Cloud Run containers at runtime, avoiding the need to hardcode them in our repository or CI/CD configuration. It also provides an audit trail of secret access and allows easy credential rotation without redeploying our application.
We use echo -n to prevent adding a trailing newline to the secret value. The --data-file=- flag tells the command to read the secret from stdin, preventing it from being saved in your shell history.
Workload Identity Federation Identity Federation
Workload Identity Federation is a modern security mechanism that enables external systems, such as GitHub Actions, to authenticate with GCP without using long-lived service account keys [6]. This is far more secure than the traditional method of storing a JSON key file as a GitHub secret.
The process involves two key GCP concepts: Service Accounts , which are special accounts for applications, and Workload Identity Federation , which allows an external identity provider (such as GitHub) to exchange its own tokens for short-lived GCP credentials.
- First, we create a Workload Identity Pool to act as a container for our external identities.
- Next, we create an OIDC provider within the pool. This configures GCP to trust OIDC tokens issued by GitHub Actions.
The --attribute-condition is a key security feature that restricts authentication to only those repositories owned by your specified GitHub organization or user.
- We also create a GitHub Actions service account to impersonate when performing deployment tasks.
- Grant this service account the necessary permissions to deploy our agent.
- Finally, establish the trust relationship that allows GitHub Actions from your repository to impersonate this service account.
The principalSet identifier ensures that only workflows running in your specified repository can assume this role.
Configuring Cloud Run Service Account
The Cloud Run service itself also needs an identity to access other GCP resources at runtime. We will grant the necessary permissions to the default service account used by Cloud Run.
Getting Values for GitHub Configuration
After running all the setup commands, you need to collect a few key values to configure your GitHub repository.
These values will be used as repository variables in our GitHub Actions workflow. We’ll see how to configure them in the next section.
The Manual Deployment Pipeline
We are now ready to deploy the agent. We will begin with a manual deployment pipeline, which provides explicit control over when deployments occur. This is valuable for initial setup, testing infrastructure changes before enabling automation, and for environments where fully automatic deployment is not desired.
Configuring GitHub Repository Variables
First, you must configure the values from the previous section as GitHub repository variables. In your GitHub repository, navigate to Settings → Secrets and variables → Actions, then click on the “Variables” tab. Here you can add repository variables.
| Variable Name | Description | Example |
|---|---|---|
GCP_PROJECT_ID | Your GCP project ID | my-project-123 |
GCP_REGION | Your preferred region | us-central1 |
CLOUD_SQL_INSTANCE | Cloud SQL connection name | my-project:us-central1:nova-postgres |
GCP_WORKLOAD_IDENTITY_PROVIDER | Full provider resource name | projects/123456/locations/global/workloadIdentityPools/github-actions-pool/providers/github-provider |
GCP_SERVICE_ACCOUNT | Deployer service account email | github-actions-deployer@my-project.iam.gserviceaccount.com |
Table 1: GitHub repository variables for deployment.
Understanding the Pipeline Structure
We define the manual deployment pipeline in the file .github/workflows/deploy-nova-mcp.yml. Let’s break down its structure and key components.
- The main
deployjob runs on anubuntu-latestrunner. Thepermissionsblock is essential for Workload Identity Federation.id-token: writeallows the workflow to request an OIDC token from GitHub, which is then exchanged for temporary GCP credentials [8].
- The first steps check out the code and authenticate to Google Cloud using the
google-github-actions/authaction. This action handles the secure OIDC token exchange, so no static keys are needed.
- Next, we configure Docker to authenticate with Artifact Registry, build the Docker image, and push it. The image is tagged with both the unique Git commit SHA for precise versioning and the
latesttag for convenience.
- The core deployment step uses the
google-github-actions/deploy-cloudrunaction. This is where we define the service’s runtime configuration.
The flags define scaling parameters (min-instances, max-instances) and resource allocation. --allow-unauthenticated makes the service publicly accessible, as our app handles its own authentication. --add-cloudsql-instances enables the secure connection to our database. The secrets block maps secrets from Secret Manager to environment variables in the container.
- Finally, the pipeline prints the deployment URL and runs a simple smoke test to confirm the service is responsive.
Triggering the Manual Pipeline
Once this workflow file is committed to your repository, you can trigger a deployment from the GitHub UI:
- Navigate to your repository on GitHub and click the Actions tab.
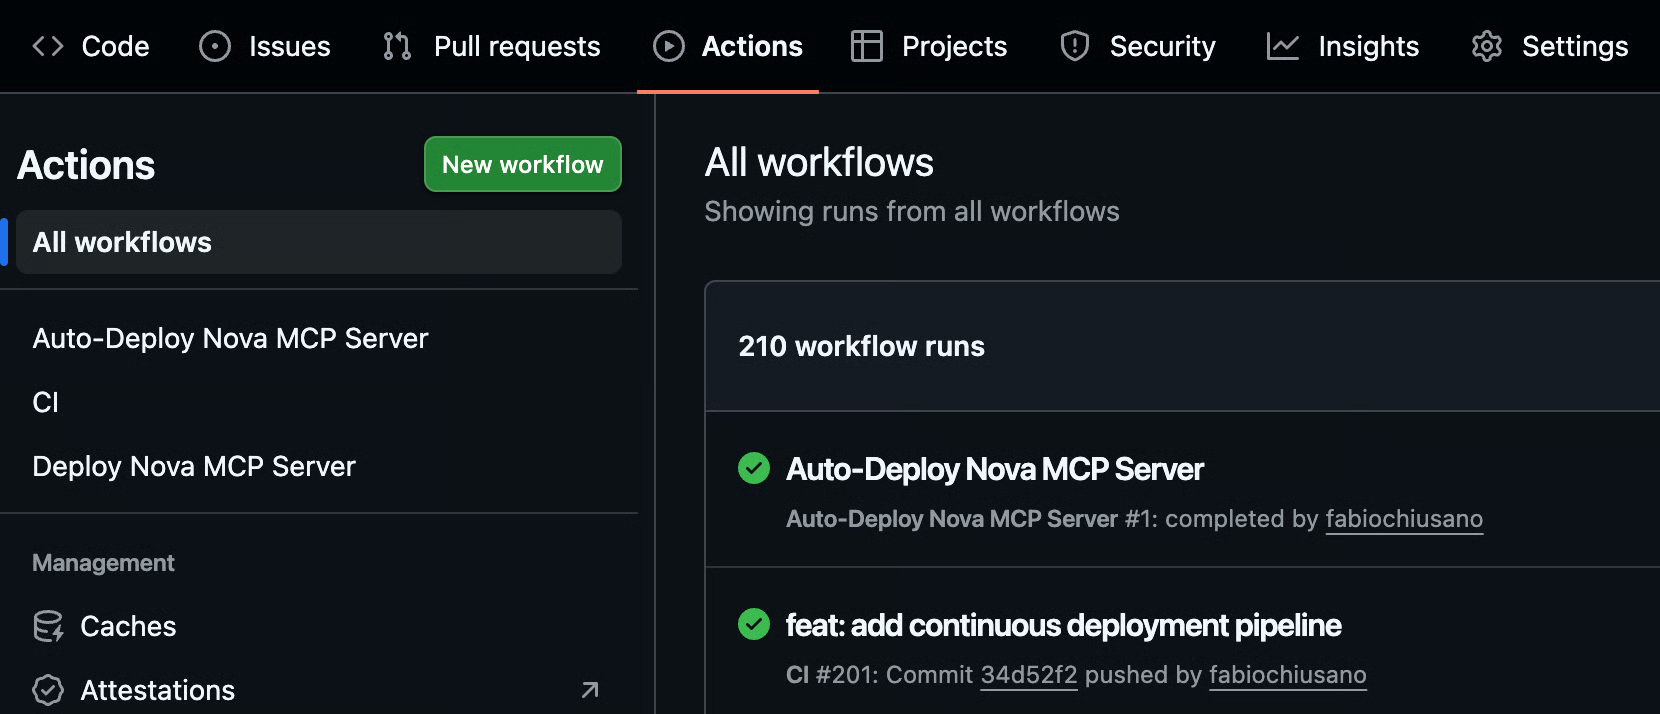
- In the left sidebar, select the Deploy Nova MCP Server workflow.
- Click the Run workflow dropdown button that appears on the right.
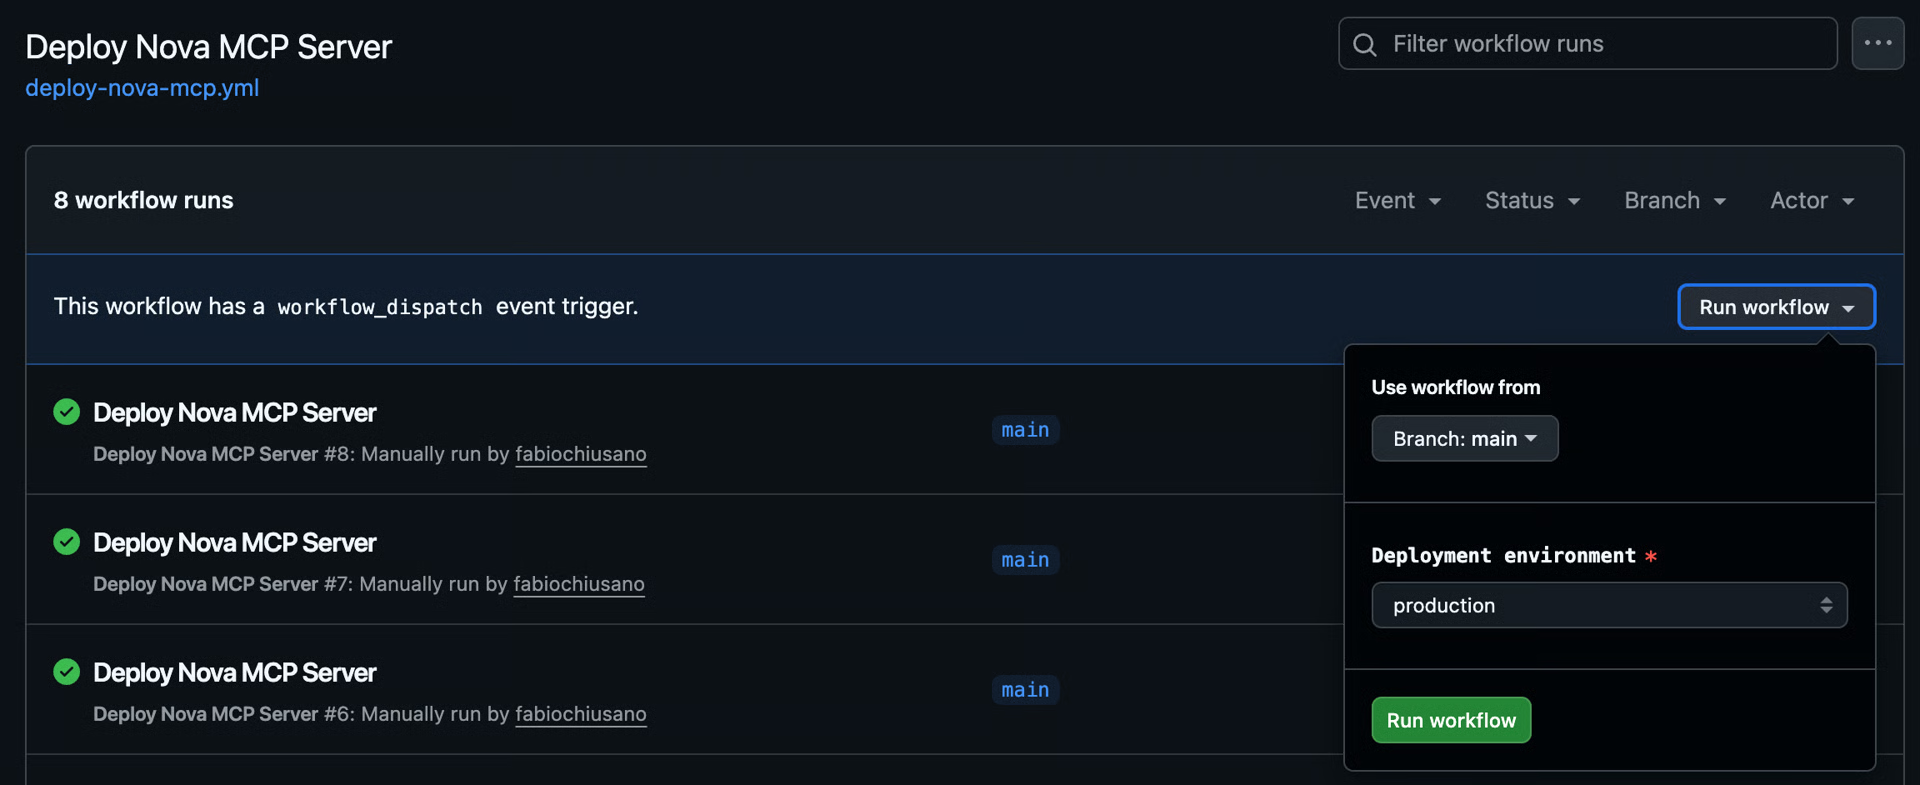
- Ensure the correct branch (usually
main) is selected. - Click the green Run workflow button to start the deployment.
You can click a running job to view its logs in real time. A successful deployment typically completes in 2-4 minutes.
Understanding Cloud Run
After your first successful deployment, the Cloud Run console becomes your primary interface for observing and managing your agent in production. Understanding its core concepts is essential for effective monitoring, debugging, and operation.
What is a Cloud Run Service
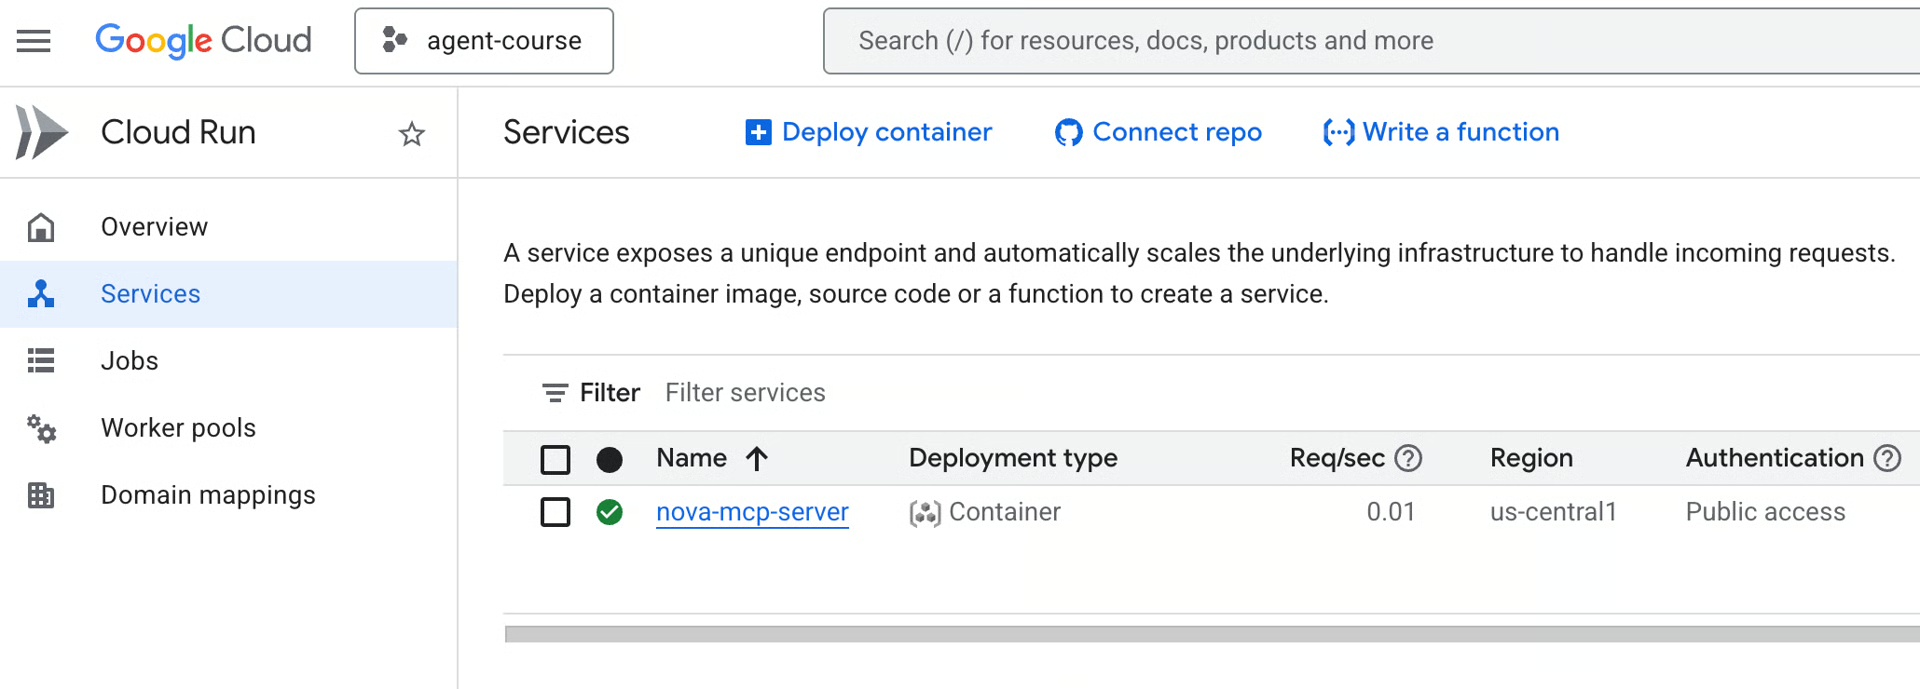
Cloud Run is Google’s fully managed serverless platform for running containers [9]. You provide a container image, and Cloud Run handles the underlying infrastructure, including server provisioning, load balancing, TLS certificates, scaling, and security patching. A service is the fundamental resource in Cloud Run; it represents your long-running application that responds to HTTP requests. Our research agent is deployed as a single service named nova-mcp-server.
Revisions and Version Management
Every time you deploy a change to a Cloud Run service, a new revision is created. A revision is an immutable, versioned snapshot of your service’s complete configuration at that point in time, including the container image, environment variables, resource limits, and scaling settings. Cloud Run maintains a history of these revisions, which is what enables instant rollbacks and gradual traffic splitting.
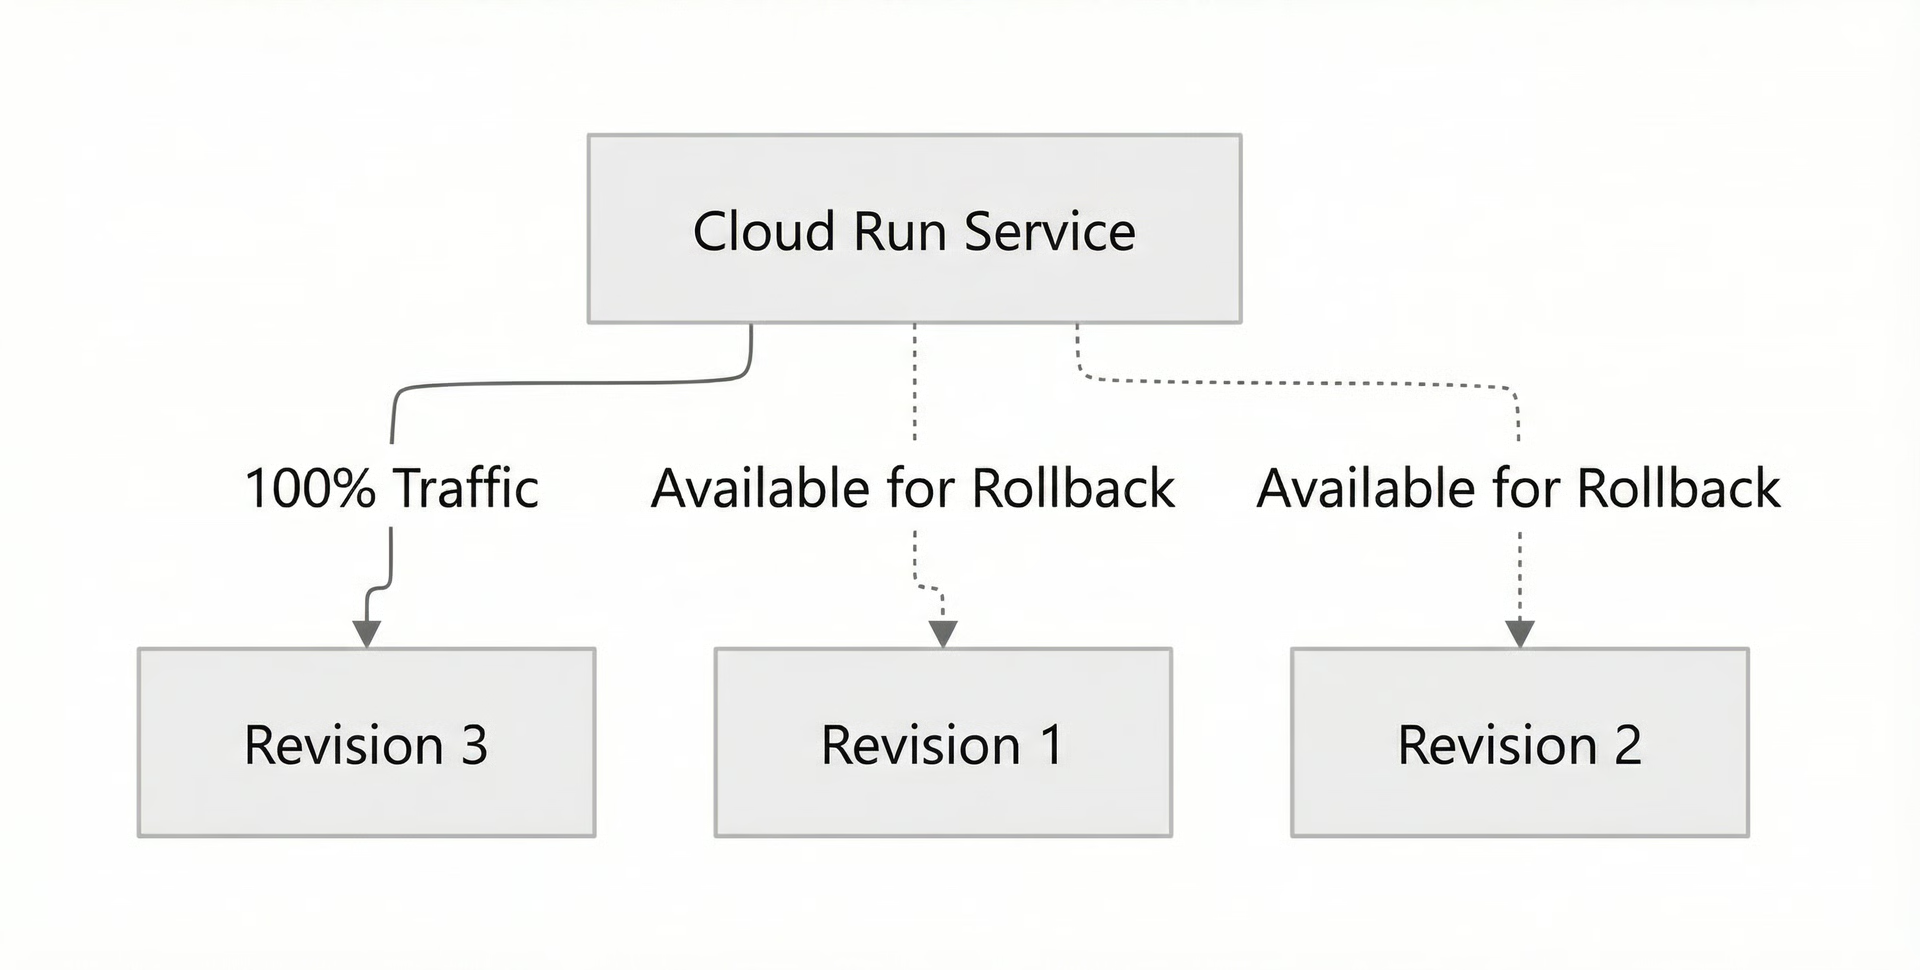 Image 2: A flowchart illustrating a Cloud Run service with multiple revisions and traffic distribution.
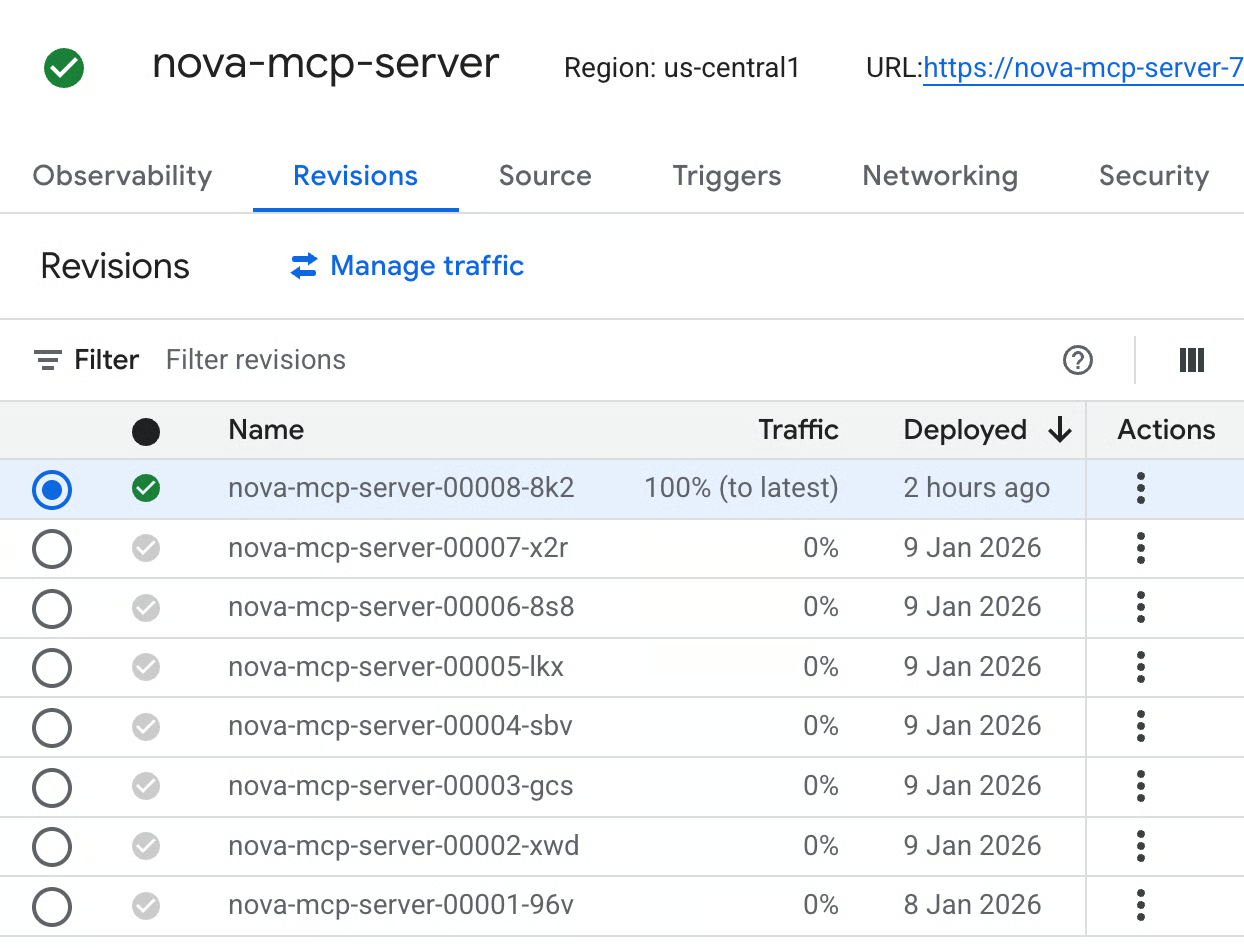 Revisions of the “nova-mcp-server” Cloud Run service.
If a new deployment introduces a bug, you can immediately roll back to a previous, stable revision by redirecting 100% of the traffic to it. This can be done in seconds via the console or a single gcloud command, providing a critical safety net for production operations. By splitting traffic across multiple revisions, this capability can also enable more advanced deployment strategies, such as canary releases or A/B testing.
Autoscaling: From Zero to N
Cloud Run automatically scales the number of container instances up or down based on incoming traffic. This behavior is governed by a few key parameters you configure:
--min-instances: The minimum number of instances to keep running at all times. Our configuration of0enables scale-to-zero , meaning Cloud Run will terminate all instances when there is no traffic, eliminating costs during idle periods.--max-instances: The maximum number of instances the service can scale out to. This acts as a safety rail to control costs and prevent your service from overwhelming downstream dependencies, such as a database.--concurrency: The maximum number of concurrent requests each container instance can handle. When instances approach this limit, the autoscaler starts new ones to handle the load.
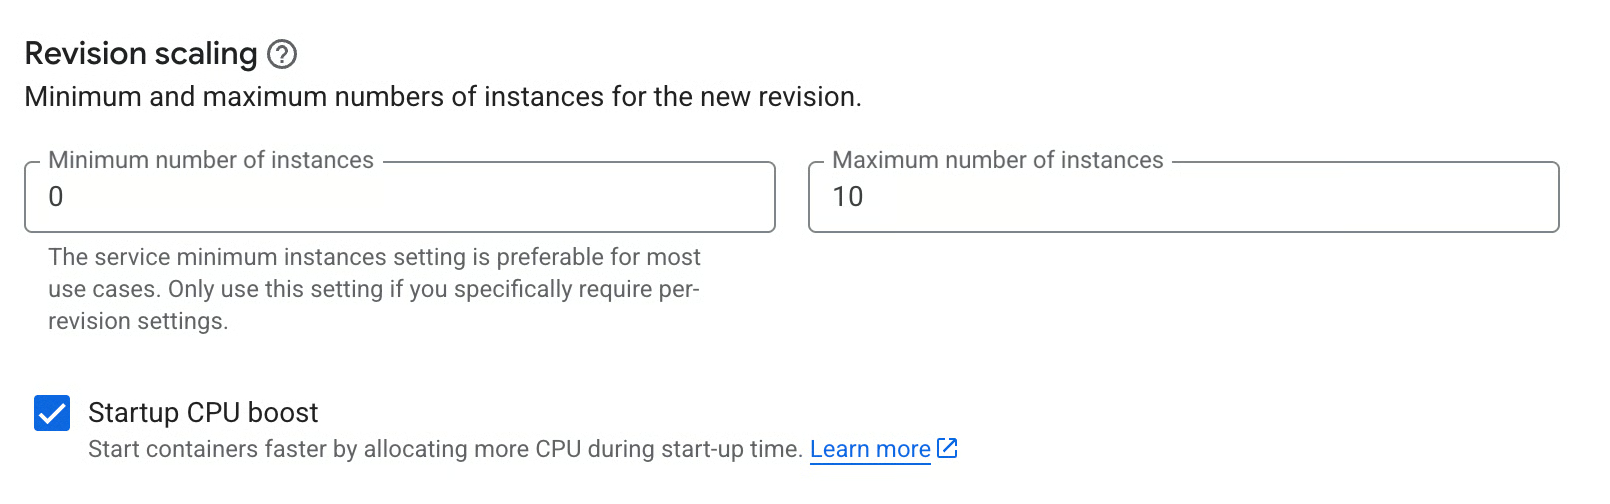 Autoscaling options from the Cloud Run console.
When a service has scaled to zero, the first request to arrive after an idle period will trigger a cold start. This process, which involves starting a new container instance, can add a few seconds of latency to that initial request. For many AI agent use cases with sporadic traffic, this is an acceptable tradeoff for the cost savings. For latency-sensitive applications, you can set --min-instances=1 to keep at least one instance always ready, but at the cost of continuous billing [10].
Health Checks and Startup Probes
Cloud Run uses health checks to ensure that container instances are healthy and ready to receive traffic [11]. There are two main types of probes:
- Startup Probe: This check runs when a container first starts. An instance is not considered “ready” and will not be added to the load balancer’s pool until this probe passes.
- Liveness Probe: This check runs periodically on running instances. If an instance fails its liveness probe, Cloud Run assumes it is in an unrecoverable state and will restart it.
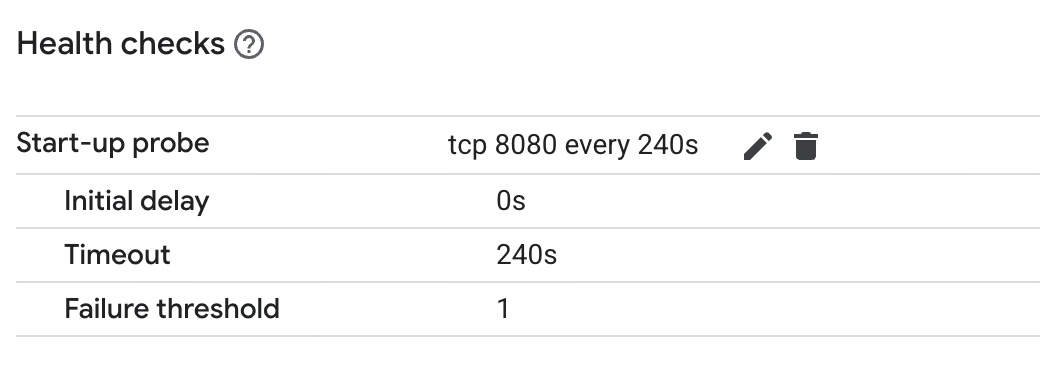 Start-up probe checks as configured from the Cloud Run console.
By default, Cloud Run uses a simple TCP probe that considers a container healthy as soon as it starts listening on its configured port. This works perfectly for our agent, as our application code ensures that database migrations complete before the web server starts listening for requests.
The Service URL and Load Balancing
Each Cloud Run service is automatically assigned a unique, stable HTTPS URL. This URL points to a Google-managed global load balancer that distributes incoming requests across all healthy instances of your service. This managed load balancer handles several critical functions for you, including TLS termination with automatically provisioned and renewed certificates, routing requests to healthy instances, and evenly distributing load.
- The first job,
check-enabled, acts as a gatekeeper. It checks a GitHub repository variableAUTO_DEPLOY_ENABLEDto see whether automatic deployments are enabled. This variable serves as a “kill switch” or feature flag for the entire pipeline.
- The
deployjob contains the actual deployment logic, which is identical to our manual pipeline. However, it includes anifcondition that makes it dependent on thecheck-enabledjob. It will only run if the CI workflow was successful AND theAUTO_DEPLOY_ENABLEDvariable istrue.
- A final
skippedjob runs if the deployment conditions are not met. This provides clear visibility in the GitHub Actions UI, explaining exactly why a deployment was skipped.
Automatic Trigger After CI
The trigger mechanism is the core of this automated pipeline.
The workflow_run event triggers this workflow whenever the specified workflow (“CI”) completes on the main branch [15]. This creates a robust dependency chain: code is only deployed after it has successfully passed all our automated quality checks.
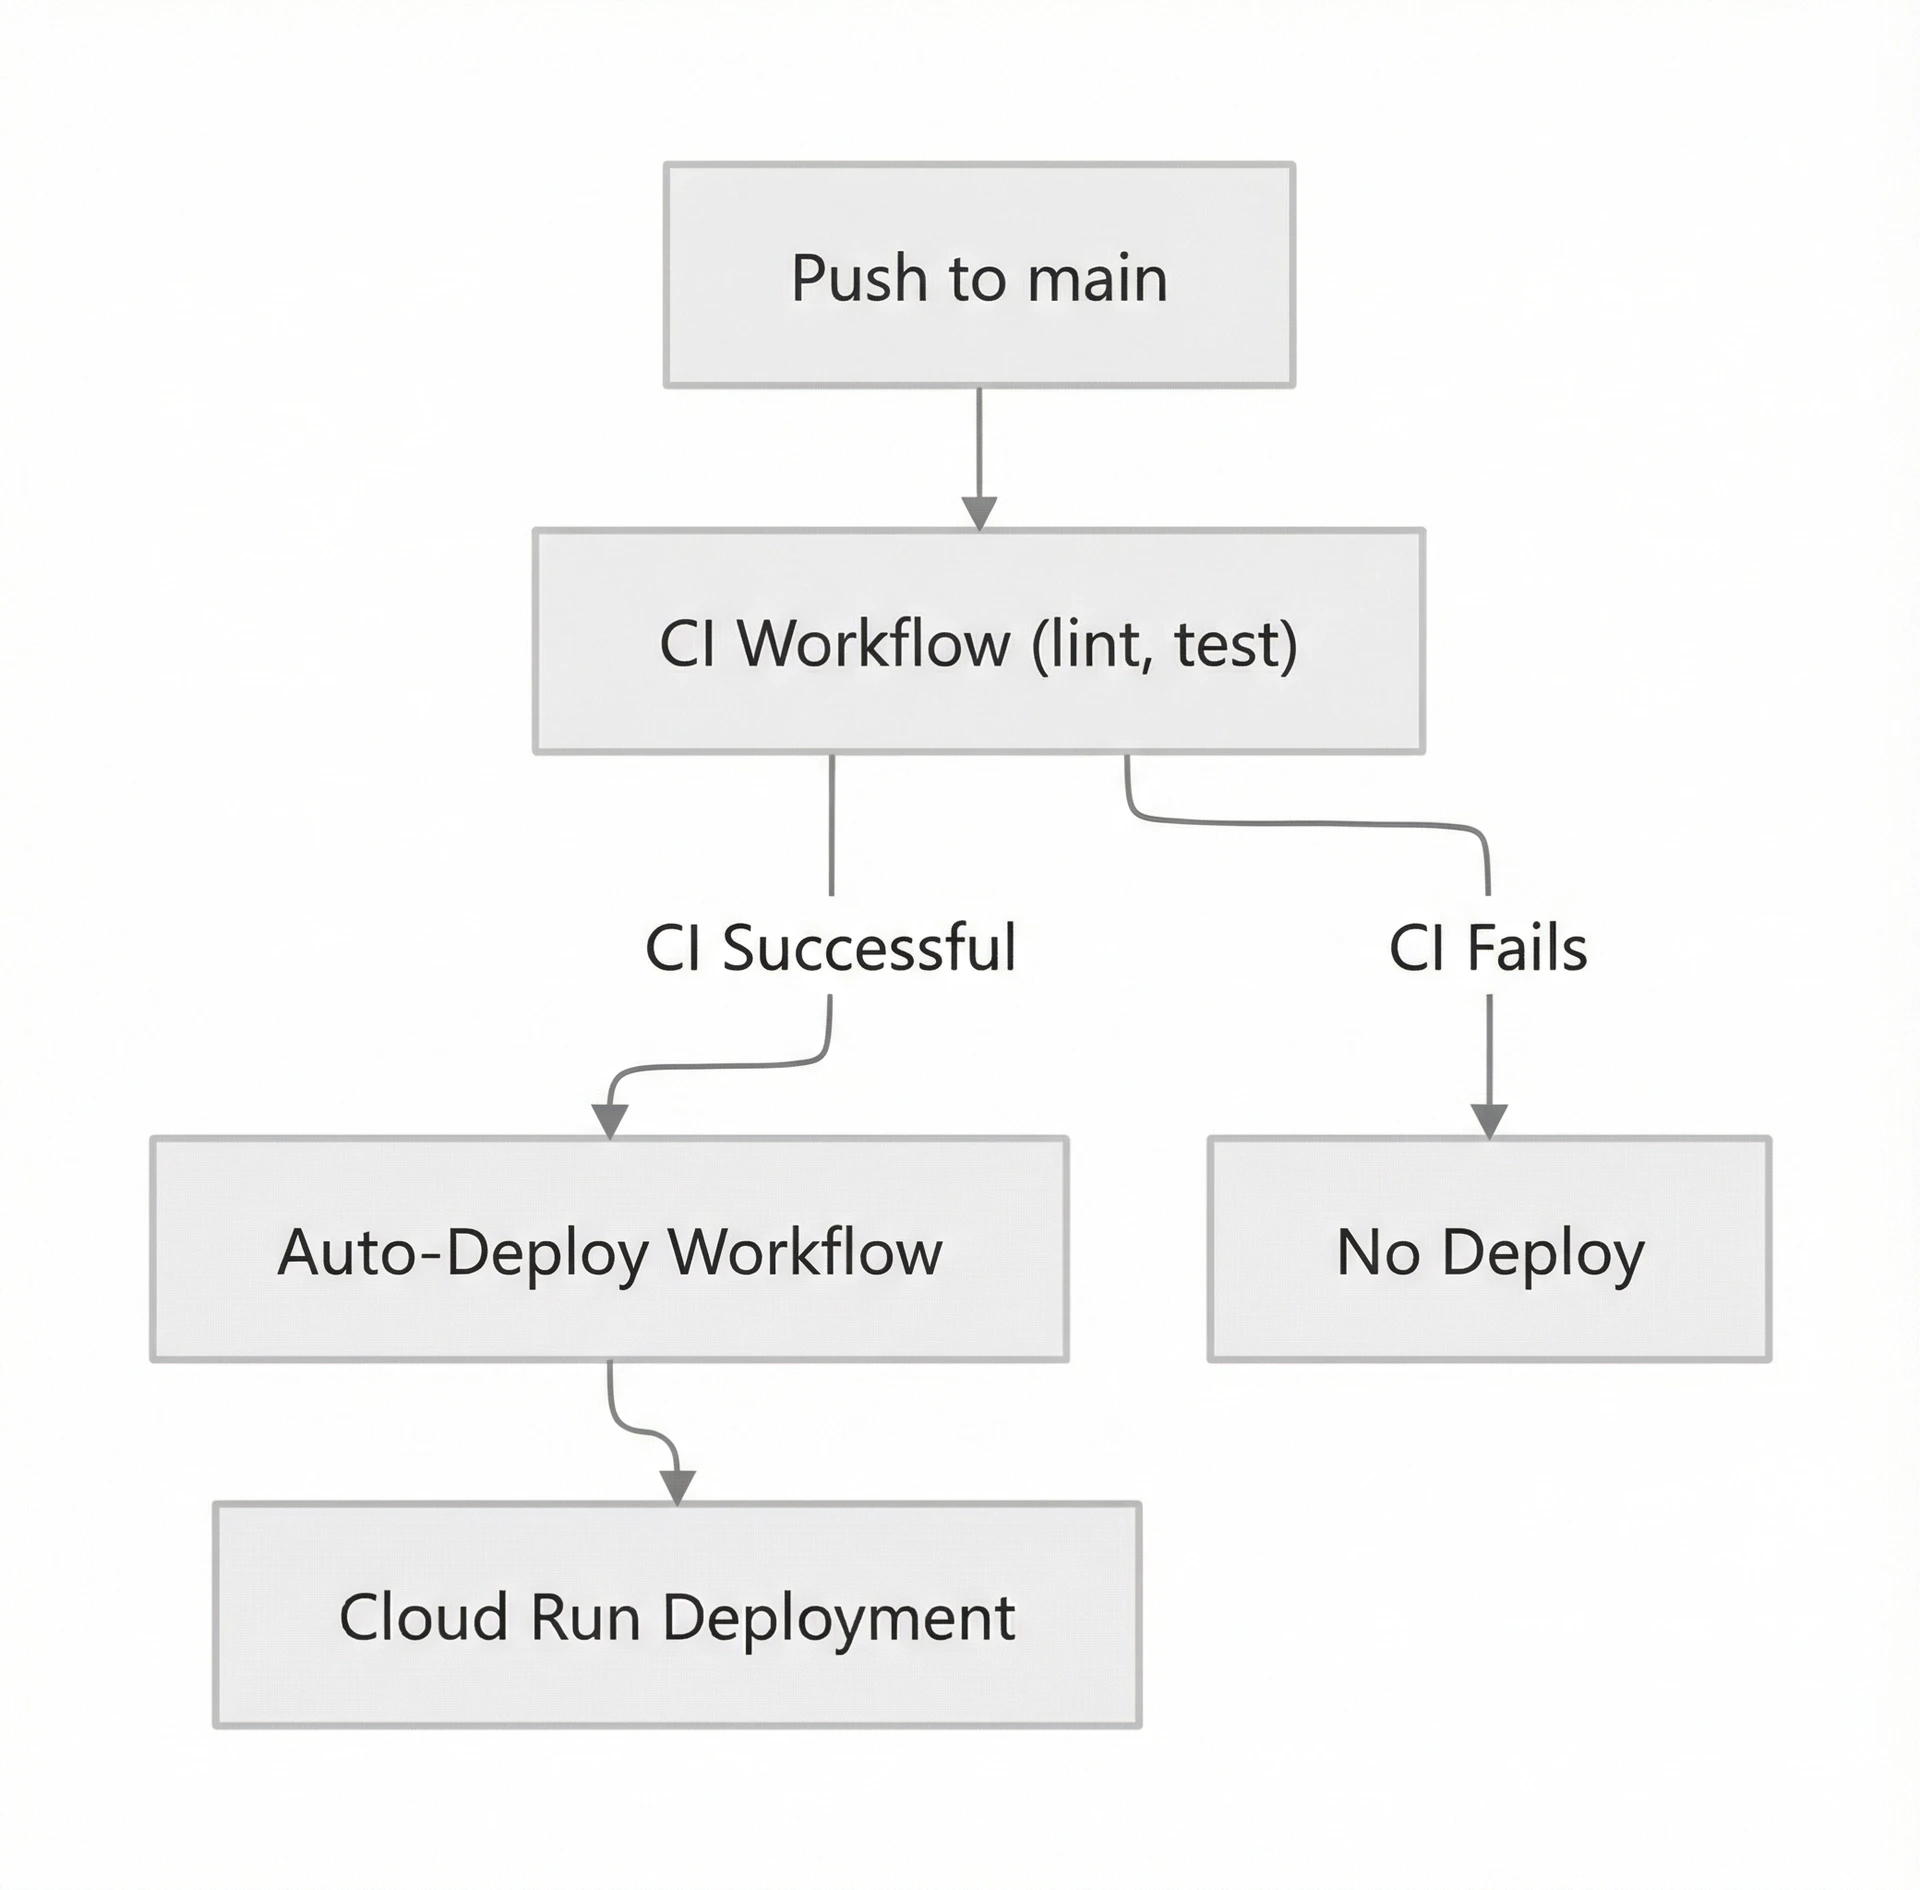 Image 4: A flowchart illustrating a continuous deployment chain triggered by a successful Continuous Integration (CI) workflow.
The Feature Flag: AUTO_DEPLOY_ENABLED
Continuous deployment is powerful, but there are times when you need to pause it, such as during a production incident or before a large, coordinated release. The AUTO_DEPLOY_ENABLED repository variable acts as a feature flag or “kill switch” for the pipeline. By setting this variable to true in your GitHub repository settings (Settings → Secrets and variables → Actions → Variables), you enable automatic deployments. Changing it to any other value will cause the check-enabled job to output should_deploy=false, pausing the pipeline without requiring any code changes.
Referencing the Triggering Commit
It is essential that the CD pipeline deploys the exact version of the code that the CI pipeline tested. The workflow_run event context provides the commit SHA of the triggering workflow via github.event.workflow_run.head_sha.
By explicitly checking out this ref, we avoid a potential race condition where a newer, untested commit could be pushed to main while the CI workflow is running. This guarantees consistency between what was tested and what is deployed.
Pros and Cons of Continuous Deployment
Continuous deployment is a powerful practice, but it is not suitable for every situation. It is important to understand the tradeoffs.
Here are some of its advantages:
- Faster Iteration: Changes reach production in minutes, enabling rapid feedback and experimentation, especially for iterative tasks like prompt engineering.
- Smaller Releases: Each deployment contains fewer changes, making it easier to identify the cause of a bug and safer to roll back.
- Reduced Manual Work: Automation eliminates manual deployment steps, reducing human error and freeing up developer time.
- Continuous Feedback: Issues are discovered quickly because changes are deployed frequently, shortening the feedback loop from development to production.
Here are some of its disadvantages:
- Requires Strong CI: Your test suite must be comprehensive and reliable. If your tests are flaky or have poor coverage, you will automatically deploy bugs to production.
- Requires Monitoring: You must have robust monitoring and alerting in place to quickly detect issues that automated tests miss.
- Not Suitable for All Changes: Major changes, like breaking API updates or complex database migrations, often require manual coordination and should not be deployed automatically.
For our AI agent, which is in active development and iteration, the benefits of CD are significant. The AUTO_DEPLOY_ENABLED flag gives us the flexibility to pause automation when we need more control, providing the best of both worlds.
Connecting from Cursor
Once your research agent is deployed to Cloud Run, you can connect to it from Cursor just as you did with the local agent in Lesson 32. The cloud agent will behave exactly the same way: it will request authentication through Descope, and once you log in, all the agent’s tools will be available in Cursor.
- In your
mcp.jsonconfiguration file, add the cloud agent configuration:
- With authentication: When you attempt to connect to the cloud agent in Cursor, the authentication flow will trigger automatically.
- Your browser will open a new tab and redirect you to the Descope login page.
- After you log in and grant consent, you will be redirected back, and Cursor will receive an authentication token.
- The agent’s tools will now be available in Cursor, and you can start a research session. The token is cached, so you will not need to log in again until it expires.
The key difference from the local setup is that you are now connecting to the Cloud Run HTTPS endpoint instead of http://localhost:8000. The authentication mechanism, user experience, and available tools remain identical. Your research sessions, files, and data are stored in the Cloud SQL database and are accessible from anywhere, as long as you authenticate with the same user account.
Conclusion
This lesson completes the DevOps journey for AI agents that we began in Lesson 31. We have now constructed a complete, automated pipeline that takes code from a developer’s commit all the way to a scalable, monitored production environment. This end-to-end system represents the culmination of our efforts in production engineering, transforming our agent from a local prototype into a professional, deployable service.
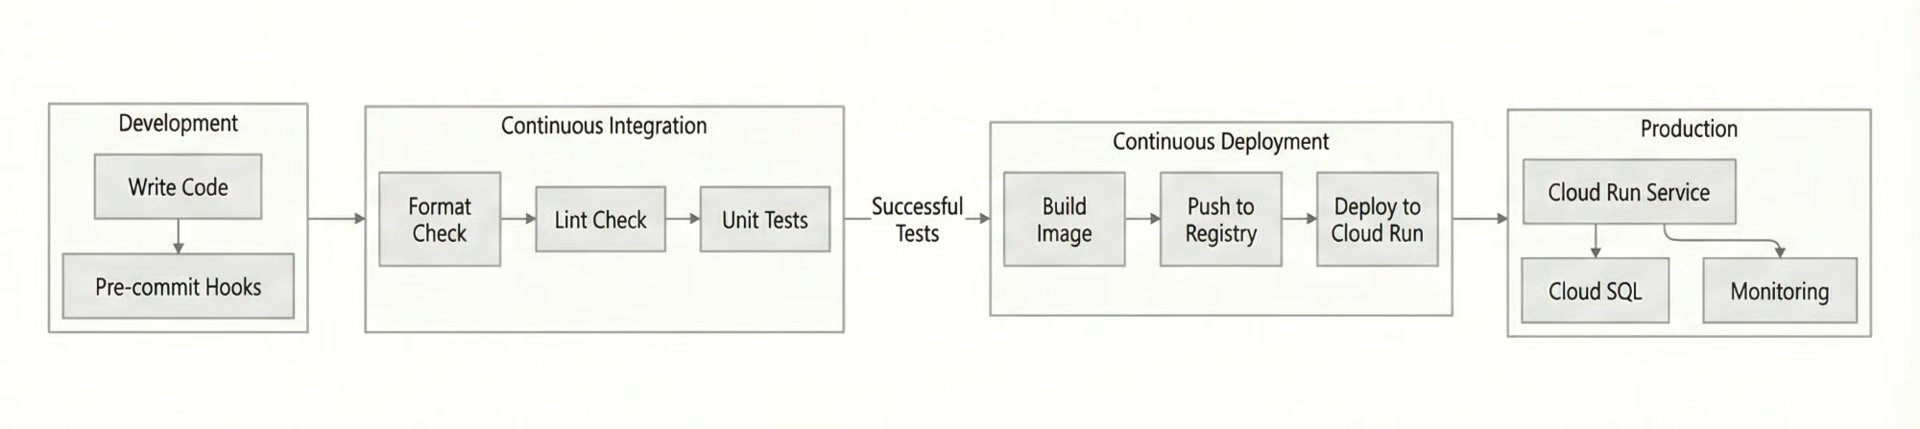 Image 5: A comprehensive flowchart illustrating the complete CI/CD pipeline from development to production.
Over the past four lessons, we have systematically built a production-ready infrastructure for shipping AI systems.
The system we have built is robust and flexible. It can scale from a single developer experimenting with prompts to a team shipping updates multiple times per day. Our command-line approach to infrastructure provides reproducibility without the steep learning curve of full IaC (Infrastructure-as-Code) tools like Terraform. Workload Identity Federation ensures our pipeline is secure by eliminating the need for long-lived credentials. Cloud Run’s serverless nature provides cost-effective autoscaling and safe, zero-downtime deployments. Finally, our continuous deployment pipeline, complete with its feature flag, gives us both the speed of automation and the safety of manual control.
This wraps up the theory portion of the course. You now have the end-to-end foundation to build, evaluate, and deploy AI agents in a professional setting. In the final lesson, we’ll introduce the capstone project, where you’ll apply everything you’ve learned: designing an agent with a solid architecture, implementing evaluation-driven development, and deploying it to production with a complete CI/CD pipeline. This is where the pieces come together, and where you demonstrate command of the full agent development lifecycle.
References
- Google. (n.d.). Infrastructure as code with Terraform on Google Cloud. Google Cloud. cloud.google.com/docs/terraform
- HashiCorp. (n.d.). Introduction to Terraform. Terraform. terraform.io
- Google. (n.d.). Install the gcloud CLI. Google Cloud. cloud.google.com/sdk/docs/install
- Google. (n.d.). Artifact Registry documentation. Google Cloud. cloud.google.com/artifact-registry/docs
- Google. (n.d.). Secret Manager documentation. Google Cloud. cloud.google.com/secret-manager/docs
- Google. (n.d.). Workload Identity Federation. Google Cloud. cloud.google.com/iam/docs/workload-identity-federation
- GitHub. (n.d.). Events that trigger workflows: workflow_dispatch. GitHub Docs. docs.github.com/en/actions/using-workflows/events-that-trigg...
- GitHub. (n.d.). About security hardening with OpenID Connect. GitHub Docs. docs.github.com/en/actions/deployment/security-hardening-you...
- Google. (n.d.). Cloud Run documentation. Google Cloud. cloud.google.com/run/docs
- Google. (n.d.). About instance autoscaling. Google Cloud. cloud.google.com/run/docs/about-instance-autoscaling
- Google. (n.d.). Configuring health checks. Google Cloud. cloud.google.com/run/docs/configuring/healthchecks
- Google. (n.d.). Logging and viewing logs. Google Cloud. cloud.google.com/run/docs/logging
- Google. (n.d.). Monitoring Cloud Run. Google Cloud. cloud.google.com/run/docs/monitoring
- Google. (n.d.). Rollouts, rollbacks, and traffic migration. Google Cloud. cloud.google.com/run/docs/rollouts-rollbacks-traffic-migration
- GitHub. (n.d.). Events that trigger workflows: workflow_run. GitHub Docs. docs.github.com/en/actions/using-workflows/events-that-trigg...