Lesson 33: Preparing For Deployment: Database and File Download/Upload
In Lesson 32, we took our first real step toward production readiness: we added OAuth 2.0 authentication with Descope and containerized the research agent with Docker. We also laid out a four-part plan to turn a local prototype into a cloud-native application: (1) stateless data storage, (2) user authentication, (3) file uploads and downloads, and (4) containerization. With authentication and Docker done, this lesson focuses on what’s left: replacing the local filesystem with a PostgreSQL database, and adding file-transfer workarounds that the MCP specification does not yet support.
The transition from file-based to database-backed storage changes how our agent manages state. In the research agent implementation, research_agent_part_2, every piece of data lived in a .nova/ folder on the local filesystem. This approach works for single-user development but fails in production.
In a serverless environment like Cloud Run, container instances are ephemeral; they can be replaced at any moment, and anything written to the local filesystem disappears with them. The problem gets worse with multiple users. Without isolation, their data collides and corrupts.
By moving all states to a PostgreSQL database, we achieve two essential goals. First, data persists beyond the lifetime of any single container. Second, each user’s data is strictly isolated from others. This lesson also introduces an additional feature enabled by using a database: rate limiting for MCP tools. Since each tool call can trigger expensive LLM API requests, we need a way to track and limit usage per user. The database makes this straightforward by recording every tool invocation and checking usage counts before allowing new calls.
Choosing a Database
The first significant decision when moving from file-based to database-backed storage is choosing the right database technology. Before committing to a specific solution, it is worth considering the alternatives.
Why PostgreSQL
After evaluating several options (SQLite, MongoDB, etc), PostgreSQL is the practical choice for our research agent. While other databases could work for this use case, PostgreSQL offers the right balance of features and simplicity for our needs.
PostgreSQL works seamlessly both locally and with Google Cloud SQL, which we’ll use in production. This consistency across environments simplifies development and deployment. It provides ACID transactions for data integrity, native JSON/JSONB columns for storing structured data like extracted URLs, and high-performance asynchronous support through the asyncpg driver. The large PostgreSQL community means extensive documentation and mature tooling, including SQLAlchemy for object-relational mapping and Alembic for database migrations [1], [2], [3], [5], [11].
For our agent, PostgreSQL is a solid, well-supported choice that handles our requirements without overcomplicating the architecture.
Database Schema Design
Now, we will design a schema that captures all the data our research agent needs to persist. The schema must replace every file that the research agent stored in the .nova/ folder while also supporting multi-user access by associating each record with a user ID.
The Article Model
The Article model (research_agent_part_3/src/db/models.py) is the central entity in our schema that replaces the research folder and its .nova/ subdirectory. Every piece of data that was previously a file now becomes a column in this table.
- We start by defining the class, table name, and primary key. We use a UUID for the
idto allow for client-side generation and prevent information leakage.
- Next, we add columns for user association and the core content: the guideline text and the workflow status. The
user_idis indexed for fast lookups.
- We then define columns that replace the files previously stored in the
.nova/directory. A native JSON column holds the extracted URLs, whileTextcolumns store the various markdown outputs.
- Finally, we add automatic timestamps to track when records are created and updated.
The key design decisions in this model are:
- UUID Primary Key: Using UUIDs instead of auto-incrementing integers allows us to generate IDs client-side and prevents information leakage about the number of articles. While UUIDs take up more space (16 bytes vs. 8 for a bigint), the performance penalty in PostgreSQL is minimal for the security and sharding benefits they provide.
- User ID Index: The
user_idcolumn is indexed for fast lookups when querying a user’s articles. - JSON Column: The
extracted_urlsfield uses PostgreSQL’s native JSON type to store structured data that would otherwise require multiple tables. - Status Enum: A PostgreSQL enum tracks the workflow state, enabling queries like “show me all failed articles”.
Supporting Tables
The research workflow generates several types of content that warrant their own tables, each linked to an article through a foreign key:
**LocalFile**: Stores user-uploaded reference files that accompany the article guideline.**ScrapedUrl**: Contains web content scraped from URLs found in the article guideline.**GitHubIngest**: Holds the results of processing GitHub repositories with GitIngest.**YouTubeTranscript**: Stores transcriptions of YouTube videos referenced in the guideline.**ScrapedResearchUrl**: Contains content from URLs discovered during Perplexity research.
Each supporting table follows the same pattern: a UUID primary key, a user_id for ownership, an article_guideline_id foreign key linking to the parent article, content-specific columns, and a creation timestamp.
Here’s an example: the model for the table containing scraped URLs (research_agent_part_3/src/db/models.py)
Schema Diagram
The following diagram illustrates the relationships between our database tables. The Article table sits at the center, with all supporting tables referencing it through foreign keys. The ToolCallUsage table stands alone, tracking tool invocations for rate limiting.
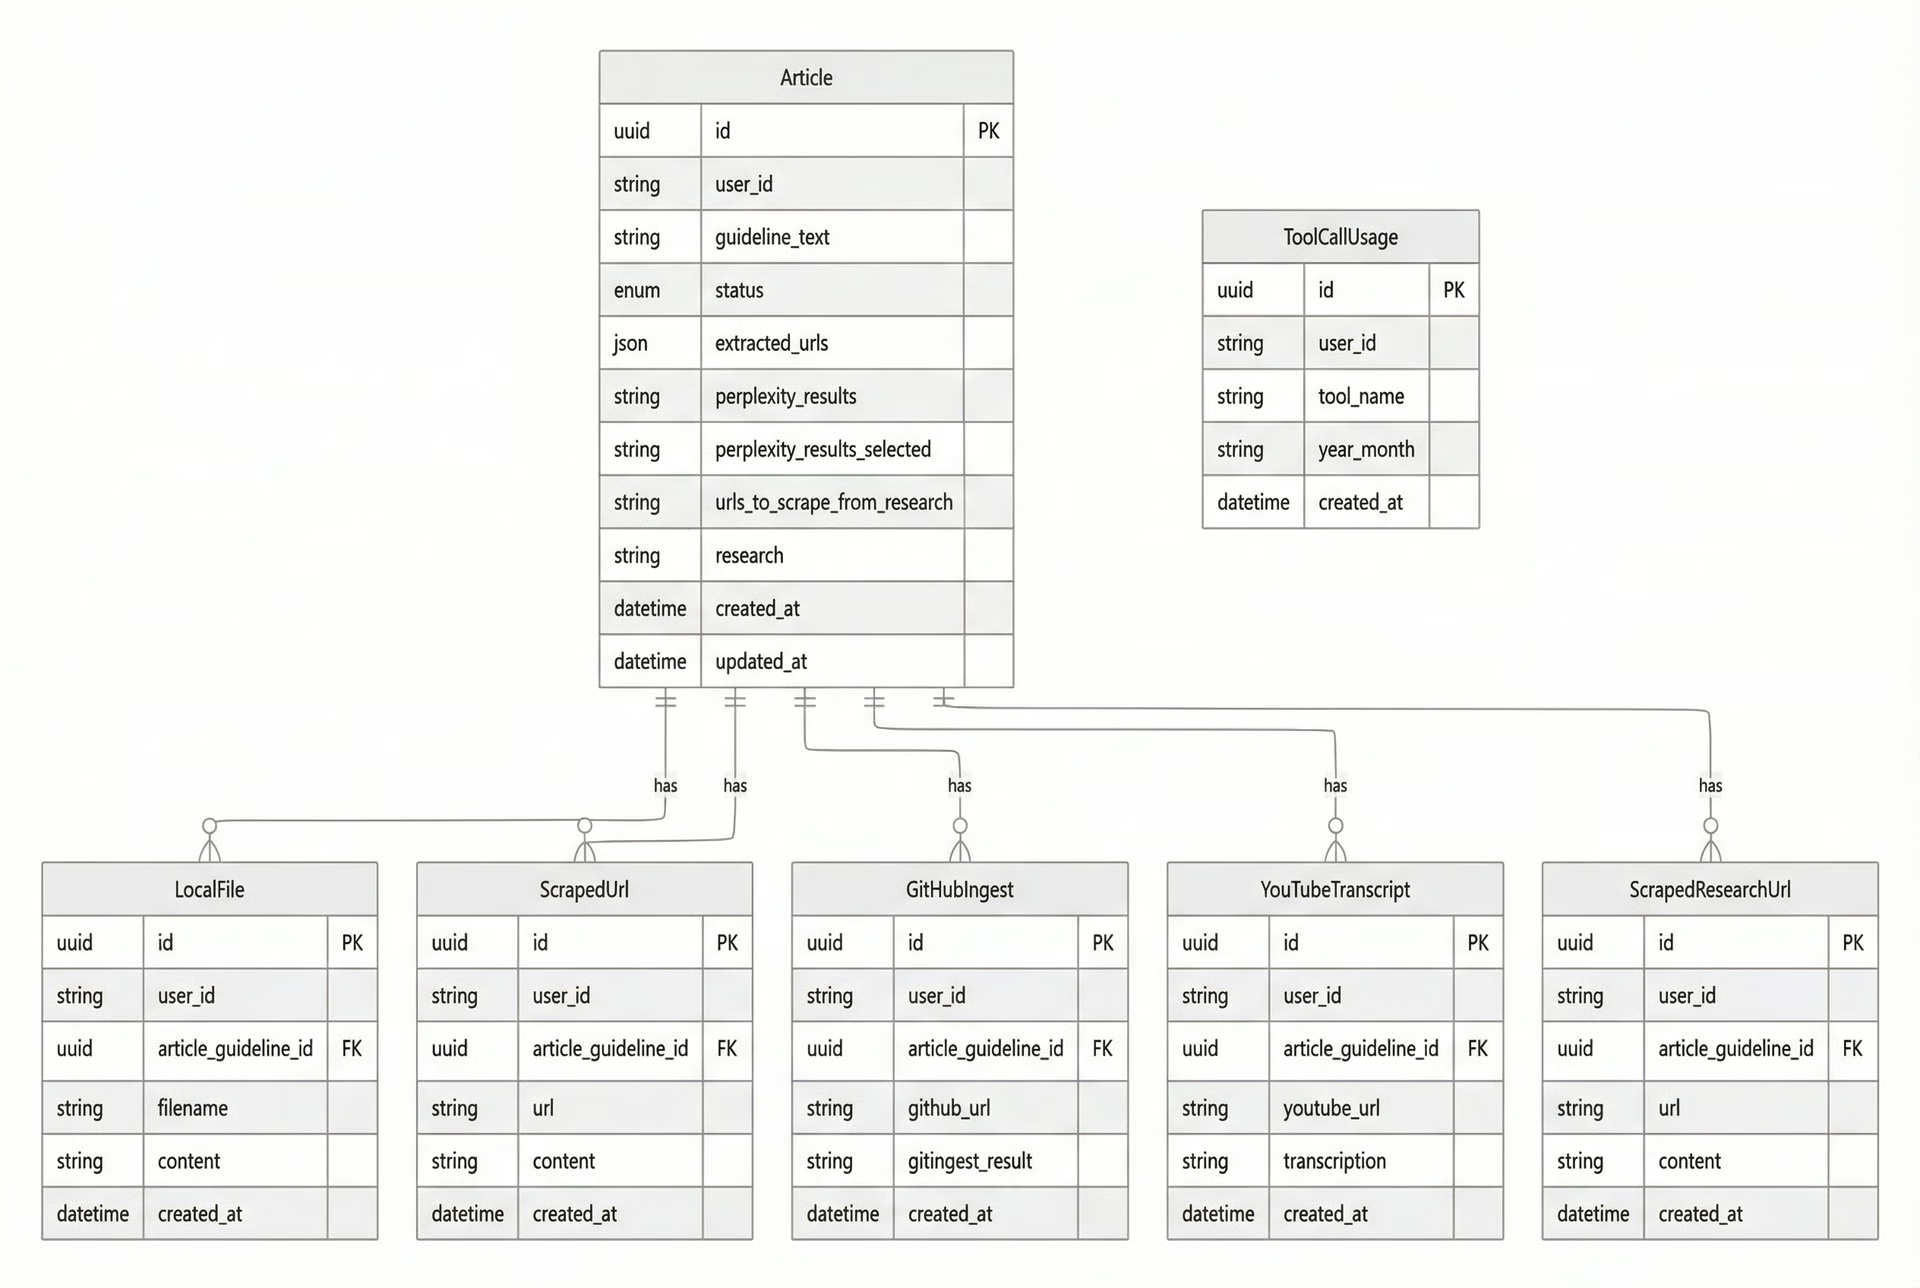 Image 1: Entity-relationship diagram showing the database schema. The Article table is the central entity, with supporting tables linked via foreign keys. The ToolCallUsage table tracks tool invocations independently for rate limiting.
Refactoring Tools: From Files to Database
Now, let’s see how MCP tools transform from file-based to database-backed implementations. Every tool follows the same transformation pattern: what was once a file path parameter becomes a UUID, file reads become database queries, and file writes become database updates.
The refactoring pattern is consistent across all tools:
- Before: Tools accept a
research_folderpath, read from files likearticle_guideline.md, and write to files in the.nova/subdirectory. - After: Tools accept an
article_guideline_idUUID, query theArticletable for data, and update columns or insert rows in related tables.
Example: the extract_guidelines_urls_tool
Let’s examine the extract_guidelines_urls_tool to see this pattern in action. This tool extracts URLs from the article guidelines and categorizes them into GitHub, YouTube, and other web URLs.
Here’s the previous implementation from research_agent_part_2/mcp_server/src/tools/extract_guidelines_urls_tool.py (which accepts a research_folder path, reads from files like article_guideline.md, and writes to files in the .nova/ subdirectory):
Here’s the new implementation from research_agent_part_3/src/tools/extract_guidelines_urls_tool.py (which accepts an article_guideline_id UUID, queries the Article table for data, and updates columns or inserts rows in related tables):
The key differences are:
research_folder: strbecomesarticle_guideline_id: str(a UUID).guidelines_path.read_text()becomesarticle.guideline_text.output_path.write_text(json.dumps(data))becomesarticle.extracted_urls = data.- The function becomes
asyncto support non-blocking database operations.
This same pattern applies to all other tools in the research workflow. The business logic remains unchanged; only the storage layer is different.
Local Development with Docker Compose
With tools refactored for database access, you need a way to run PostgreSQL during development. Docker Compose is a good way to manage this by defining our multi-container application in a single YAML file. With one command, we can spin up both the PostgreSQL database and our MCP server.
The Two-Service Architecture
Our docker-compose.yml (research_agent_part_3/docker-compose.yml) defines two services that work together.
- First, we define the
postgresservice. We use the lightweightpostgres:16-alpineimage, configure it with environment variables, and map the container’s port 5432 to the host. A named volume ensures data persistence, and a health check verifies the database is ready before other services start.
- Next, we define the
mcp-serverservice. It builds from our localDockerfileand depends on thepostgresservice being healthy. TheDATABASE_URLuses the service namepostgresas the hostname, which Docker’s internal networking resolves. We also mount the source code as a read-only volume to enable hot-reloading during development.
- Finally, we declare the named volume for PostgreSQL data.
Let’s understand some aspects of this configuration:
- The
DATABASE_URLusespostgresas the hostname, which Docker’s internal networking resolves to the PostgreSQL container’s IP address. This works because both containers share the same Docker network by default. - The
postgres_datavolume persists database files outside the container. When you rundocker compose down, the data survives. Onlydocker compose down -vremoves the volume. - The
pg_isreadycommand verifies whether PostgreSQL is accepting connections. The MCP server’sdepends_on: condition: service_healthyensures it waits for a healthy database before starting. - Mounting
./src:/app/src:roallows code changes during development without rebuilding the container, while:ro(read-only) prevents the container from modifying host files [8], [9], [10].
Cloud SQL for Production
Docker Compose works for local development, but production requires a managed database service. Cloud SQL provides fully managed PostgreSQL with automatic backups and IAM authentication.
Cloud SQL is Google Cloud’s fully managed relational database service supporting PostgreSQL, MySQL, and SQL Server. For production deployments, it offers several advantages over self-managed databases:
- Automatic Backups: Daily backups with point-in-time recovery and configurable retention periods.
- High Availability: Optional regional instances with automatic failover.
- Security Patches: Google applies security updates without downtime.
- Private Connectivity: Cloud Run can connect to Cloud SQL via a private IP address, preventing the database from being exposed to the public internet.
- IAM Authentication: Instead of managing passwords, Cloud Run can authenticate using its service account [5], [13], [14].
Environment-Based Configuration
Our application must work in two environments: local development with Docker Compose and production with Cloud SQL. We achieve this through environment-based configuration in settings.py (research_agent_part_3/src/config/settings.py):
The is_cloud_sql property provides a simple check: if the CLOUD_SQL_INSTANCE environment variable is set, we are running in production; otherwise, we use the local DATABASE_URL.
The Cloud SQL Python Connector
The database session management in session.py (research_agent_part_3/src/db/session.py) handles both environments transparently. The key is the _init_database() function, which creates the appropriate SQLAlchemy engine based on the environment:
The Cloud SQL Python Connector provides several benefits over direct connection strings. It uses the Cloud Run service account’s identity for IAM authentication instead of passwords, manages SSL certificates transparently, and efficiently handles database connection pooling. Additionally, the refresh_strategy= “lazy” option is optimized for serverless environments like Cloud Run, where CPU may be throttled between requests. This strategy retrieves connection info only when needed, rather than in a periodic background thread [4], [21].
Database Migrations with Alembic
Whether running locally or in the cloud, you need a way to evolve the database schema over time. Adding a new column, creating a new table, or modifying an index requires careful coordination between code changes and database changes. Alembic provides database migrations for SQLAlchemy, acting as version control for your database schema.
Alembic is a database migration tool created by the author of SQLAlchemy. It addresses a fundamental challenge: your SQLAlchemy models define the schema, but the database might have an older one. Alembic bridges this gap by:
- Version Control: Each migration has a unique revision ID, creating a linear history of schema changes.
- Upgrade/Downgrade: Migrations define both
upgrade()(apply changes) anddowngrade()(rollback) functions. - Autogeneration: Alembic can compare your models to the database and generate migration scripts automatically.
- Environment Support: The same migrations run in development, staging, and production [3], [22], [23].
Alembic Configuration
Our Alembic setup consists of two key files: alembic.ini (research_agent_part_3/alembic.ini) for configuration and env.py (research_agent_part_3/alembic/env.py) for runtime behavior.
The env.py file handles async database connections and supports both local PostgreSQL and Cloud SQL:
Migration Examples
Let’s examine two migrations from our project to understand Alembic’s capabilities.
The first migration (research_agent_part_3/alembic/versions/20241211_000000_001_create_articles_table.py) creates the main articles table with its enum type and all columns:
A later migration (research_agent_part_3/alembic/versions/20241216_000000_008_create_tool_call_usage_table.py) adds the tool_call_usage table for rate limiting:
Running Migrations
In development, migrations can be run manually like this:
In production, the Docker entrypoint script (research_agent_part_3/docker-entrypoint.sh) runs migrations automatically on container startup, ensuring the database schema is always up-to-date before the application starts accepting requests.
Rate Limiting for MCP Tools
Features like rate limiting require persistent storage to track usage across requests and even container restarts. Without a database, we would have no way to know how many tool calls a user has made this month.
Why Rate Limiting Matters
MCP tools are not free to operate. Each tool call can trigger expensive API requests:
- LLM Calls: Perplexity research, source selection, and query generation all invoke paid LLM APIs.
- Web Scraping: Firecrawl charges per page scraped.
- YouTube Transcription: Processing videos consumes compute resources.
Without rate limiting, a single user could exhaust your API budget. Rate limiting also enables future business models: in the current implementation, all users share the same monthly limit, but the system could be extended to support premium users with higher limits.
The ToolCallUsage Model
The ToolCallUsage model (research_agent_part_3/src/db/models.py) records every tool invocation:
The year_month column is a denormalization. We could extract the month from created_at, but storing it explicitly enables a simple, indexed query: SELECT COUNT(*) WHERE user_id = ? AND year_month = ?. This is a common pattern for optimizing analytics queries [25].
The @rate_limited Decorator
The rate-limiting logic is encapsulated in a decorator (research_agent_part_3/src/utils/rate_limit_utils.py) that wraps MCP tools:
Every tool in tools.py (research_agent_part_3/src/routers/tools.py) is then decorated with @rate_limited like as follows:
File Handling: Upload and Download Workarounds
The database handles state, and rate limiting protects your budget. But there’s another challenge the MCP specification doesn’t address: file transfers.
File handling is straightforward when running locally with stdio transport: the agent can read files from the user’s filesystem. But HTTP transport is different. The MCP client (e.g., Cursor) and MCP server may be on different machines, and there’s no MCP message type for “upload this file” or “download this file.” Users need to upload article guidelines before research can begin.
The MCP specification is actively evolving and may address file handling in future versions. For now, we implement a workaround using custom HTTP endpoints [12].
Our Solution: Custom HTTP Endpoints
FastMCP allows adding custom HTTP routes alongside MCP endpoints using the @mcp.custom_route() decorator. These routes are regular FastAPI endpoints that exist outside the MCP protocol [26].
Here’s how we register the routes for uploading the article guideline file (research_agent_part_3/src/routers/ui.py). We have one GET endpoint to display the UI to the user, and one POST endpoint that is called when the user uses the UI to upload a file.
The Upload Flow
The upload flow involves coordination between the user, the AI agent, and the MCP server:
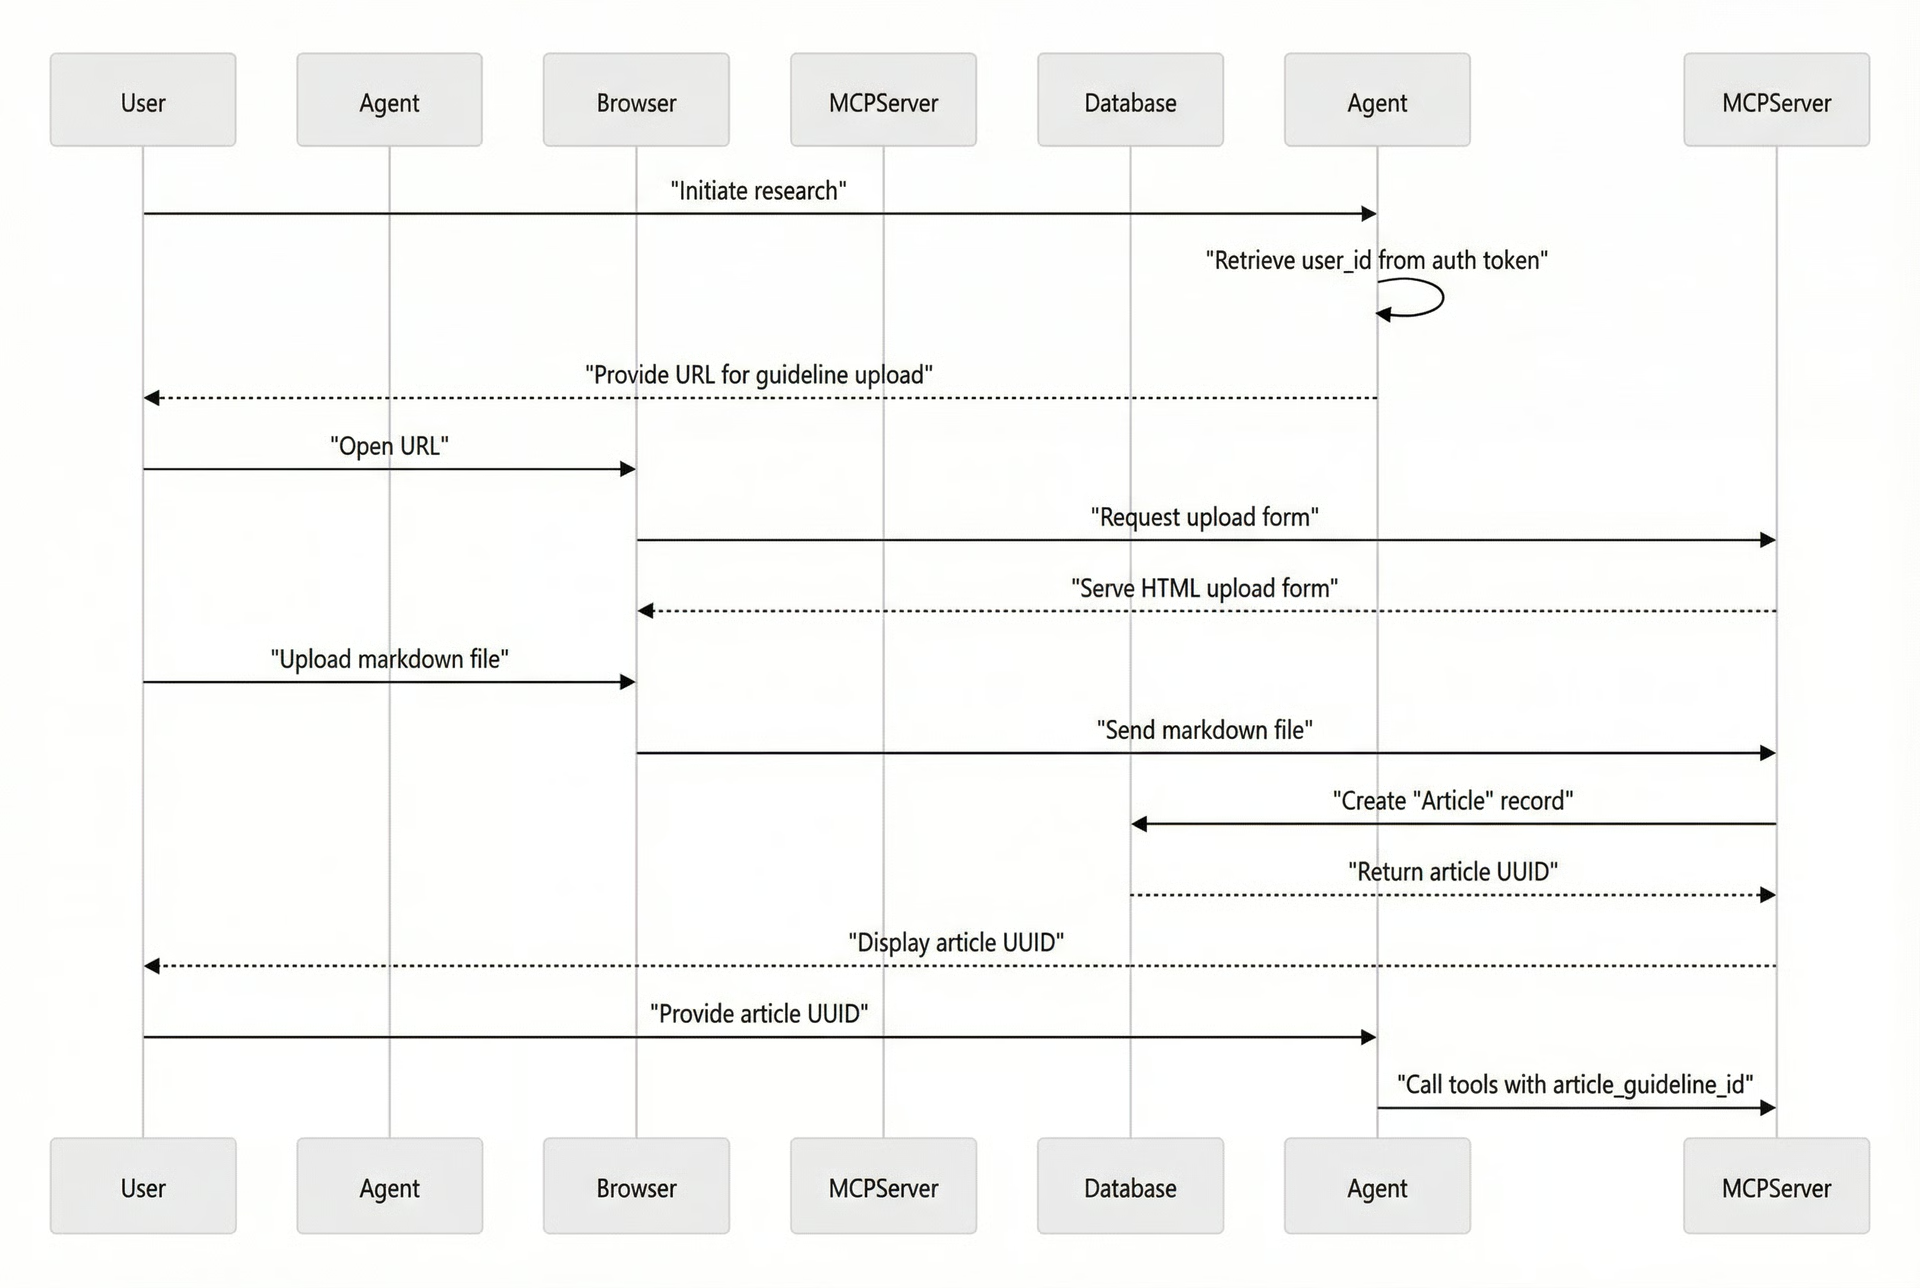 Image 2: Sequence diagram for user uploading an article guideline.
The implementation in upload_ui.py handles the POST request, parses the multipart form data, and creates a new Article record in the database. We won’t show the code here as it’s standard backend/frontend code for uploading files, but if you want to dive deeper, you can check the code in lessons/research_agent_part_3.
The Download Flow
At the end of the research workflow, we need a way for users to download the final research document. The same custom route approach applies.
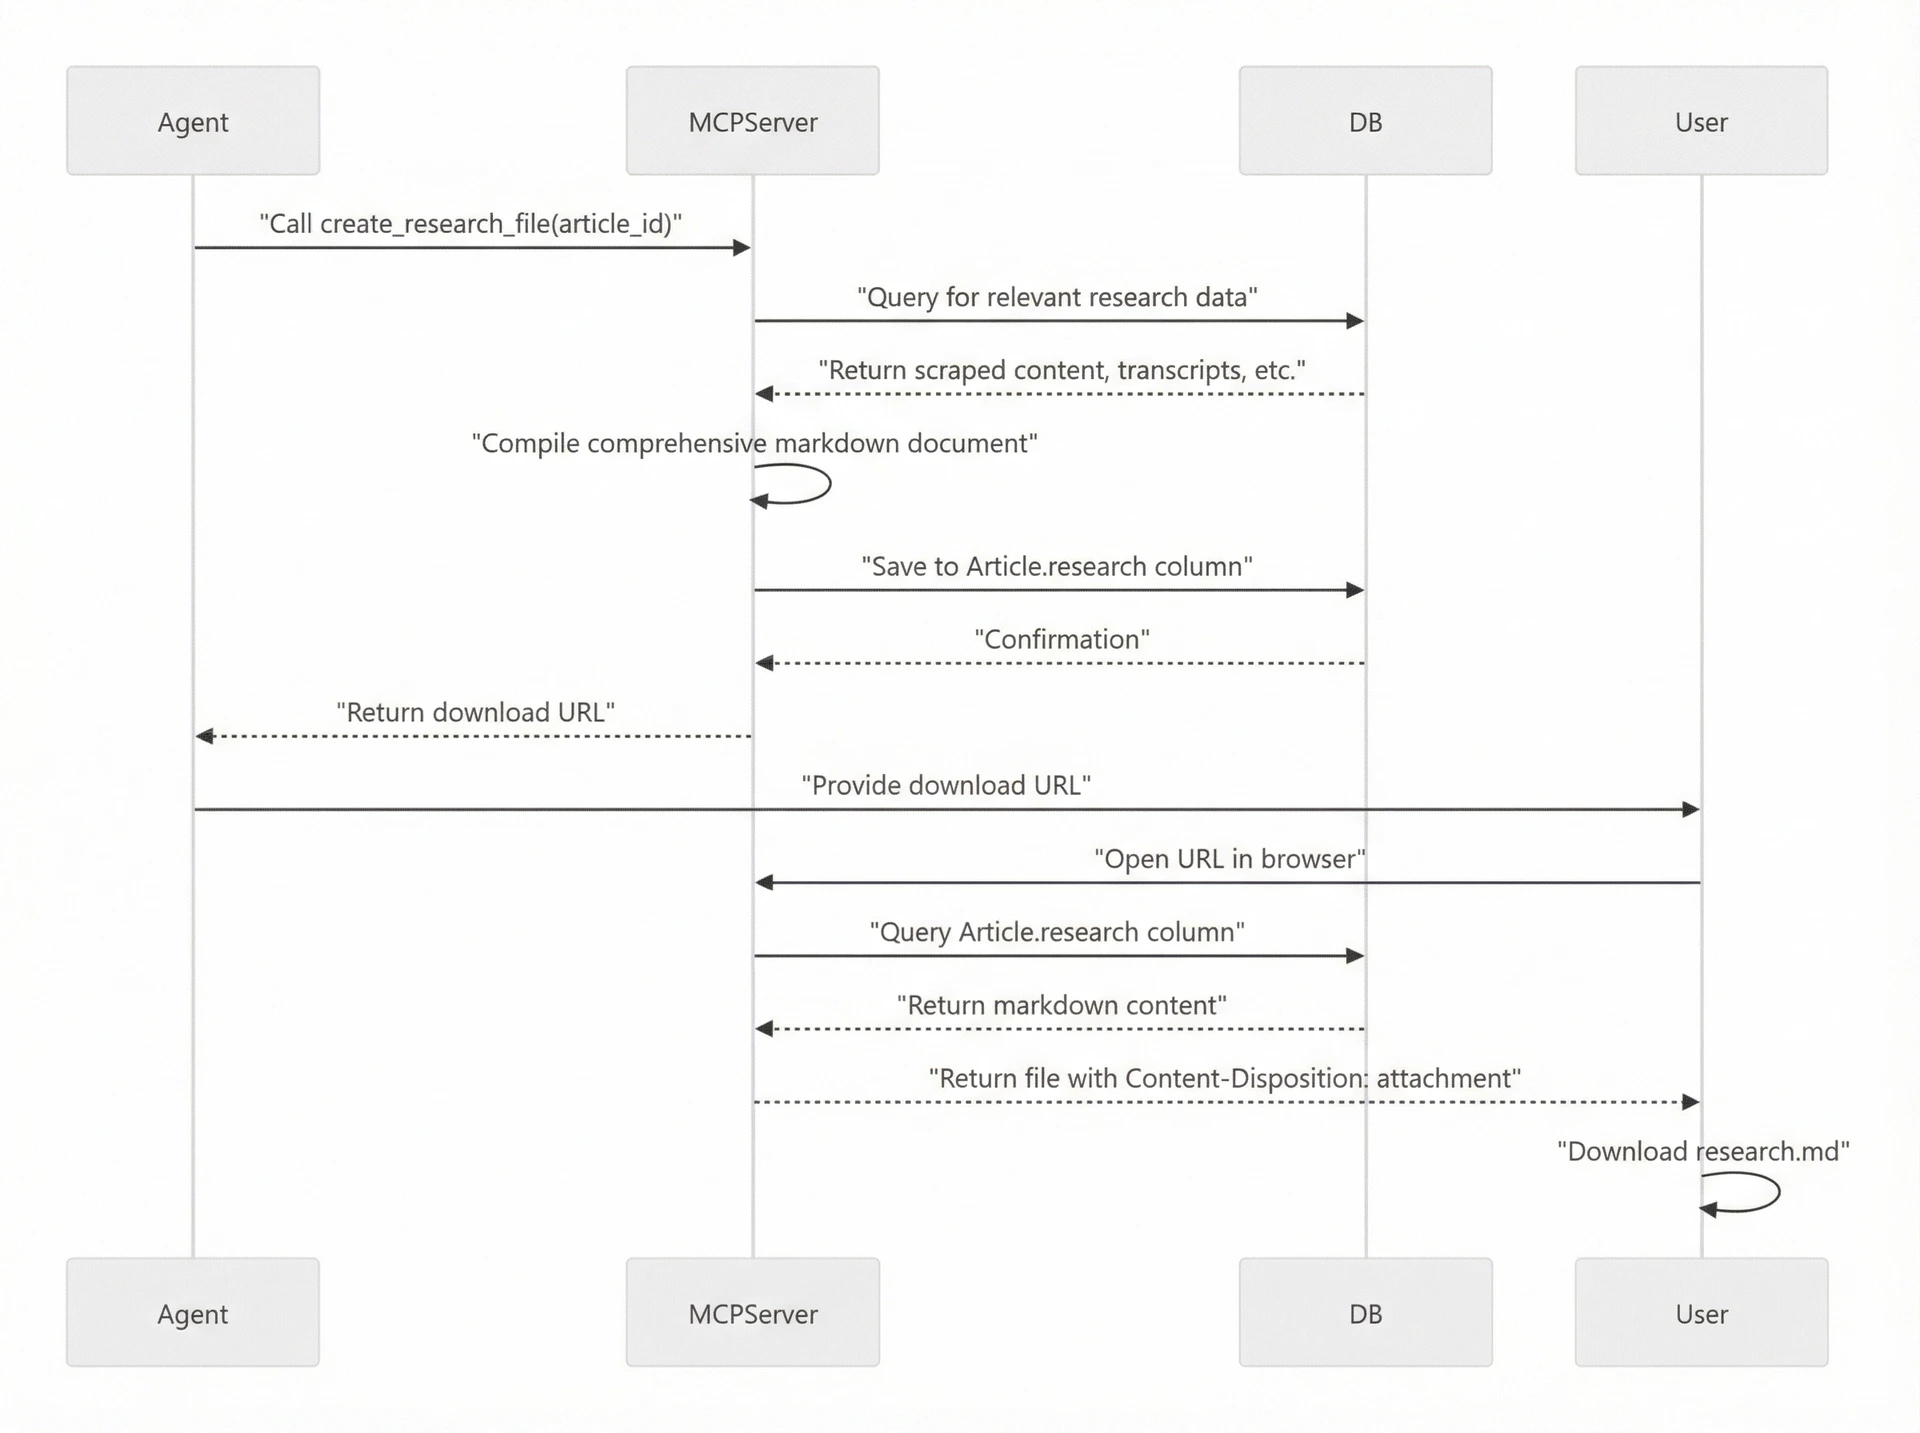 Image 3: Sequence diagram illustrating the process of a user downloading the final research document.
The download route, defined in downloads.py, queries the database for completed research content and returns it as a downloadable Markdown file.
Analytics and Monitoring
All this usage data, including tool calls, articles created, and research completed, lives in our database. This opens up powerful analytics possibilities that were impossible with file-based storage.
Our schema provides rich data for analysis:
- Tool Usage: Every tool call is recorded in
tool_call_usagewith user, tool name, and timestamp. - Article Lifecycle: The
articlestable tracks status transitions fromcreatedthroughcompletedorfailed. - Research Artifacts: All intermediate data is preserved for debugging.
Example Analytics Queries
Here are some queries you might run to understand your agent’s usage:
Once deployed, you can run these queries directly in Google Cloud Console’s Cloud SQL Studio, or connect via the gcloud CLI:
We will cover Cloud SQL querying in detail in Lesson 34 after deploying the application.
Conclusion
This lesson addressed the core infrastructure challenges of preparing an AI agent for production deployment. We transformed our research agent from a file-based prototype into a database-backed, rate-limited, cloud-ready application.
We began by replacing the ephemeral .nova/ folder with persistent PostgreSQL storage, ensuring data survives container restarts and can be queried efficiently. We then created an article-centric data model with supporting tables for research artifacts, each linked to users through authentication. All MCP tools were refactored to read from and write to database columns instead of filesystem paths.
The application was designed to use Docker Compose with local PostgreSQL for development and Cloud SQL for production. We implemented Alembic migrations to version-control database changes, with automatic migration on container startup. Usage tracking and monthly limits were added to protect API budgets and enable future tiered pricing models. Finally, we worked around MCP’s lack of file-transfer support by implementing custom HTTP endpoints for uploads and downloads.
With our agent fully prepared for production, the next lesson covers the actual deployment. We’ll push our container to Artifact Registry, deploy to Cloud Run, and then create and configure the production Cloud SQL database instance. We’ll set up GitHub Actions for continuous deployment that automatically deploys on push to main. Finally, we’ll explore Cloud Logging and Cloud Monitoring to observe our agent in production.
References
- PostgreSQL Global Development Group. (n.d.). JSON types. PostgreSQL Documentation. postgresql.org/docs/current/datatype-json.html
- SQLAlchemy. (n.d.). SQLAlchemy documentation. sqlalchemy.org
- Alembic. (n.d.). Alembic documentation. alembic.sqlalchemy.org
- Google. (n.d.). Cloud SQL Python Connector. GitHub. github.com/GoogleCloudPlatform/cloud-sql-python-connector
- Google. (n.d.). Cloud SQL for PostgreSQL documentation. Google Cloud. cloud.google.com/sql/docs/postgres
- Google. (n.d.). Container runtime contract. Google Cloud. cloud.google.com/run/docs/configuring/services/containers
- SQLite. (n.d.). Appropriate uses for SQLite. sqlite.org/whentouse.html
- Docker. (n.d.). Networking in Compose. docs.docker.com/compose/how-tos/networking
- Docker. (n.d.). Use volumes. docs.docker.com/engine/storage/volumes
- Docker. (n.d.). Compose file reference: healthcheck. docs.docker.com/reference/compose-file/services
- MagicStack. (n.d.). asyncpg documentation. magicstack.github.io/asyncpg/current
- Model Context Protocol. (n.d.). MCP specification. modelcontextprotocol.io/specification
- Google. (n.d.). Connect from Cloud Run. Google Cloud. cloud.google.com/sql/docs/postgres/connect-run
- Google. (n.d.). IAM database authentication. Google Cloud. cloud.google.com/sql/docs/postgres/iam-authentication
- AhmetB. (n.d.). Cloud Run FAQ. GitHub. github.com/ahmetb/cloud-run-faq/blob/master/README.md
- Crunchy Data. (n.d.). Designing your Postgres database for multi-tenancy. crunchydata.com/blog/designing-your-postgres-database-for-mu...
- PostgreSQL Global Development Group. (n.d.). Using EXPLAIN. PostgreSQL Documentation. postgresql.org/docs/current/using-explain.html
- SQLite. (n.d.). Frequently asked questions. sqlite.org/faq.html
- Do, H. (n.d.). MySQL vs PostgreSQL: Features & capabilities comparison. DEV Community. dev.to/harry_do/part-3-mysql-vs-postgresql-features...
- Cybertec. (n.d.). INT4 vs INT8 vs UUID vs NUMERIC performance on bigger JOINs. cybertec-postgresql.com/en/int4-vs-int8-vs-uuid-vs-numeric-performan...
- Google. (n.d.). cloud-sql-python-connector/connector.py. GitHub. github.com/GoogleCloudPlatform/cloud-sql-python-connect...
- testdriven.io. (n.d.). Alembic database migrations. testdriven.io/blog/alembic-database-migrations
- Alembic. (n.d.). Auto-generating migrations. alembic.sqlalchemy.org/en/latest/autogenerate.html
- The Full Stack. (2023, May 25). Production-ready FastAPI with background tasks and database migrations [Video]. YouTube. youtube.com/watch
- Neon. (n.d.). Rate limiting in Postgres. neon.com/guides/rate-limiting
- JCharisTech. (2022, December 11). Create an upload and download files API endpoint with FastAPI. blog.jcharistech.com/2022/12/11/create-an-upload-and-download-fil...
- Tiger Data. (n.d.). A guide to data analysis on PostgreSQL. tigerdata.com/learn/guide-to-data-analysis-on-postgresql
- PostgreSQL Global Development Group. (n.d.). Viewing statistics. PostgreSQL Documentation. postgresql.org/docs/current/monitoring-stats.html