Lesson 1, Part 2: Course Admin
- Core Learning Outcomes
- Who This Course Serves
- Prerequisites Check
- Syllabus (Work-in-progress)
- Part 1: Foundations of Workflows and Agents
- Part 2: Agentic Techniques & Building Agentic Systems
- Part 3: Evaluation, Observability, and Production Engineering
- Part 4: Your Capstone Project
- How to Run the Code Exercises
- Option 1: Google Colab (Recommended for a Quick Start)
- Option 2: Local Development Setup
- API Keys
- For Google Colab Users
- For Local Setup Users
- Access to Our Course Instructors in the Course Discord
- About Towards AI and Decoding AI
In the previous lesson, we established the critical role of the AI Engineer in transforming raw LLM potential into reliable, real-world solutions. We explored the challenges and great opportunities in building systems that can reason, act, and learn. This lesson provides a detailed roadmap for this course, outlining exactly what you will learn, who this course is for, and the practical steps to get started.
⭐
✨ Quick note: One of the best ways to stay motivated and actually finish a course is to share publicly that you’re doing it! It creates accountability and boosts your chances of following through 🚀.
If you’d like, post about starting this course and tag me, Louis-François Bouchard (ln, X, Insta) and Towards AI (ln, X, Insta). I’ll cheer you on, and you’ll inspire others 🙌
Core Learning Outcomes
Building robust AI systems requires a blend of software engineering discipline and an experimental, scientific mindset. This course is designed to work on that expertise. Through intensive, hands-on practice, you will learn the core competencies that separate experimental demos from production-grade solutions:
- The AI Engineering Mindset : Understanding when to use agents vs. workflows, how to debug non-deterministic systems, and the art of iterative improvement.
- Agentic Architecture Patterns : From simple ReAct loops to sophisticated agent orchestration, including planning strategies, tool integration, and memory management.
- Modern Frameworks : Comprehensive expertise in LangGraph (our primary framework), with exposure to other frameworks for comparison.
- Production Engineering : Real-world skills in LLMOps, observability, deployment, cost management, and the crucial "march of the 9s" toward reliability.
- Evaluation Systems : Building custom benchmarks and evaluation suites that ensure your agents work reliably in production, not just in demos.
Who This Course Serves
This course bridges the gap between traditional software development and the new paradigm of AI engineering, making it ideal for:
- Software Engineers & Full-Stack Developers tasked with integrating autonomous features or building AI-native applications.
- Data Scientists and Data Engineers aiming to deploy their Python and data skills to build AI systems.
- Machine Learning Engineers expanding from model training to building complete AI systems.
- Computer Science Students with solid programming skills who want to specialize in this rapidly growing field.
- Anyone with Python proficiency, ready to start working with AI or move beyond experimenting with basic LLM APIs and chatbot tutorials to production-grade systems.
The common thread is a solid foundation in coding and a drive to build serious, functional AI applications, not just to chat with models.
Prerequisites Check
Required:
- Solid Python proficiency : You should be comfortable with development fundamentals like functions, classes, data structures, and working with APIs. We will be writing and debugging code from the start.
- Problem-solving mindset : Building with LLMs involves iteration and experimentation. A willingness to debug non-deterministic systems and continuously improve your approach is essential.
Not Required:
- You do not need a deep background in machine learning theory or advanced mathematics.
- A formal computer science degree is not necessary; practical programming experience is what truly matters.
- Prior AI or LLM experience is helpful but not mandatory. We will guide you through the key concepts needed to build sophisticated agents from the ground up.
If you need to strengthen your Python skills, we recommend starting with our Python for Generative AI course, available in a bundle offer.
This course focuses on building LLM agents. If you wish to explore relevant LLM theory and further AI Engineering skills such as Prompting, Advanced Retrieval Augmented Generation, Fine-Tuning, and Data-Collection in more depth, we recommend our companion course, From Beginner to Advanced LLM Developer . You are welcome to integrate these additional LLM Developer techniques into your final project.
Syllabus (Work-in-progress)
We're actively developing the syllabus for this course, and new lessons are being released progressively as they become complete. The final syllabus will be published here when it is finalized.
We will be sending you weekly updates from now on with new lessons and progress on our part for the course, expecting your attention and feedback 🙂
In the meantime, here’s an overview of the key topics and objectives covered in each part:
Part 1: Foundations of Workflows and Agents
This foundational section introduces the core concepts and essential building blocks of agents and workflows. You’ll learn about the current agent landscape and the critical distinctions between predefined workflows and autonomous, LLM-driven agents. We'll explore techniques for effectively managing context and information flow, creating structured outputs, and giving agents the ability to interact with external tools. You’ll also dive into reasoning patterns like ReAct, as well as methods to equip agents with memory and knowledge retrieval (including advanced RAG techniques) and multimodal processing capabilities.
You'll build core competencies through focused, hands-on exercises:
- AI Engineering & Agent Landscape: Understanding the role, the stack, and why agents matter now
- Workflows vs. Agents : Grasping the crucial difference between predefined logic and LLM-driven autonomy
- Context Engineering : The art of managing information flow to LLMs
- Structured Outputs : Ensuring reliable data extraction from LLM responses
- Basic Workflow Ingredients : Implementing chaining, routing, parallel and the orchestrator-worker patterns
- Agent Tools & Function Calling: Giving your LLM the ability to take action
- Planning & Reasoning: Understanding patterns like ReAct (Reason + Act)
- Implementing ReAct : Building a reasoning agent from scratch
- Agent Memory & Knowledge: Short-term vs. long-term memory (procedural, episodic, semantic)
- RAG Deep Dive : Advanced retrieval techniques for knowledge-augmented agents
- Multimodal Processing : Working with documents, images, and complex data
Part 2: Agentic Techniques & Building Agentic Systems
In this section, you'll move from theory to practice by starting your work on the course's central project: an interconnected research and writing agent system. After a deep dive into agentic design patterns and a comparative look at modern frameworks, we'll focus on LangGraph. You will implement the research agent, equipping it with tools for web scraping and analysis. Then, you'll construct the writing workflow to convert research into polished content. Finally, you'll integrate these components, working on the orchestration of a complete, multi-agent pipeline from start to finish.
Part 3: Evaluation, Observability, and Production Engineering
With the agent system built, this section focuses on the engineering practices required for production. You will learn to design and implement robust evaluation frameworks to measure and guarantee agent reliability, moving far beyond simple demos. We will cover AI observability, using specialized tools to trace, debug, and understand complex agent behaviors. Finally, you’ll explore optimization techniques for cost and performance and learn the fundamentals of deploying your agent system, ensuring it is scalable and ready for real-world use.
Part 4: Your Capstone Project
In this final part of the course, you will build and submit your own advanced LLM agent, applying what you've learned throughout the previous sections. We provide a complete project template repository, enabling you to either extend our agent pipeline or build your own novel solution. Your project will be reviewed to ensure functionality, relevance, and adherence to course guidelines for the awarding of your course certification.
You have the freedom to vary our provided agent examples and are encouraged to create something closely aligned with your personal interests or professional goals.
Full details of the submissions process will be provided at the end of the course, and include the following steps:
- Build your project according to the necessary constraints.
- Submit your code and documentation for review, including a detailed
READMEthat clearly outlines your project's functionality, tech stack, API key usage, and a quick cost estimation to ensure affordability (under $0.50 for user testing). - Ensure your project incorporates at least five optional functionalities from the provided checklist to enhance complexity and depth.
Upon successful completion, your project can serve multiple purposes:
- A strong addition to your professional portfolio.
- A proof of concept for your current employer.
- The starting point of an entrepreneurial venture or personal utility tool.
How to Run the Code Exercises
Some lessons of this course feature hands-on exercises with code. We provide two ways to run them: through Google Colab for a quick, browser-based setup, or by setting up a local development environment for more control. Choose the option that works best for you.
Option 1: Google Colab (Recommended for a Quick Start)
Google Colab is a free, cloud-based service that lets you run Jupyter Notebooks directly in your web browser without requiring any installation on your computer. It's the fastest way to start experimenting with the course code.
For lessons that include a code exercise, you will find a direct link to the corresponding Colab notebook at the beginning of the lesson. Simply click the link, and you'll be ready to go.
Option 2: Local Development Setup
If you prefer to work on your own machine and have full control over the environment, you can set up the project locally. This involves cloning the course's private GitHub repository, which contains all the hands-on code exercises.
To get started, you'll need to install two essential tools: git and uv.
git | [git](<https://git-scm.com/>) is a version control system used to track changes in code and collaborate with others. It allows you to download (or "clone") the course repository to your local machine. | - macOS : Git should be pre-installed. If not, open the Terminal and run xcode-select --install. - Windows : Download and install Git from the official Git for Windows website. - Linux : Open a terminal and run sudo apt-get install git (for Debian/Ubuntu) or sudo yum install git (for Fedora/CentOS). |
|---|---|---|
| Tool | Purpose | Installation |
uv | [uv](<https://github.com/astral-sh/uv>) is a fast Python package manager and installer. It's a modern replacement for tools like pip and venv and it’s the current standard in the industry. We use it in this course to manage project dependencies and ensure a reproducible environment. | - macOS, Linux, and Windows : Run the following command in your terminal: `curl -LsSf <https://astral.sh/uv/install.sh> |
Once you have git and uv installed, you can clone the project repository. The following command will download the course materials to your computer.
This command first defines a variable with a fine-grained GitHub token that provides read-only access to the course's code exercises. Then, it uses the git clone command to create a local copy of the entire repository on your machine.
Here’s the structure of the repository, showing how to find the notebook files for each lesson. Note that not all lessons have an accompanying notebook.
Let's take a look at the main files in the repository's root directory:
.python-version: This file specifies the exact version of Python the project is intended to run on.pyproject.toml: This is the central configuration file for the project. It defines the project's direct dependencies and their version constraints (e.g.,package>=1.2.0). In modern Python development, it replaces the traditionalrequirements.txtfile, offering a more structured way to manage project metadata and tool configurations. It can also contain information about deploying your Python code as a Python package, such as package version, description, authors, etc.uv.lock: This is a lock file automatically generated byuv. It contains the exact, pinned versions of all dependencies, including transitive dependencies (the dependencies of your dependencies). This ensures that everyone working on the project has a perfectly reproducible environment, which is crucial for consistency..env.example: This is a template file for environment variables. You'll need to create your own local version of this file called.envto store your secret API keys.
Now that you have the repository cloned, navigate to the project's root directory in your terminal and run the following command:
This command will read the pyproject.toml and uv.lock files, create a virtual environment in a .venv folder within the project root, and install all the necessary packages.
This command creates a new Jupyter kernel named "ai-agents-course" that points to the virtual environment you created with uv sync --group dev.
Now, you can launch the Jupyter Notebook user interface by running:
This will open a new tab in your web browser showing the project's file structure.
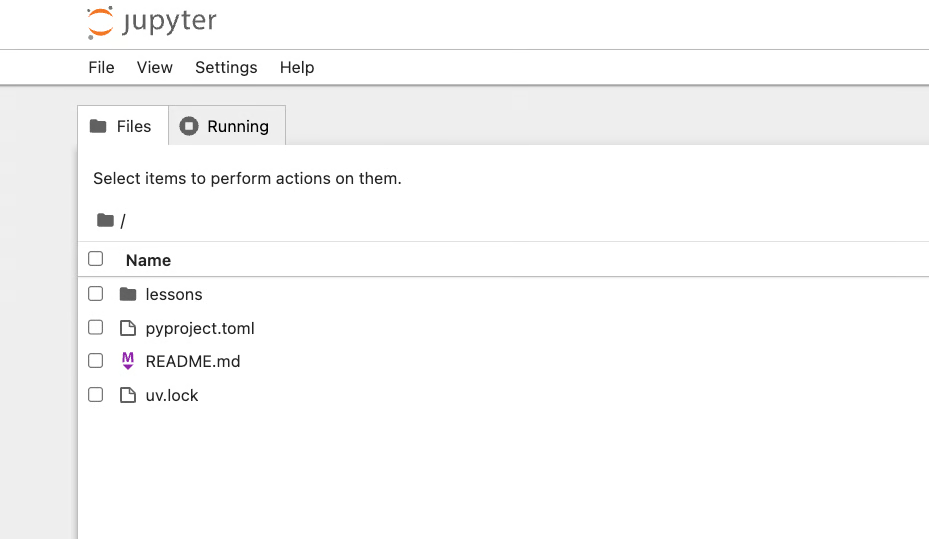
From there, you can navigate to the lessons directory, choose a specific lesson, and open its notebook.ipynb file.
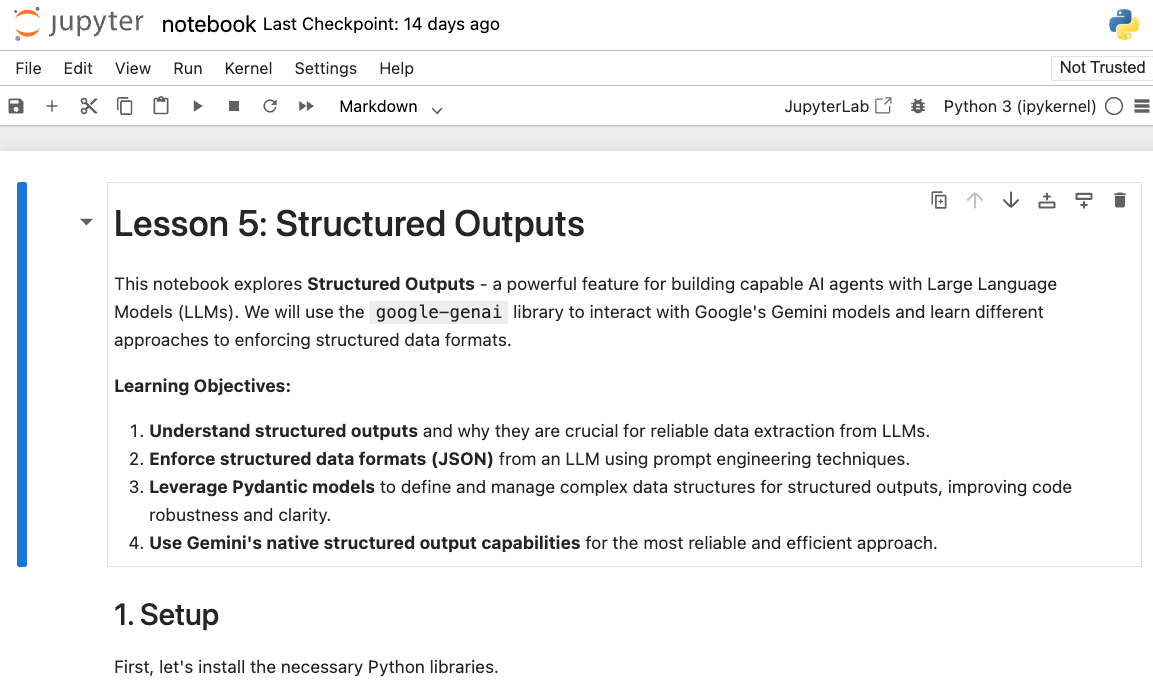
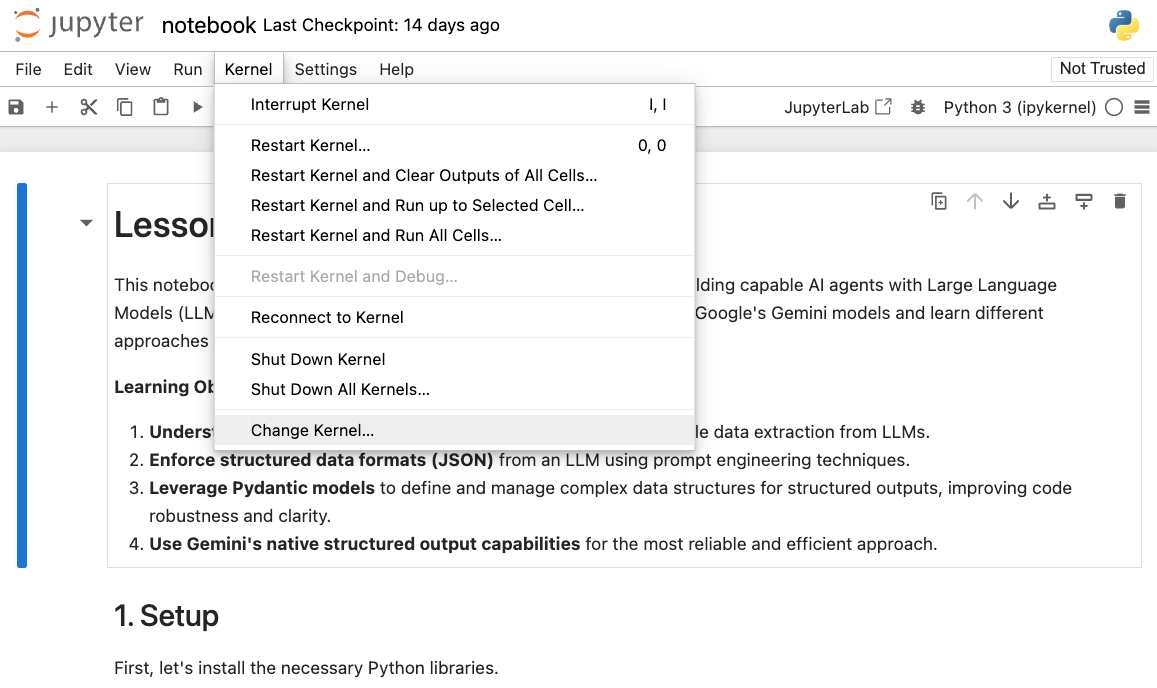
Once the notebook is open, click on "Kernel" in the top menu, then "Change kernel".
Next, select "ai-agents-course" from the list.
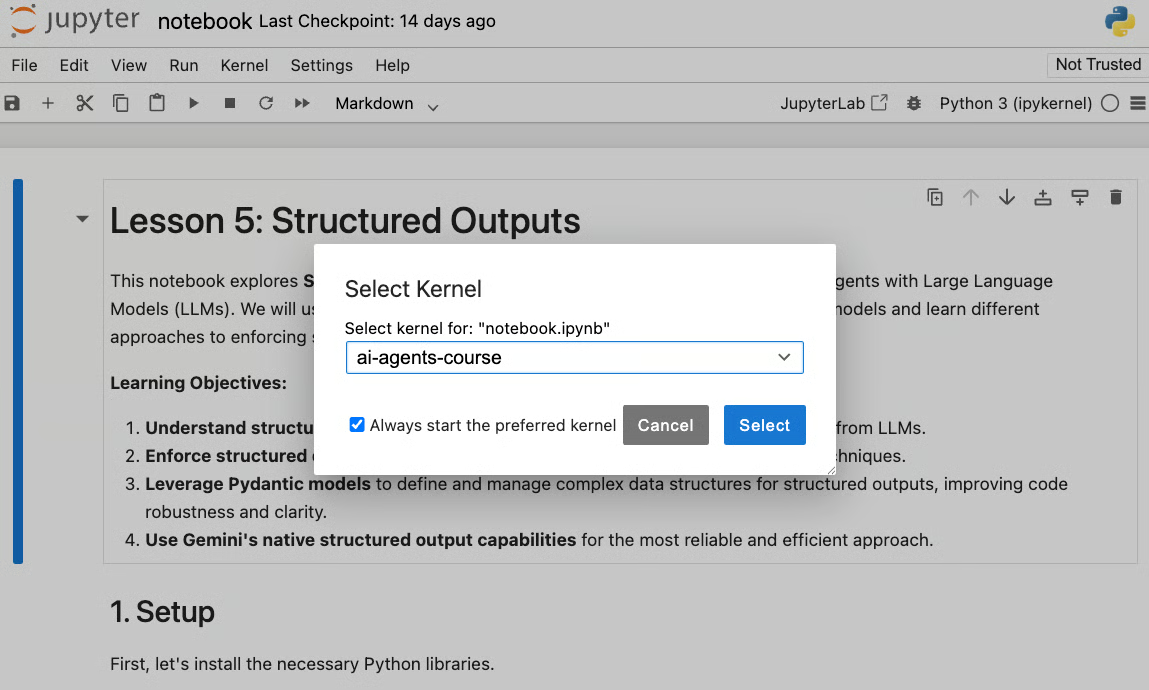
Now, when you run code cells in the notebook, the code will have access to all the libraries installed in your project's virtual environment.
Alternatively, you can run the notebooks directly from a modern code editor or Integrated Development Environment (IDE) like VS Code or Cursor, which offer excellent support for Jupyter Notebooks.
To use notebooks in VS Code, you will first need to install the official Jupyter extension from the marketplace. Once installed, open the course-ai-agents project folder in VS Code.
When you open a notebook.ipynb file, you should see it as follows.
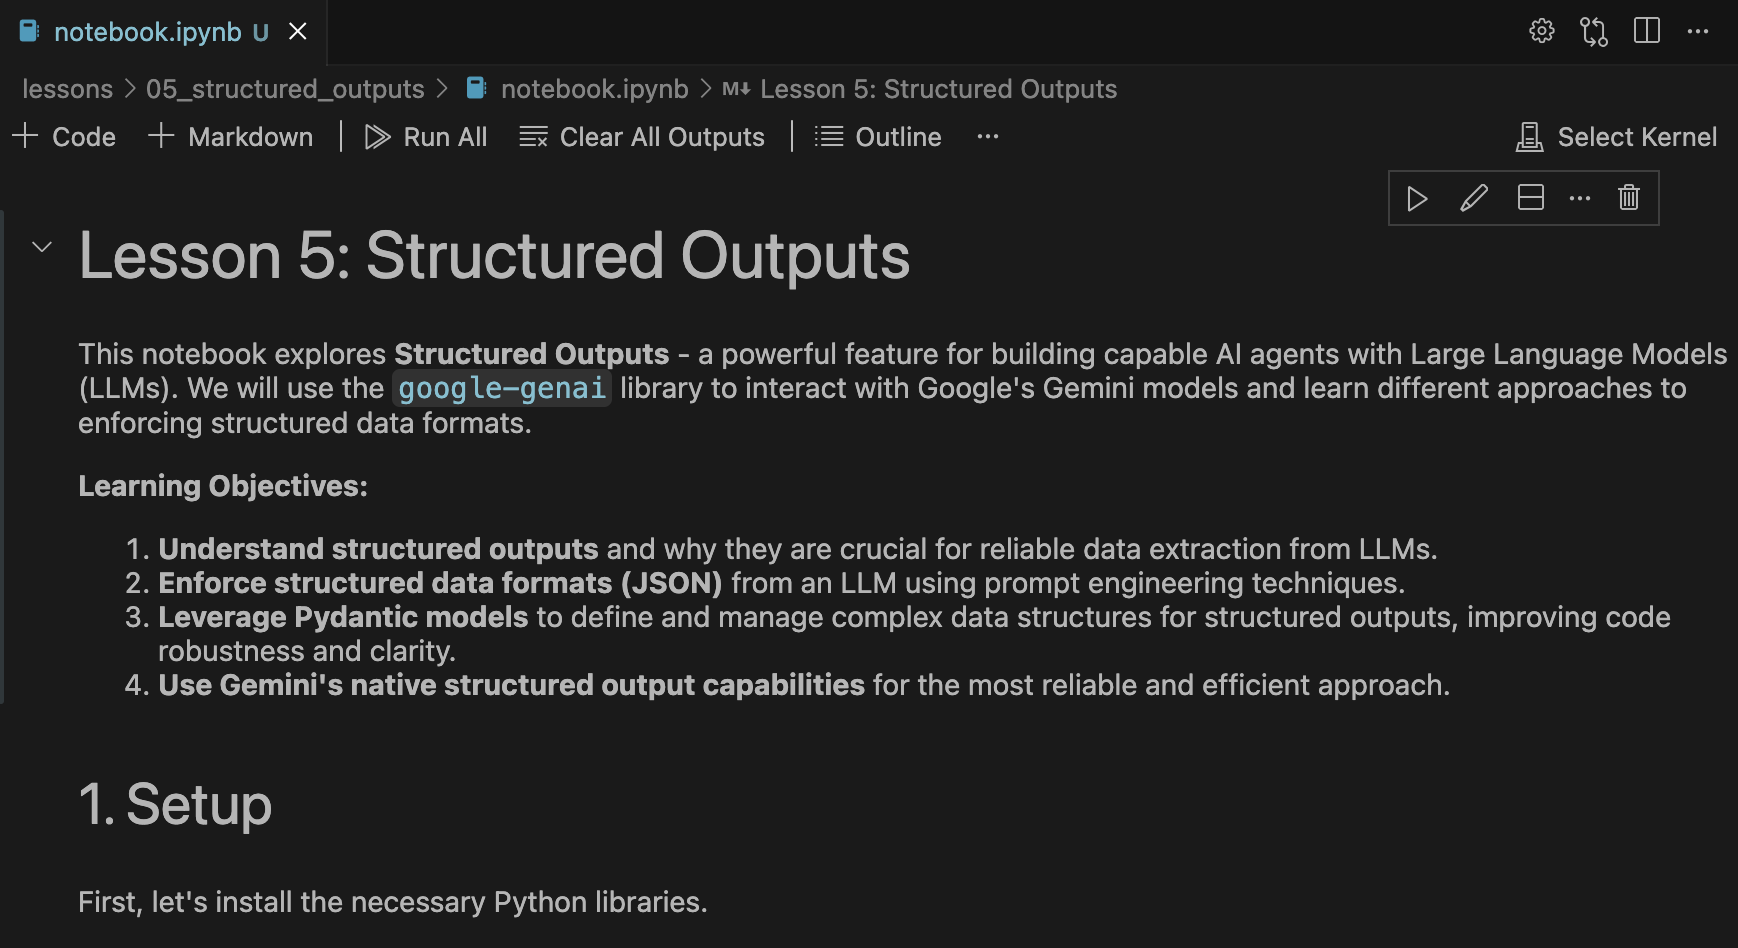
Click on the “Select Kernel” button at the top right of the editor, and you’ll see the following options to choose from. Select “Python Environments”.
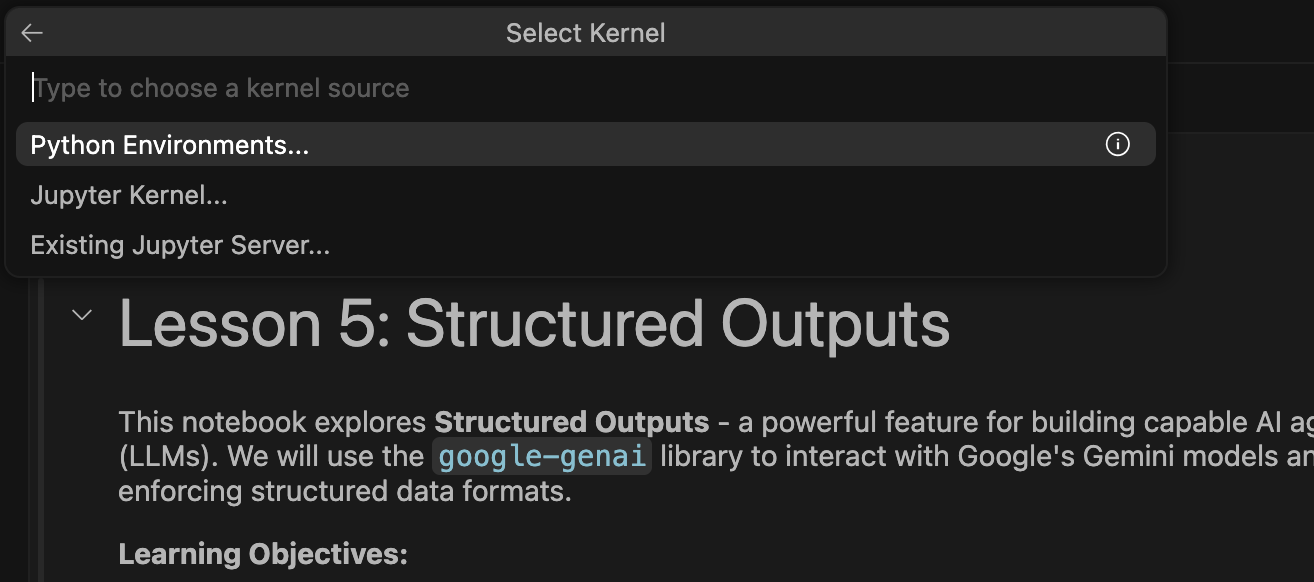
Then, you should see a list of virtual environments from your machine. Select the one from the cloned GitHub repository, which will come from .venv/bin/python.

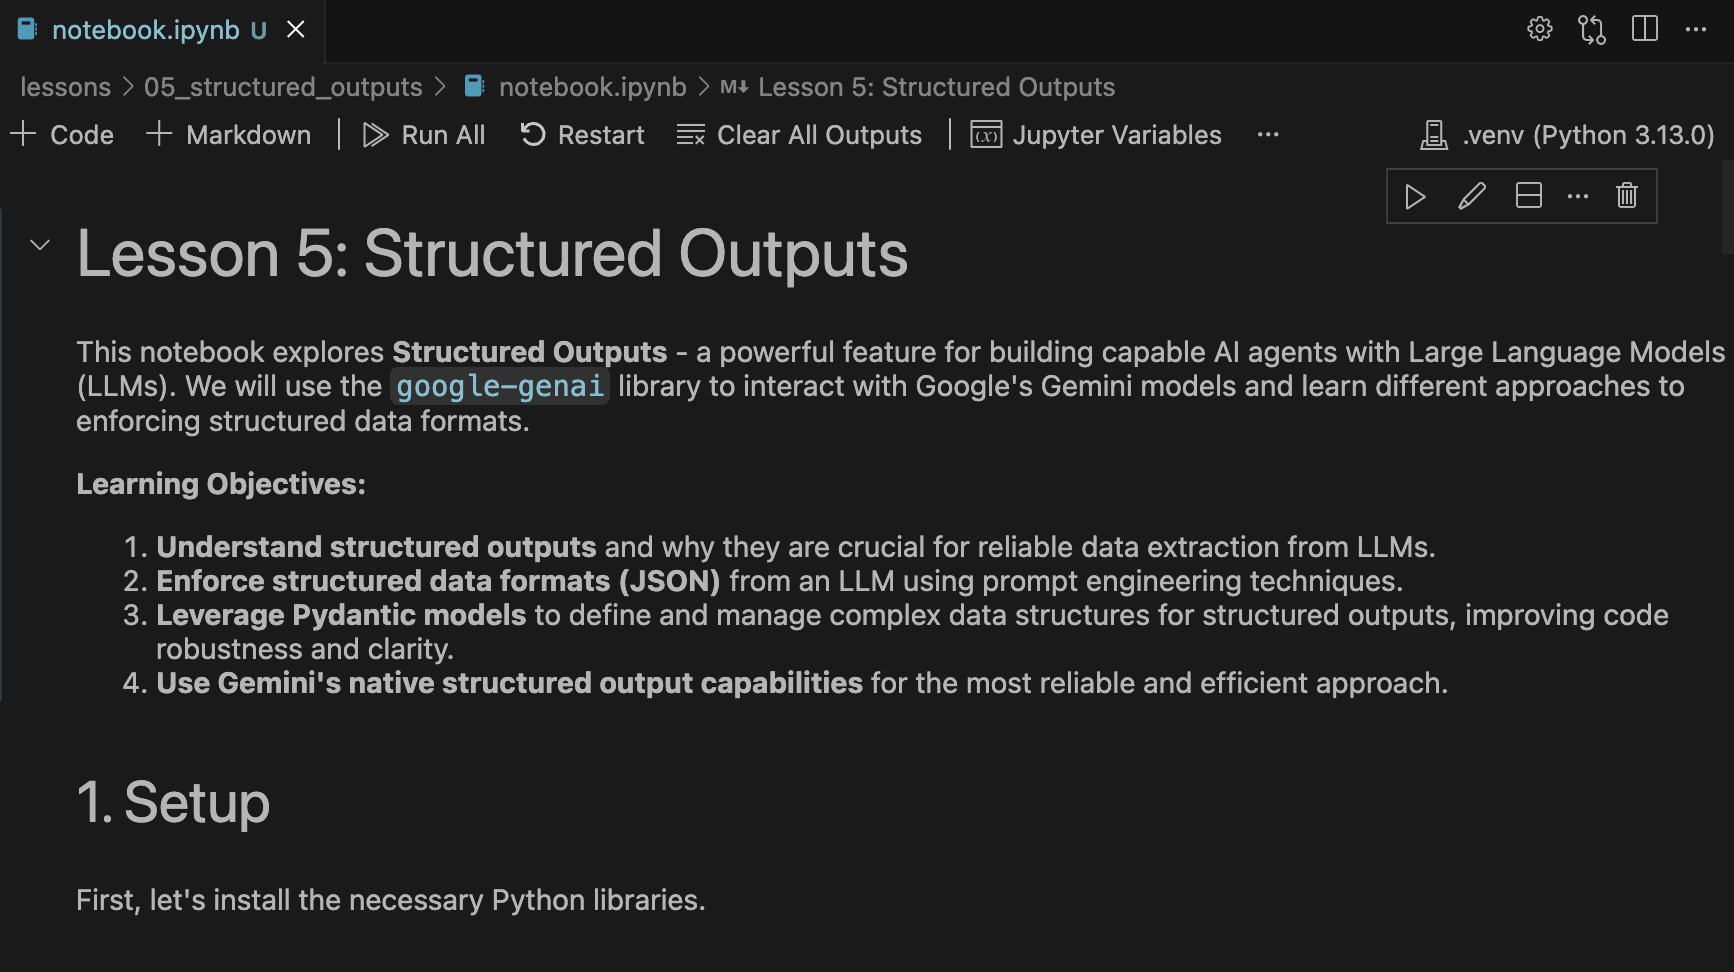
Now you’re ready to run the notebook, enjoying the benefits of both an interactive notebook and a powerful code editor! Notice how, at the top right of the editor, it shows .venv instead of “Select Kernel”.
API Keys
As a final step before running the code, you must configure your API keys to allow the notebooks to access hosted LLMs and other services. You can get your own key for Google Gemini from Google AI Studio. The service offers a generous free tier that is sufficient to run most of the course exercises at no cost. You can read more about the free tier here. As of August 2025, users can submit 5 requests per minute to Gemini 2.5 Pro, 10 requests per minute to Gemini 2.5 Flash, and 15 requests per minute to Gemini 2.5 Flash Lite for free.
The process for setting up your key differs depending on your chosen environment.
For Google Colab Users
In Colab, you should use the built-in Secrets manager to securely store your API key. This prevents you from accidentally sharing it.
- Open the course notebook in Colab.
- Click on the key icon (Secrets) in the left-hand sidebar.
- Click "Add new secret".
- In the Name field, enter
GOOGLE_API_KEY. - In the Value field, paste your actual API key.
- Ensure the "Notebook access" toggle is enabled for this secret.
The code in our Colab notebooks is pre-configured to automatically access this secret, so you don't need to do anything else.
For Local Setup Users
If you have cloned the repository to your local machine, you must configure your API keys using a local environment file. First, copy the .env.example file to a new file named .env in the project root:
Next, open the new .env file in a text editor. You'll see a placeholder for GOOGLE_API_KEY. You need to replace the placeholder text with your actual API key.
Access to Our Course Instructors in the Course Discord
In this course, you will also have access to our instructors in the dedicated course channel (agents-course-towardsai-decodingml) within our 80,000-strong Learn AI Together Discord Community if you have any questions or require help during your AI learning journey, whether as a beginner or an expert in the field, you can reach out to our community members and the ~15 writers of this course in the dedicated channel (space).
About Towards AI and Decoding AI
Since 2019, Towards AI has been dedicated to making AI accessible. Our team of 15 AI experts has helped over 500,000 learners globally understand and apply cutting-edge AI through our courses, articles, and community resources. Our expertise lies in breaking down complex AI topics into clear, practical knowledge.
Over the past three years, we have focused on bridging the gap between AI hype and real-world industry value through books, courses, customized corporate bootcamps, and consultancy.
Collaboration with Paul Iusztin & Decoding AI
Paul Iusztin is a senior AI engineer and the founder of Decoding AI, an educational magazine that is read monthly by over 150,000 AI engineers worldwide. He is also a co-author of the Amazon-bestselling LLM Engineer's Handbook, which has sold in over 17,000 copies. Paul's passion is to ship large-scale AI systems and teach people about the process of taking them from prototype to production.
We decided to join forces and create the best resource for our learners to design, build, and deploy production-grade LLM workflows and AI agents, further strengthening our mission to turn AI innovation into tangible business impacts.
You can explore the full range of our latest offerings on our course page.