Lesson 8: ReAct Practice
In this lesson, we will get to practical implementation and build a minimal ReAct agent from scratch using Python and the Gemini API. You will implement the complete Thought → Action → Observation loop to get a concrete mental model of how these systems work. By the end, you will have a working agent you can extend, debug, and customize.
Setup and Environment
First, we prepare the Python environment by securely loading the API key from an environment file and importing the libraries used throughout the course. This includes google-genai for interacting with the Gemini API, pydantic and enum for structured data models, and a utility function for pretty-printing outputs.
With the key loaded, we can initialize a genai.Client and use the gemini-2.5-flash model to power our ReAct agent.
The next step is to give our agent a tool it can use to interact with the world.
The Tool Layer
To demonstrate and understand how external capabilities integrate with the ReAct framework, we will create a mock search tool. A function that simulates looking up information.
If it receives a query it does not recognize, it will return a "not found" message.
Pay close attention to the docstring and the function signature in the implementation. As learned in lesson 6 on Tools, the google-genai library can directly take a list of functions as input and create tools. The library will use this docstring to understand what the tool does and how to use it, automatically extracting its purpose and parameters. It's the primary description for the tool.
In a real-world application, you could easily replace this mock function search with a call to an actual search API, a database query, or an external data source. The agent's logic interacts with the tool through a consistent input/output structure, meaning only the tool's underlying implementation needs to change, not the agent's core reasoning or prompt logic [4], [5], [6], [7], [8].
Now that we have defined a tool, we need to enable the agent to "think" about when and how to use it.
⚠️
Production Considerations for Tools
When building real-world agents, consider:
- Input Validation : Sanitize all tool inputs to prevent injection attacks
- Rate Limiting : Implement rate limits per tool to prevent abuse
- Timeout Handling : Set execution timeouts to prevent hanging operations
- Audit Logging : Log all tool executions for debugging and compliance
- Sandbox Execution : For code execution tools, use containerized environments
The Thought Phase
Now, we will focus on the “Thought” phase of the ReAct loop. We will construct a prompt template that includes tool descriptions and a placeholder for the conversation history. You will learn how this prompt guides the LLM to produce a concise, purposeful thought, directing the agent’s following action.
In the ReAct framework, the “Thought” phase is where the agent processes what has happened so far and chooses the best immediate course of action [9]. The first Thought only includes the users’ query and a list of available tools, but by the end of the loop, the thoughts include all the previous decisions and tool results.
This internal monologue, or verbal reasoning trace, is crucial because it requires the agent to explicitly state its reasoning before taking any action. Seeing the “reasoning,” i.e., the why behind the decisions , promotes transparency, which is suitable for us to develop the agent. It also makes the agent easier to debug. Also, prompting the model to think increases the agent’s performance and capacity in multi-step problem-solving [5], [11], [10].
To help the LLM reason about and select tools, we format their descriptions into an XML-like structure. This helps the model clearly understand the available tools and their functionalities [12].
We define the build_tools_xml_description function. This function takes our TOOL_REGISTRY and generates an XML string describing each available tool, using its name and docstring. This XML is then embedded into our main prompt template, giving the LLM an up-to-date overview of its capabilities.
Here we include the tools directly in the prompt rather than passing them into the Gemini config because, during the Thought phase, the model is meant to reason about available tools, not execute them. Presenting tool descriptions inline (often in a structured format like XML) keeps a clear separation between reasoning and execution, gives the model an easy-to-parse structure for understanding tool capabilities, and allows flexibility to customize descriptions without being bound to API schemas. This also makes the distinction between “knowing about tools” in the Thought phase and “using tools” in the Action phase explicit.
The PROMPT_TEMPLATE_THOUGHT guides the LLM's reasoning. It states the agent's role, includes the descriptions of `` inside the XML block, and contains a conversation placeholder for the dialogue history. This allows the agent to consider all previous interactions when formulating its next step. The final instruction directs the LLM to produce a short paragraph about its intended action and reasoning.
We also remind the model that we only want plain text that corresponds to its thoughts, not a tool call.
Let’s see the formatted prompt in its entirety.
It outputs:
The output shows the agent's objective, the search tool's details, and a placeholder for the dynamic ``. This structured prompt design is highly effective for facilitating effective reasoning, as it provides the LLM with all the necessary context to generate coherent thoughts [5].
Finally, we wrap this logic in a function, generate_thought. This function takes the current conversation history, formats the prompt, sends it to the Gemini model, and returns the model's response as the agent's thought.
For example, when called with a simple question, generate_thought returns a string containing the agent's reasoning:
It outputs:
With a thought generated, the agent must translate this into a concrete action.
The Action Phase
The “Action” phase is where the agent decides its next move: call a tool or provide a final answer. We use Gemini's native function calling for this.
Our action-generation prompt is simpler than the thought prompt. As thought in Lesson 6, we pass tool functions directly to the Gemini API, which automatically extracts the name, description, and parameters from the function's signature and docstring [15]. This keeps our prompt clean and separates strategic guidance from technical details [12], [16].
Here are the prompt templates for the action phase:
We use a separate prompt to produce a final answer. Just as in lesson 6, in some cases, we cap the number of turns to avoid infinite loops and to control things like costs and latency. When that cap is reached, we might want to force the next step to be a final answer. In that case, the model does not need to choose between “call a tool” or “answer now”; it should simply compose the answer.
In real-world applications, you might also choose to return an Error __ message to users. Explaining that the agent failed to achieve the goal within the app's limits.
In our example, we keep a dedicated prompt template for this forced-final step for clarity and reliability. You can implement this differently, but a separate template keeps the intent explicit.
Next, we define Pydantic models to structure the two possible outcomes: a ToolCallRequest or a FinalAnswer. This ensures the output is predictable and easy to parse.
The core of this phase is the generate_action function. Our function parses the Gemini output into a structured ToolCallRequest or FinalAnswer. We also include a force_final flag to handle cases where the agent must conclude, preventing infinite loops and ensuring a graceful exit [1].
Here is the implementation of the generate_action function:
The function returns different object types depending on the model's decision. When the agent decides to use a tool, it returns a ToolCallRequest:
It outputs:
We now turn to the Observation step, where the tool’s raw result is captured and will be fed back into the loop to inform the next Thought.
The Observation Phase
In Lesson 7, we defined Observation as the result of executing an action. In code, that simply means: take the ToolCallRequest created by the generate_action function, run the tool, and return the output:
Let’s see what an observation looks like given the execution of our mock tool:
It outputs:
As expected, the agent chose the search tool and we can see the predefined result for this question.
Now that we have defined all the main components of the ReAct loop, let’s implement the control loop , the system that connects them.
The Control Loop: Messages, Scratchpad, Orchestration
The control loop is the heart of our agent, managing the iterative flow of the ReAct cycle until the user's question is answered or a limit is reached. To recap how ReAct works, here’s a diagram showing its process, which we’ll implement in this section into a function that controls the main ReAct loop.
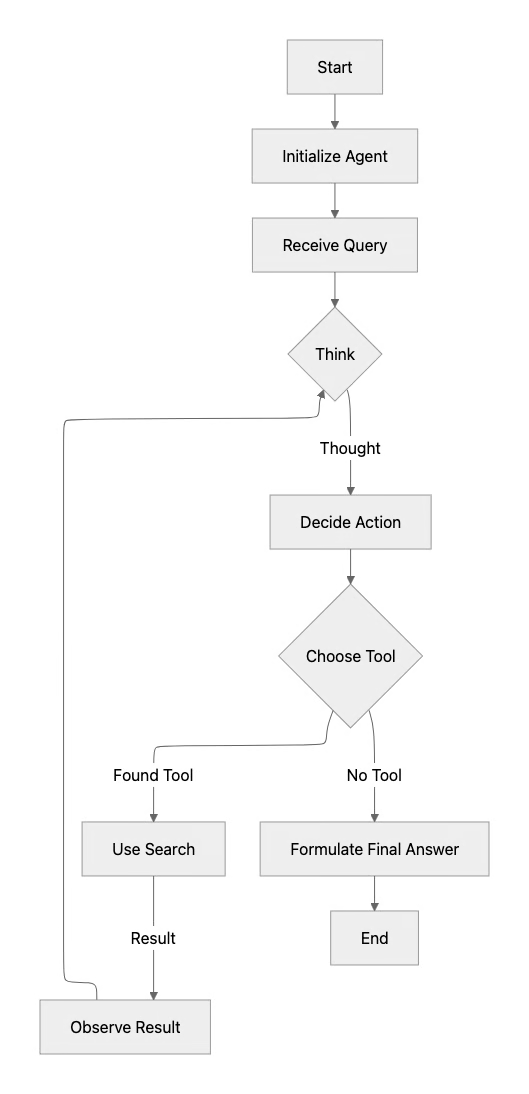 Main ReAct Loop
An important component of ReAct is the scratchpad, which maintains the conversation history and the agent's internal state. This running log of thoughts, actions, and observations provides the agent with a “memory” of its past steps, which is useful for informing its subsequent step [17], [18]. The scratchpad mirrors the sequence of steps shown in the following example from the ReAct paper [24].
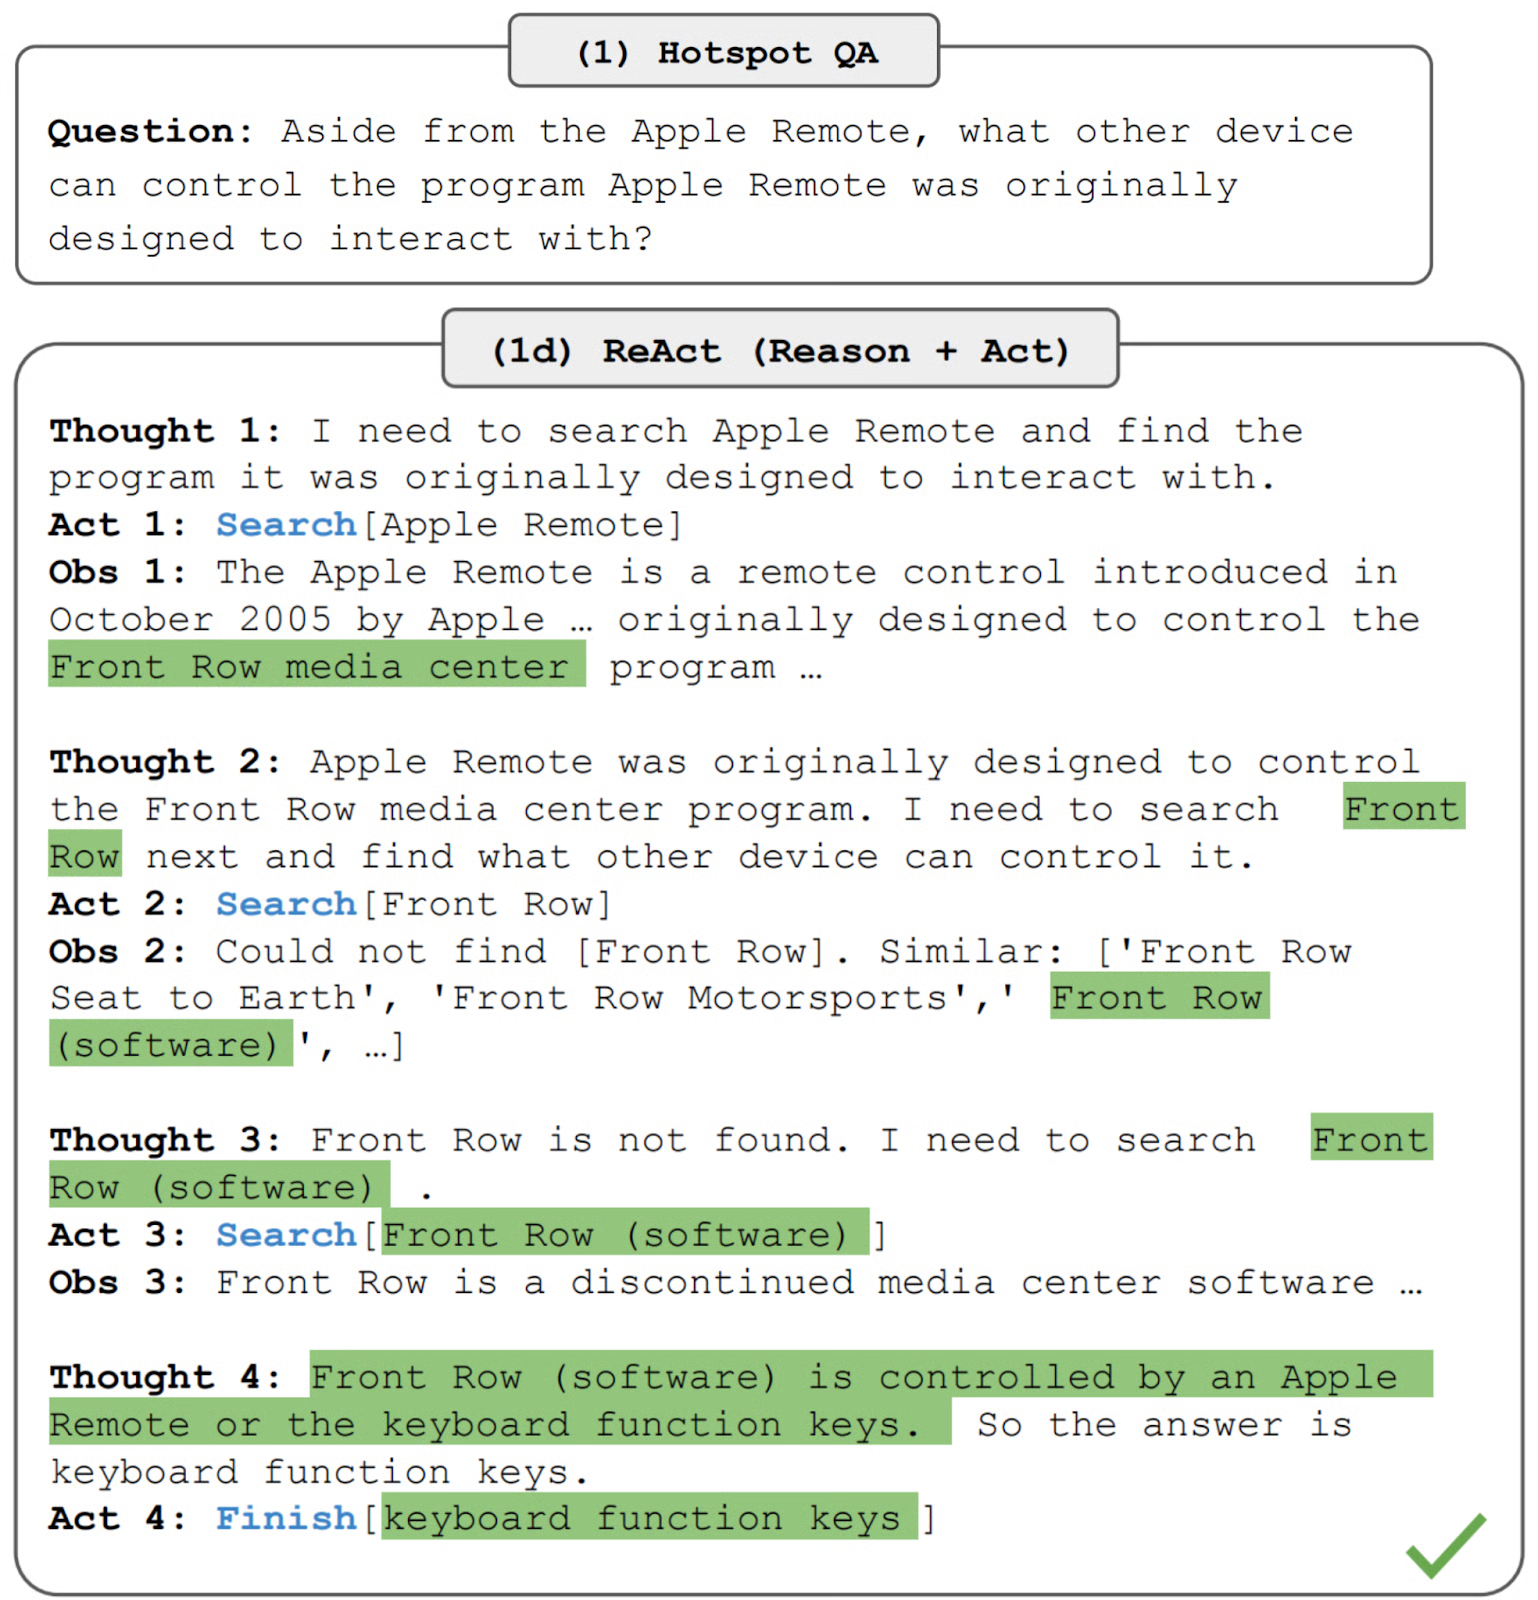 A ReAct agent in action. (Media from [24])
So, to manage this history, we first define a structured data system. We use an Enum for MessageRole to categorize interactions and a Pydantic model for Message to ensure every entry is structured.
With these two building blocks in place, we can now design the Scratchpad class. It serves as the running log of the agent, storing all messages (user queries, thoughts, tool calls, and results) and providing methods to append or review them.
Now, we build the main react_agent_loop function. This function manages the iterative cycle, ensuring the agent progresses toward its goal while maintaining a clear state [20]. The react_agent_loop function begins by initializing the Scratchpad and adding the user's initial query.
Within the main loop, the agent generates a Thought based on the current scratchpad content. This thought is then appended to the scratchpad, making the agent's reasoning explicit [17].
Following the thought, the agent generates an Action by calling generate_action, which decides whether to use a tool or provide a final answer.
Depending on the next action, we have two cases:
- If the
action_resultis aFinalAnswer, the loop terminates, and the answer is returned.
- If the
action_resultis aToolCallRequest, the agent executes the tool. The tool's output becomes theobservation, which is added back to thescratchpad. This feedback is critical because it directly influences the agent's subsequent steps, enabling it to dynamically adapt its strategy [17], [20], [23].
Finally, the loop includes a termination condition. If the max_turns limit is reached, the agent is forced to generate a final answer. This mechanism is important for preventing infinite loops and ensuring a graceful exit [1], [21]. For debugging, verbose logging is an effective strategy to trace state transitions and identify issues early [20], [22].
With the full loop implemented, it is time to test our agent and see it in action.
T ests and Traces: Success and Graceful Fallback
We now validate the complete ReAct agent with two distinct tests. The first uses a factual question to demonstrate a successful run, while the second uses an unsupported query to show how the agent handles failure and forced termination. We will analyze the printed traces for both runs to ensure the loop, tool integration, and fallback mechanisms behave as designed.
First, let's ask a question to our mock search tool that knows how to answer: "What is the capital of France?" We will limit the agent to two turns and run the loop with verbose=True to see the full trace of its thought process.
The output trace clearly shows the ReAct cycle in action:
This trace validates that the entire end-to-end loop works as intended. The agent correctly identifies the need for a tool, generates a valid tool call, executes it, processes the observation, and then uses that new information to formulate a final answer.
Now, let's test the agent's ability to handle a query our mock tool does not know: "What is the capital of Italy?" This will test the agent's reasoning when a tool fails and demonstrate the forced termination logic.
The trace for this query demonstrates the agent's ability to adapt and handle failure gracefully:
This test confirms that our agent does not get stuck in a loop when its tools fail, preventing common failure modes like improper loop termination or error propagation [1], [25]. It recognizes the failure, attempts an alternative strategy, and provides a sensible final response after hitting the max_turns limit. This resilience is a key feature of a well-designed agent.
Alternative: ReAct with Model-Native Reasoning
In Lesson 7, we introduced reasoning models and how they are changing how we develop agentic applications with LLMs. We will use their “thinking” features to showcase their differences and build an alternative ReAct loop that doesn’t include an explicit “Thought Phase”.
Modern Gemini models reason in every response, including during tool calls. You do not need to prompt the model to think. If you want to see the short explanation of what the model reasoned about, set include_thoughts=True. That flag will enable the return of “ thought summaries”[30]. As the name suggests, these are summaries generated for transparency, not the model’s full raw internal reasoning trace. They can still be very helpful for debugging and understanding why the model made a particular decision.
A second feature called “ thought signatures ” is available in the Gemini API [13]. Thought signatures are opaque metadata attached to the model’s response. They allow the model to carry forward its internal reasoning across turns without exposing the raw chain-of-thought to us. To preserve these signatures, pass the exact Content returned by the model back into the next request.
In short, “thought summaries” are optional text you may show in your application; “thought signatures” are how the model actually maintains its private reasoning state across the loop.
Now let’s get back to our new ReAct implementation.
In the following code, we enable thought summaries, set a thinking budget, and define two helpers. The first helper extracts any thought summary text the API returns. The second finds the first function call in a response when the model decides to use a tool.
Here, we build the request configuration. We provide the Python functions as tools and enable built-in thinking. Automatic function calling is disabled, so we can log each step and run tools ourselves with the observe function.
Now this is the alternative ReAct loop. The conversation is maintained as a list of types.Content.
After each model turn, we append response.candidates[0].content back into contents to preserve thought signatures.
When the model calls a tool, we execute it, log the observation, and then append a function_response part so the model can use that observation on the next turn.
For the visible trace, we keep using a Scratchpad object (which we call human_log) and our pretty_print_message helper function.
Now let’s test this new loop using the same questions we used earlier.
We get the same answer, but now the Thought comes from the summarized version of the model’s internal thinking. Notice how verbose these thought summaries are by default. We have some control over the maximum length using the thinking_budget=1024 parameter.
Now let’s ask our agent the second question.
We also get the same answer as our classic ReAct agent.
Conclusion
By building this agent piece by piece, we moved beyond abstract diagrams. We implemented the core engine that powers autonomous agents: a control loop that iteratively reasons, acts, and observes. You now have a concrete mental model of how an agent uses its tools to act and how it incorporates feedback to refine its approach. Each new observation informs the agent’s next step. You can prompt the model to produce an explicit Thought, or rely on a reasoning model that performs this reflection by default.
In the upcoming lessons, we will explore more advanced topics. For instance, Lesson 9: RAG Focus will show you how to extend your agent with external knowledge using retrieval-augmented generation. After that, we will cover how to give your agent a memory to recall past interactions.
References
- [1] Guide to Implementing LLM Agents: ReAct and Simple Agents - DynamiQ
- [2] How to Build a ReAct Agent from Scratch with LLMs - Arize AI
- [3] Building effective agents - Anthropic
- [4] Reliable AI at Your Fingertips: How We Built Universal ReAct Agents That Just Work - Motley Crew AI
- [5] ReAct - Prompting Guide
- [6] How to build a ReAct AI agent with Python from scratch - Technofile
- [7] LangChain Crash Course for Beginners - Custom Tools for Agents - Patrick Loeber
- [8] AI Agent Engineering: ReAct, RAG, & Multi-Agent - Rakesh Gohel
- [9] ReAct: The Future of AI-Powered Problem Solving - Shafiqul Islam
- [10] Why the ReAct Agent Matters: How AI Can Now Reason and Act - Wordware
- [11] ReAct Prompting - Arize AI
- [12] ReAct AI Agent from Scratch using DeepSeek: Handling Memory & Tools without Frameworks - GoPubby
- [13] Function calling with the Gemini API - Google AI for Developers
- [14] ReAct Agents vs. Function Calling Agents: A Comparative Analysis - LeewayHertz
- [15] Building agents with Google Gemini and open source frameworks - Google for Developers Blog
- [16] ReAct agent from scratch with Gemini 2.5 and LangGraph - Google AI for Developers
- [17] AI Agents Crash Course (Part 10): The ReAct Agentic Pattern - Daily Dose of DS
- [18] Implementing AI Agents from Scratch Using LangChain and OpenAI - GeekyAnts
- [19] Using LangChain ReAct Agents for Data Engineering Tasks - Airbyte
- [20] Building a ReAct Agent in LangGraph - Dylan Castillo
- [21] ReAct vs. Plan-and-Execute: A Practical Comparison of LLM Agent Patterns - James Li
- [22] Building a Python ReAct Agent Class: A Step-by-Step Guide - Nerando
- [23] ReWOO vs. ReAct: Choosing the Right Agent Architecture for Your Needs - Nutrient
- [24] ReAct: Synergizing Reasoning and Acting in Language Models - Yao et al., 2022
- [25] LLM Agents - Lilian Weng
- [26] ReAct: Synergizing Reasoning and Acting in Language Models
- [27] ReAct Agent - IBM
- [28] AI Agent Planning - IBM
- [29] Building effective agents - Anthropic
- [30] Gemini thinking - Google