Lesson 6: Tools
In previous lessons, we covered the fundamentals of context engineering, structured outputs, and LLM workflow patterns like chaining and routing. Now, we will focus on tools, the building blocks that allow LLMs to take actions in external environments. Deeply understanding the mechanism behind tools, also known as function calling, is a core skill for any AI engineer who needs to build, debug, and monitor AI applications that interact with external systems.
In this lesson, you will learn how to implement tool calling from scratch, build a simple tool calling framework similar to LangGraph’s @tool decorator and use tools with production-grade SDKs such as Gemini. Ultimately, we will consolidate all the examples by showing you how to leverage Pydantic models as tools to get validated, structured outputs, and chain multiple tools together in a loop to solve multi-step tasks.
Understanding Why Agents Need Tools
Before starting to implement tool calling from scratch, let’s quickly understand what they are and why LLMs need them.
The core idea is simple: LLMs have a fundamental limitation, which is that they cannot interact with the external world on their own. They cannot browse the web, access a database, or even check the current time. Their knowledge is static, frozen at the time of their last training run, which means they cannot access real-time information or update themselves with new data [1], [2], [3], [4]. Tools are the engineering solution to this problem.
You can think of an LLM as the "brain" of the system, capable of reasoning and planning, while tools are the "hands and eyes," providing the required connections to the external environment. Intuitively speaking, through tools, LLMs can read information from the environment (the eyes) and take actions within it (the hands), overcoming their inherent static nature [5], [6].
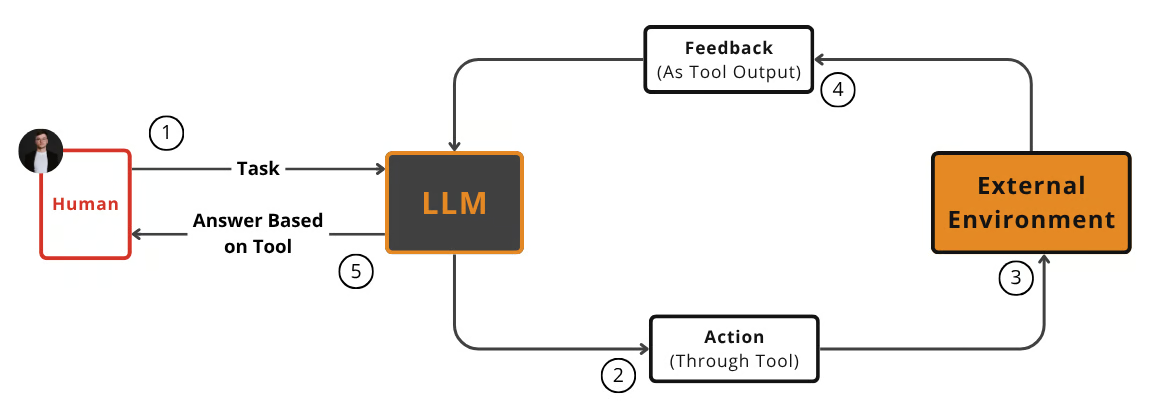 _Figure 1:__Autonomous agent:_An LLM using tools to take actions in the external environment and interpreting its outputs as feedback
Common categories of tools you integrate into production agents include [7], [8]:
- API Access: Interacting with external services to get real-time information, like today's weather or the latest news from a search engine [9].
- Database Interaction: Querying structured databases (e.g., PostgreSQL, Snowflake) to retrieve specific business private data.
- Memory Access: Connecting to a vector or graph database to retrieve relevant information from its long-term memory, a process central to Retrieval-Augmented Generation (RAG). We will discuss memory further in Lesson 9 and RAG in Lesson 10.
- Code Execution: Running code, typically in a sandboxed Python environment, to perform precise calculations, data manipulation, or statistical analysis [10].
Implementing Tool Calls From Scratch
The best way to understand how tools work is to build a tool-calling module from scratch. This will show you the mechanics of tool definition and schema structure, as well as how an LLM discovers tools and interprets their outputs.
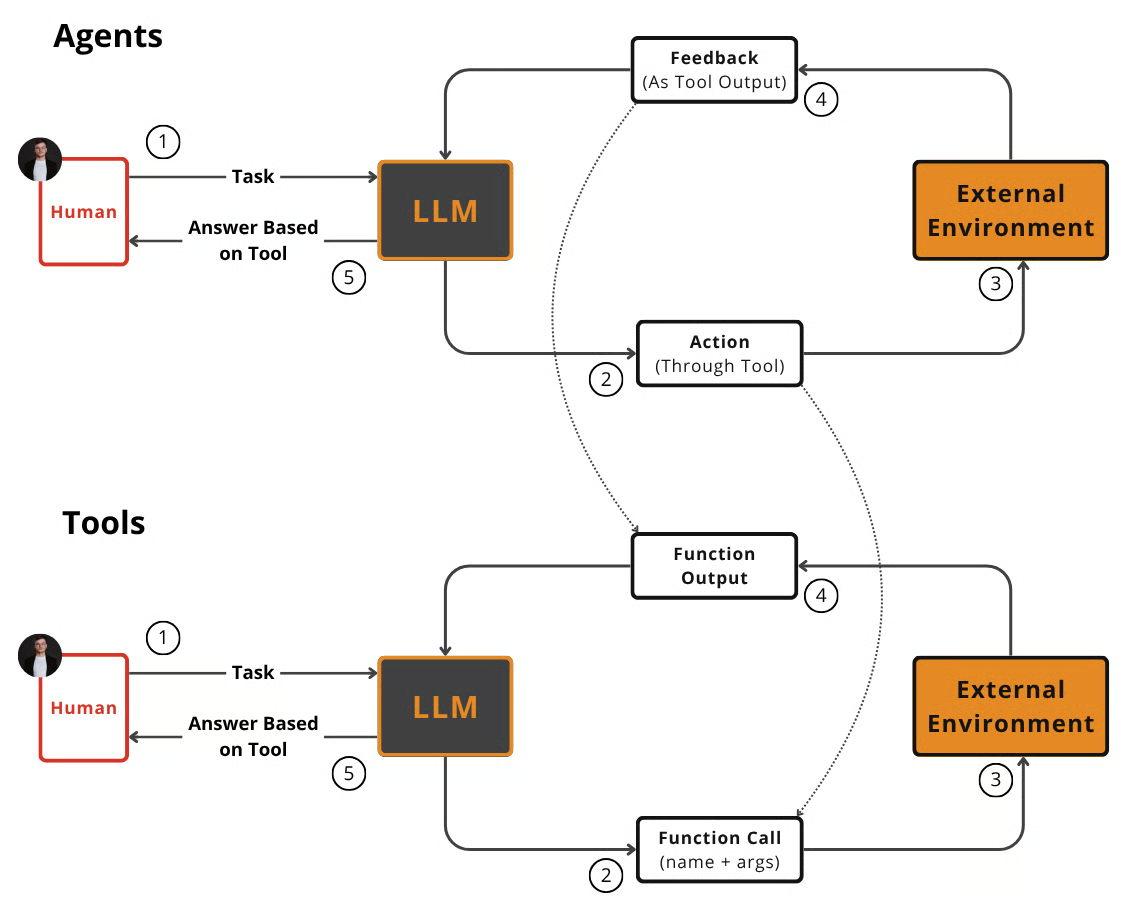 Figure 2: Actions are mapped to function calls, while environment feedback to function outputs.
Our goal is to provide the LLM with a list of available tools and allow it to decide which one to use and what arguments to generate based on your input query. The high-level logic operates as follows:
- Application: We provide the LLM a task, with a list of available tools and their descriptions via a system prompt.
- LLM: It analyzes your query and responds with a
function_callrequest, specifying the tool's name and arguments in a structured format like JSON. - Application: We parse this request and execute the corresponding function in our code.
- Application: We send the function's output back to the LLM as additional context.
- LLM: It uses the tool's output to formulate a final, user-facing response [11], [12].
This request-execute-respond loop is the fundamental pattern for tool use in LLM workflows and especially in AI agents.
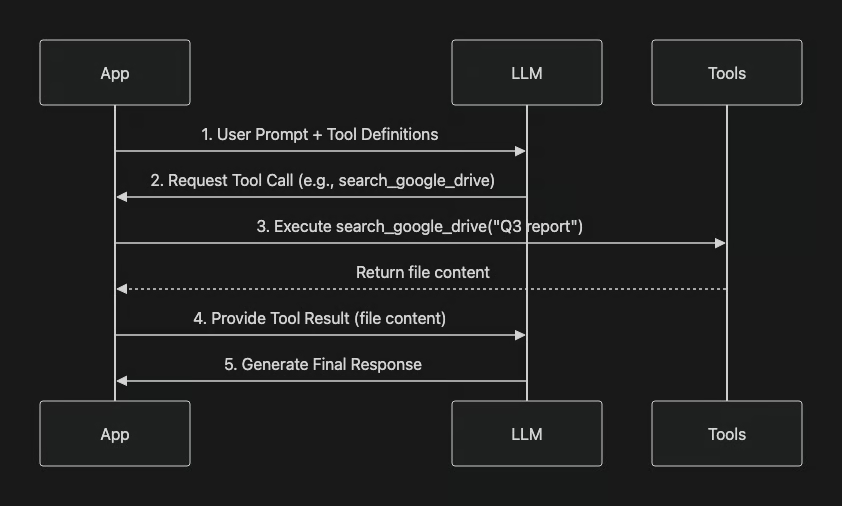 Figure 3: The five-step flow of an LLM tool call, from initial prompt to final response.
Let's start coding our tool calling Python module. We will implement a simple, yet suggestive example where we search for mocked documents on Google Drive, summarize their content, and then send the result to a Discord channel.
Setting Up the Environment and Mock Data
First, we set up our environment by importing the necessary libraries and initializing the Gemini client. We also define a sample financial document to simulate the content of a file found on Google Drive.
Defining Mock Tools
Next, we define our three tools as simple Python functions. For this example, they will return predefined data, which allows us to focus on the tool-calling logic itself.
This is the mocked tool to search in Google Drive:
This is the mocked tool to send messages to Discord:
Last, this is the mocked tool to summarize financial reports:
Creating Tool Schemas
For the LLM to understand these tools, we must provide a schema for each one. This schema, typically in JSON format, describes the tool's name, its purpose as a description, and the parameters it accepts, including their types and whether they are required [13]. This is the industry standard used by major providers like OpenAI, Google, and Anthropic.
Here's the schema for the search_google_drive tool:
Here's the schema for the send_discord_message tool:
Last, here's the schema for the summarize_financial_report tool:
Building the Tool Registry
We then create a tool registry to map tool names to their function handlers/references and associated schemas:
The TOOLS_BY_NAME mapping looks like this:
Here's what an entry in TOOLS_SCHEMA looks like instead:
Crafting the System Prompt
Now, we need a system prompt to instruct the LLM on how to use these tools. This prompt explains the guidelines, the expected output format for a tool call, and provides the list of available tools enclosed in XML tags.
The LLM uses the description field in the tool schema to decide if a tool is suitable for a user's query. This means clear, unambiguous descriptions are essential for building reliable agents. For instance, if you have two tools with similar descriptions, such as "Tool used to search documents" and "Tool used to search files," the LLM might get confused. We must be explicit: "Tool used to search documents on Google Drive" versus "Tool used to search files on the local disk."
Clear tool names, descriptions, and explicit user prompts ensure the agent selects the correct tool. This becomes important as you scale to dozens of tools per agent. We will explore scaling methods in Parts 2 and 3 of this course. For now, it's essential to remember this: “ Tool names and descriptions have to be clear and explicit as they are the only source of information that helps the LLM decide whether to use it or not.”
Once a tool is selected, the LLM generates the function name and arguments as a structured output. Modern LLMs are incredibly good at this as they are specifically fine-tuned to interpret these schemas and produce valid tool call requests.
Testing the Tool Calling Mechanism
Now, let's test the three tools defined above and ask the LLM to find the latest quarterly report:
The model correctly identifies the search_google_drive tool and generates the necessary arguments:
Let's try another example. We will ask the model to find the Q3 earnings report and send a summary to Discord.
The model correctly identifies the send_discord_message tool and generates the necessary arguments:
Parsing the LLM Response and Executing the Tool
Now, let's parse this response and execute the function. First, we extract the JSON string from the LLM's response.
Then, we parse the string into a Python dictionary.
We can then retrieve the actual Python function from our TOOLS_BY_NAME registry.
Finally, we execute the function with the arguments provided by the LLM.
This returns our mocked document content:
Streamlining Tool Execution with a Helper Function
For reproducibility, we can merge this logic into a helper function, call_tool :
The output is the same as before:
Interpreting Tool Output with the LLM
The final step in the loop is to send the tool_result back to the LLM. This allows it to either formulate a final answer for the user or decide on the next action to take.
The LLM then provides a natural language summary based on the tool's output:
We have successfully implemented the entire request-execute-respond tool logic from scratch. This is the core idea behind tool calling that is implemented even in the most sophisticated AI agents. Now, let's improve our implementation and transform it into a mini tool calling framework similar to those found in popular frameworks like LangGraph.
Implementing a Tool Calling Framework From Scratch
Manually defining a JSON schema for every function becomes tedious and unscalable as you add more tools. This approach violates the “Don't Repeat Yourself (DRY)” principle from software engineering, where every piece of business logic should be done in a single place within your application. Modern agentic frameworks like LangGraph address this by using decorators like @tool to automate schema generation and aggregate everything into a registry [14], [15].
So, let's create a small framework that implements a @tool decorator that automatically generates the schema by inspecting a function's interface, type hints, and docstring. This centralizes the schema generation logic, making our code cleaner and easier to maintain. Also, it implements good software engineering principles, as we standardize how we gather tool schemas in a single, modular place.
We can refactor our previous implementation to use this decorator-based approach.
First, we define a ToolFunction class. This class will hold both the callable function and its automatically generated schema, allowing us to bundle them together:
And define our tools registry. To keep it simple, we define it as a list of ToolFunction objects:
Next, we implement the @tool decorator. In Python, a decorator is a function that takes another function as an argument and extends or modifies its behaviour without changing its interface. In other words, it's a clean way to do function composition. Our @tool decorator inspects the decorated function's signature and docstring to automatically build the JSON schema.
🐍
Python Tip: Function composition means connecting functions so that the output of one becomes the input of another. With Python decorators, when writing @tool above a function is equivalent to assigning my_fn = tool(my_fn).
Ultimately, it adds it to the tool's global registry:
Now, we can redefine our tools by simply applying the @tool decorator to each function. This eliminates the boilerplate of manual schema creation.
The decorated functions are now ToolFunction objects:
Now, let's directly inspect the type of a decoration function, such as search_google_drive_example :
As you can see, after decorating them, even the functions themselves are ToolFunction objects. This works because it implements the __call__ method with generic args and kwargs, which makes the object callable. In other words, we can call it exactly like a normal function, regardless of its input parameters:
Further, let's inspect their auto-generated schema. We will see it's identical to the one we wrote manually in the previous section:
Outputs:
The functional handler can be accessed via the .func attribute:
Finally, let's test our new tool framework. First, let's define some helper mappings as we did in the previous section:
Now, let's see how this new method works with LLMs. We will use the same USER_PROMPT as before.
The LLM correctly identifies the search_google_drive_example tool and generates the necessary arguments:
We can then use our call_tool function to execute the tool based on the LLM's response:
It outputs:
We have our own tool calling framework. This decorator-based approach provides a scalable and maintainable way to manage tools, similar to production-grade frameworks such as LangGraph.
Now, we can call the model with just the user prompt. The complex system prompt is no longer needed:
The Gemini API returns a structured FunctionCall object directly, eliminating the need for manual parsing:
We can then inspect the arguments returned by the LLM:
And extract the right handler from the tool registry as before:
Ultimately, leveraging the arguments from the function_call object, we can call the tool:
This returns our mocked document content:
The Gemini Python SDK simplifies this even further by automatically creating schemas from Python functions. You can pass the function callables directly into the tools configuration completely bypassing the need for managing the schemas on your side (either manually or through decorators).
We create a new config object by passing the search_google_drive and send_discord_message functions directly. The SDK automatically creates the schema based on the signature and docstrings of each function, as we did so far with our from-scratch implementations:
Now, we call the LLM again with this new configuration.
The LLM response is the same as before:
We can simplify the tool execution with a helper function that directly accepts the function_call object and executes the tool:
Using this helper function, we can call the tool from the LLM response in one go:
The output is identical:
By using Gemini's native SDK, we reduced the tool implementation from dozens of lines of code to just a few. This native approach is not unique to Gemini. Other major APIs from providers like OpenAI and Anthropic follow a similar logic. Thus, you can easily transfer these skills across different platforms [16]. By using the native SDK, you write less code, reduce potential errors, and build more robust, production-ready agents.
Using Pydantic Models As Tools for On-Demand Structured Outputs
Let's consolidate everything we've learned so far with a popular example of combining structured outputs (learnt in Lesson 4) with tool calling. More precisely, we will transform Pydantic models into tools. This approach provides a clean way to get validated, structured data when an agent needs it.
Instead of forcing a structured output at every step, an agent can use unstructured text for intermediate reasoning, which is often easier for an LLM. The agent then dynamically decides to call the Pydantic "tool" only when it needs to generate a structured final answer [17]. This pattern is particularly useful for agents that interact with other systems expecting a specific, validated data format.
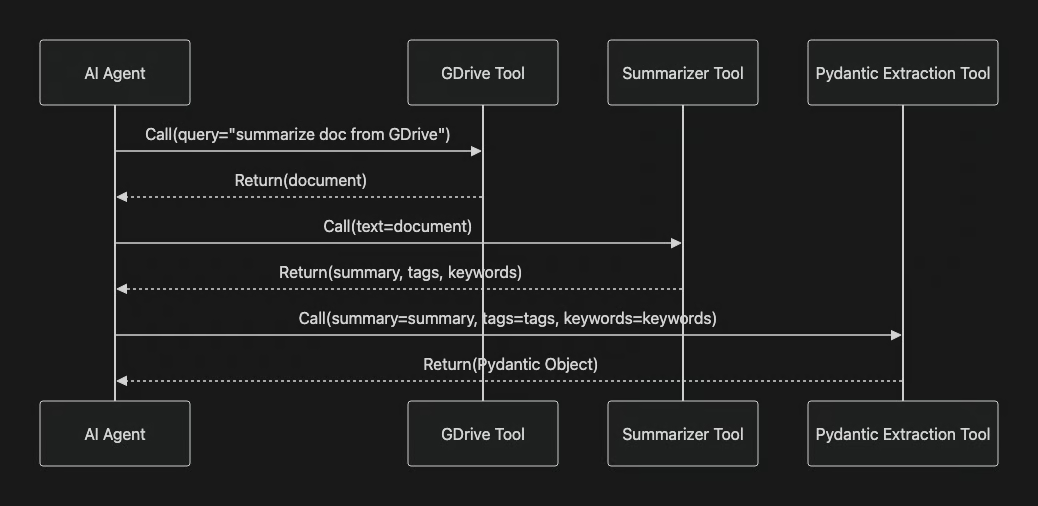 Figure 4: An agent using multiple tools sequentially, with the final step being a Pydantic tool for structured data extraction.
Let's see how to implement this. First, we define our DocumentMetadata Pydantic model, which specifies the exact structure we expect:
Next, we define this Pydantic model as a tool. We create a function declaration named extract_metadata and pass its schema to the parameters field using DocumentMetadata.model_json_schema(). This automatically generates a JSON schema from our Pydantic model, guiding the LLM on what parameters to output, similar to what we did in Lesson 4:
We prompt the LLM to analyze our document and extract the metadata.
The LLM responds with a function_call to extract_metadata, with the arguments perfectly matching our Pydantic schema.
Using them, we instantiate the Pydantic object, which automatically validates the structure and types of the extracted data. This validation step is important. If the LLM's output does not conform to the DocumentMetadata schema, Pydantic raises a ValidationError, preventing malformed data from proceeding in further steps in your application [18]:
This pattern ensures that an agent's final output is structured, validated, and ready for reliable use in downstream applications.
The Downsides of Running Tools in a Loop
So far, we have focused on single tool calls. However, many tasks require multiple steps, chaining several tools together. The next logical step is to run tools in a loop, allowing the LLM to decide the next tool to call based on the previous output. As seen in Figure 4, this approach provides flexibility and the ability to handle complex user requests.
 Figure 5: A diagram illustrating the iterative tool-calling loop.
Let's implement a loop to handle a request that requires finding a report, summarizing it, and then sending the summary.
First, we set up our tools and configuration, making all three functions available to the model.
We initiate a conversation with a multi-step request, which involves searching Google Drive, summarizing the retrieved document, and then sending it to Discord. This starts to sound like an AI agent, right?
Let's start by making the first LLM call:
The LLM correctly identifies the first step, which is to search Google Drive, and generates the corresponding function call:
Now, we implement the loop. At each step, we execute the tool call, append the result to our message history, and send it back to the LLM to decide the next action. We repeat running tools in a loop until the LLM stops outputting a function_call object or we reach the max_iterations target.
🐍
Python Tip: The hasattr function in Python checks if an object has an attribute with a specified name, returning True if it exists and False otherwise.
Here is how the code looks:
As a result, the agent successfully chains the tools: search_google_drive , then summarize_financial_report , then send_discord_message, where the final output looks like this:
Running tools in a loop is powerful for multi-step tasks, but this approach has limitations. It assumes the agent should call a tool at each iteration and does not provide explicit opportunities for the model to reason about tool outputs before deciding on the next action. The agent immediately moves to the next function call without pausing to think about what it learned or whether it should change strategy. This can lead to inefficient tool usage or getting stuck in repetitive loops [19], [20]. For example, agents might repeat the same actions without making progress, show a disconnect between their reasoning and actions, or fail to verify if a tool call achieved its intended effect [19].
For example, even if in our particular use case it performed the right steps, in the right order, it got stuck in calling the send_discord_message tool until it reaches max_iterations.
Going Through Popular Tools Used Within the Industry
To ground these concepts in real-world applications, let's go over four common categories of tools that power production AI agents.
1. Database & Memory Access
These tools enable an agent to retrieve information from private data sources. They form the basis for building agents that answer questions about private company data. Examples include tools for querying vector databases, document stores, or graph databases. A more advanced pattern, text-to-SQL, allows a tool to construct and execute SQL queries against traditional databases based on natural language.
All these tools revolve around the concepts of memory, RAG, and agentic RAG. More on this in Lessons 9 and 10.
2. Web Search & Browsing
This is one of the most commonly seen applications of tool use. Agents like Google's Gemini, Perplexity AI, and Microsoft Copilot use tools that interface with search engine APIs. This allows them to fetch up-to-date information from the internet and give answers based on the latest news [24], [25]. More advanced versions include web scraping tools. These can extract and parse content directly from web pages, enabling agents to perform in-depth research.
3. Code Execution
Giving an agent a code interpreter, usually a sandboxed Python environment, unlocks powerful capabilities. This includes data analysis, computation, and visualization [26]. Instead of trying to perform math with its limited reasoning abilities, the agent can write and execute code to get a precise answer.
⚠️
This is also the most dangerous tool. Executing LLM-generated code poses security risks. It is important to run it in a secure, isolated sandbox. This prevents arbitrary code execution or unauthorized system access [27], [28].
4. Other Popular Tools
Beyond these core categories, other popular tools that enhance AI agents include interacting with external APIs for calendar, email, or project management. Such tools are common in enterprise AI applications. We also often encounter file system operations, like reading or writing files and listing directories, which are widely used in productivity AI applications that interact with your operating system.
Conclusion
Tool calling is the mechanism that allows an LLM to interact with the external world. Understanding how to define, implement, and orchestrate tools is a core skill for building, monitoring, and debugging any serious AI application. In this lesson, we showed you how to build this capability from scratch, use production APIs, and chain tools together to solve complex problems.
We also identified the limitations of simple loops, which set the stage for our next topic from Lesson 7, where we will explore the theory behind planning and the ReAct pattern.
References
- [1] 10 Major Limitations of Large Language Models (LLMs) in 2024
- [2] LLM Limitations: Why LLMs Can't Query Your Enterprise Data
- [3] Pre-training of Large Language Models
- [4] Pitfalls
- [5] LLMOrch: A System for Orchestrating Large Language Model-based Agents
- [6] AI, Privacy Risks and Mitigations in Large Language Models
- [7] Athena: A Framework for the Integration of External Tools with Large Language Models
- [8] Comprehensive Guide to Integrating Tools and APIs with Language Models
- [9] Microsoft brings Copilot AI-powered web search mode on Bing: How it works
- [10] AI Agents Primer (Part 1)
- [11] How to use tools with LLMs
- [12] LLMs and Function/Tool Calling
- [13] Function Calling
- [14] Concepts - Tools
- [15] Tools
- [16] Function calling
- [17] Enforce and validate LLM output with Pydantic
- [18] Models - Pydantic
- [19] An Empirical Study of Failure Modes in Multi-Agent LLM Systems
- [20] A Systematic Investigation of Function-Calling LLMs
- [21] A Deep Dive into Function Calling in Gemini
- [22] Function calling
- [23] Function calling with the Gemini API
- [24] Perplexity AI vs Google Gemini vs ChatGPT: The Ultimate Comparison
- [25] Copilot in Bing: Our approach to responsible AI
- [26] Deep Research Agents: The Future of Scientific Discovery
- [27] Setting Up a Secure Python Sandbox for LLM Agents
- [28] Setting up a secure Python sandbox for LLM agents
- [29] Building effective agents
- [30] Tool Calling Agent From Scratch
- [31] Efficient Tool Use with Chain-of-Abstraction Reasoning
- [32] Building AI Agents from scratch
- [33] What is Tool Calling? Connecting LLMs to Your Data
- [34] Primer on Python Decorators